Nginx+awstats统计web服务器log
2012-12-18 14:49
357 查看
使用AWSTATS自动分析Nginx日志
环境说明:
Nginx安装目录:/usr/local/nginx
Nginx配置文件存放目录:/usr/local/nginx/conf/nginx.conf
Nginx日志目录:/usr/local/nginx/logs
Awstats安装目录:/usr/local/awstats
Awstats配置文件存放目录:/etc/awstats
日志切割脚本存放目录:/usr/local/nginx/sbin/cut_nginx_log.sh
一、Nginx日志切割
1、修改nginx.conf配置文件,使AWSTATS支持分析日志格式
# vim /usr/local/nginx/conf/nginx.conf
2、编辑Nginx日志切割脚本
# vim /usr/local/nginx/sbin/cut_nginx_log.sh
# chmod +x /usr/local/nginx/sbin/cut_nginx_log.sh
3、
二、下载安装Awstats
1、下载安装
2、配置
回车
回车
回车
回车
三、修改统计日志文件的路径
这里是对应上面Nginx日志切割所生成的目录存放位置,注意awstats的年月日格式,分析的执行顺序是:
Nginx 产生日志 –> 日志切割 –> Nginx 继续产生日志 –> 另存切割日志 –> 交由Awstats统计 –> 生成结果
四、执行Awstats 日志更新程序开始统计分析
看到以上显示,证明日志切割和 Awstats 都已经运行无误了。统计分析完成后,结果还在 Awstats 的数据库中。在 Apache 上,可以直接打开 Perl 程序的网页查看统计。但本文开始时已经提到,Nginx 对 Perl 支持并不好,所以我们要换个方法,利用 awstats 的工具将统计的结果生成静态文件。
五、Awstats生成静态文件
/usr/local/awstats/tools/awstats_buildstaticpages.pl #Awstats 静态页面生成脚本
-update -config=192.168.2.143 #更新配置选项
-lang=cn #语音中文
-dir=/usr/local/nginx/logs/wwwroot/awstats/ #统计结果输出目录
-awstatsprog=/usr/local/awstats/wwwroot/cgi-bin/awstats.pl #日志更新程序路径
六、修改nginx配置文件
七、配置Awstats自动运行
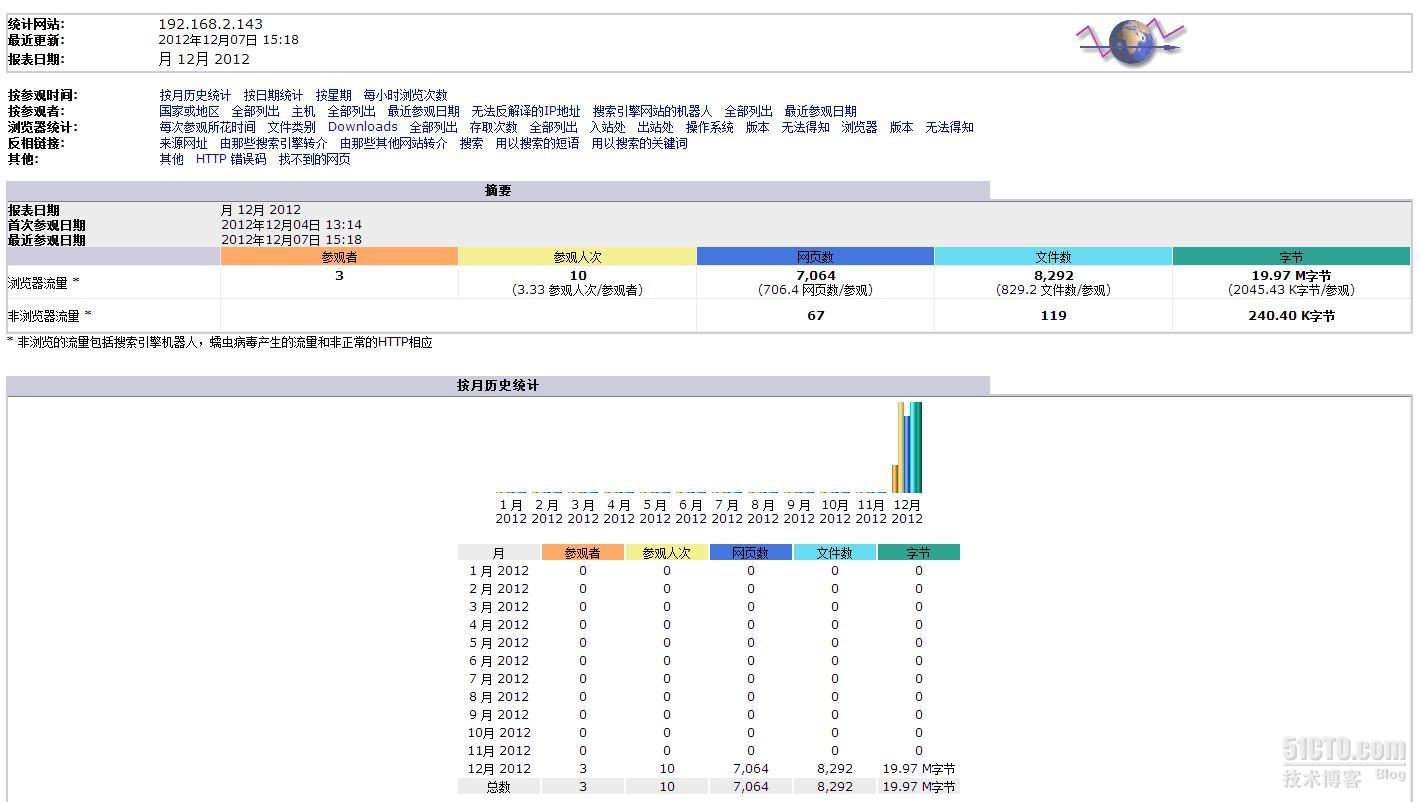
八、结果验证,URL输入http://192.168.2.143:8080/awstats/awstats.192.168.2.143.html
本文出自 “Darrenpan” 博客,请务必保留此出处http://darren.blog.51cto.com/1081720/1081974
[背景]
给公司同事装了个nginx的平台,想监控下来自那里的人访问,就想到了awstats。可也让我头疼了一会,awstats跑的是perl cgi,而我按照张宴的配置是不可以跑perl的cgi的。就有了现在这篇文章。本文章是借助coolerfeng兄弟的大作http://coolerfeng.blog.51cto.com/133059/97723的延续,也可以说是完整版吧!呵呵!
[过程]
Perl的cgi配置按照coolerfeng大哥的就可以了。不过有几点注意,在这里要说明下
(1)
location ~ ^/cgi-bin/.*\.cgi$
{
gzip off; #gzip makes scripts feel slower since
they have to complete before getting gzipped
fastcgi_pass unix:/var/run/nginx/cgi.sock;
fastcgi_index index.cgi;
fastcgi_param SCRIPT_FILENAME
/var/www/cgi-bin$fastcgi_script_name;
此处要修改为:
fastcgi_param SCRIPT_FILENAME $document_root$fastcgi_script_name;
fastcgi_param QUERY_STRING $query_string;
fastcgi_param REQUEST_METHOD $request_method;
fastcgi_param CONTENT_TYPE $content_type;
fastcgi_param CONTENT_LENGTH $content_length;
fastcgi_param GATEWAY_INTERFACE CGI/1.1;
fastcgi_param SERVER_SOFTWARE nginx;
fastcgi_param SCRIPT_NAME $fastcgi_script_name;
fastcgi_param REQUEST_URI $request_uri;
fastcgi_param DOCUMENT_URI $document_uri;
fastcgi_param DOCUMENT_ROOT $document_root;
fastcgi_param SERVER_PROTOCOL $server_protocol;
fastcgi_param REMOTE_ADDR $remote_addr;
fastcgi_param REMOTE_PORT $remote_port;
fastcgi_param SERVER_ADDR $server_addr;
fastcgi_param SERVER_PORT $server_port;
fastcgi_param SERVER_NAME $server_name;
(2)
./cgiwrap-fcgi.pl >/dev/null 2>&1 &执行后,需要再执行
Chown –R www:www /usr/local/webserver/perl/nginx/fcgi/cgi.sock
每次运行一个后台进程后,都要再执行下chown
(3)
/var/log/nginx { #说真的,我一开始就被这个搞晕了,修改为/home/wiki/www/logs/wikilogs.log,这样就可以轮替wikilogs.log了。
/home/wiki/www/logs/wikilogs.log {
daily
missingok
rotate 7
compress
delaycompress notifempty #如果日志为空,延时压缩
create 644 nginx root #注意,这个要修改与你的nginx运行的用户权限一样,如我的是www, 那么就要改成create
644 www root
sharedscripts
prerotate
/usr/local/awstats/wwwroot/cgi-bin/awstats.pl --config=www.mysite.com
-update #改成你在执行awstats_configure.pl时配置的website名称,如我的wikiob.xxxx.com,那么就是
/usr/local/awstats/wwwroot/cgi-bin/awstats.pl --config=wikiob.xxxx.com -update
endscript
postrotate
if [ -f /usr/local/nginx/nginx.pid ]; then
kill -USR1 `cat /usr/local/nginx/nginx.pid` #要修改成自己的nginx.pid的路径,如我的/usr/local/webserver/nginx/nginx.pid
fi
endscript
}
注意:可以用logrotate -vf /etc/logrotate.d/nginx调试,用这个来排除错误!
(4)
只需要修改nginx的logformat,不需要更改 awstats的logformat,保留为1便可,如果按照cooler兄的更改,我这便报这个问题,
Found 6 corrupted records, ==》显示不了数据.
几点注意后,我们来安装awstats
(1)下载,解压
如:/usr/local/awstats 这个路径很重要,因为awstats的配置默认路径就是这个,我曾将tools下的工具移到其他目录下,再去执行配置时,会报一些问题给你的,并且告诉你,他的默认路径就是这个。
(2)cp -r /usr/local/awstats/wwwroot/* /home/wiki/www/awstats/
这样,就把css,classes,icon ,js文件夹移到了/home/wiki/www/awstats/
(3)修改/添加nginx
原先:location ~ ^ /cgi-bin/.*\.cgi$ {
修改为:
location ~ ^/awstats/cgi-bin/.*\.(cgi|pl)?$ {
追加:
location /classes/ {
alias /home/wiki/www/awstats/classes/;
}
location /css/{
alias /home/wiki/www/awstats/css/;
}
location /icon/ {
alias /home/wiki/www/awstats/icon/;
}
(4)生成awstats配置文件
Cd /usr/local/awstats/tools
Perl awstats_configure.pl 按照提示做,基本没问题。(配置文件会生成在/etc/awstats下)
为什么不将tools目录也移走呢?
答案:因为awstats的默认目录在/usr/local/awstats,如果我移走了这个,在生成配置文件时,需要从wwwroot下读取一个默认的配置文件,可惜我改了名字,所以不能移动了。除非我将有这样的一个目录/usr/local/webserver/awstats/wwwroot/cgi-bin等在第二步拷过来的目录,可惜我只有/usr/local/webserver/awstats/
cgi-bin,这样,我需要修改nginx.cfg那样,我访问的时候就要
http://wikiob.xxxx.com/awstats/wwwroot/cgi-bin/awststs.pl,这样不容易记忆,也不习惯。曾想用alias来实现,
location /awstats/ {
alias /home/wiki/www/awstats/wwwroot/;
}
Location ~ ^/awstats /cgi-bin/.*\.(cgi|pl)?${
但后面还是出现了很多问题,
所以,只能不移了。
(5)修改awstats的配置文件
Vi /etc/awstats/awstats.wikiob.xxxx.com
Logfile=”/home/wiki/www/logs/wikilogs.log”
Mkdir /var/lib/awstats
Chown –R www:www /var/lib/awstats
(6)添加crontab
Crontab –e
*/5 * * * * /usr/local/awstats/wwwroot/cgi-bin/awstats.pl -update -config=wikiob.xxxx.com
[完成]
http://wikiob.xxxx.com/awstats/cgi-bin/awstats.pl
便可以正常访问了。
[总结]
朋友的力量是无穷的…….天助自助者。嘻嘻。。。。本文仅供参考.
本文出自 “坏男孩” 博客,请务必保留此出处http://5ydycm.blog.51cto.com/115934/140029
环境说明:
Nginx安装目录:/usr/local/nginx
Nginx配置文件存放目录:/usr/local/nginx/conf/nginx.conf
Nginx日志目录:/usr/local/nginx/logs
Awstats安装目录:/usr/local/awstats
Awstats配置文件存放目录:/etc/awstats
日志切割脚本存放目录:/usr/local/nginx/sbin/cut_nginx_log.sh
一、Nginx日志切割
1、修改nginx.conf配置文件,使AWSTATS支持分析日志格式
# vim /usr/local/nginx/conf/nginx.conf
| log_format main '$remote_addr - $remote_user [$time_local] "$request" ' '$status $body_bytes_sent "$http_referer" ' '"$http_user_agent" "$http_x_forwarded_for"'; access_log logs/access.log main; |
# vim /usr/local/nginx/sbin/cut_nginx_log.sh
| #!/bin/bash mv /usr/local/nginx/logs/access.log /usr/local/nginx/logs/access_`date +%Y%m%d`.log mv /usr/local/nginx/logs/error.log /usr/local/nginx/logs/error_`date +%Y%m%d`.log killall -s USER1 nginx |
3、
二、下载安装Awstats
1、下载安装
| # wget http://awstats.sourceforge.net/files/awstats-7.0.tar.gz # tar -zxvf awstats-7.0.tar.gz # mv awstats-7.0 /usr/local/awstats # mkdir -p /var/lib/awstats |
| # mkdir - p /tmp/src/wwwroot/cgi-bin/ # cp /usr/local/awstats/wwwroot/cgi-bin/awstats.model.conf /tmp/src/wwwroot/cgi-bin/ # /usr/local/awstats/tools/awstats_configure.pl -----> Running OS detected: Linux, BSD or Unix Warning: AWStats standard directory on Linux OS is '/usr/local/awstats'. If you want to use standard directory, you should first move all content of AWStats distribution from current directory: /tmp/src to standard directory: /usr/local/awstats And then, run configure.pl from this location. Do you want to continue setup from this NON standard directory [yN] ?输入y |
| -----> Check for web server install Enter full config file path of your Web server. Example: /etc/httpd/httpd.conf Example: /usr/local/apache2/conf/httpd.conf Example: c:\Program files\apache group\apache\conf\httpd.conf Config file path ('none' to skip web server setup): > none 这里不是apache,写none,跳过# |
| -----> Update model config file '/tmp/src/wwwroot/cgi-bin/awstats.model.conf' File awstats.model.conf updated. -----> Need to create a new config file ? Do you want me to build a new AWStats config/profile file (required if first install) [y/N] ?输入 y #创建一个全新的统计 |
| -----> Define config file name to create What is the name of your web site or profile analysis ? Example: www.mysite.com Example: demo Your web site, virtual server or profile name: > 192.168.2.143被统计网站的域名 # |
| -----> Define config file path In which directory do you plan to store your config file(s) ? Default: /etc/awstats Directory path to store config file(s) (Enter for default): > #回车继续 -----> Create config file '/etc/awstats/awstats.192.168.2.143.conf' Config file /etc/awstats/awstats.192.168.2.143.conf created. -----> Add update process inside a scheduler Sorry, configure.pl does not support automatic add to cron yet. You can do it manually by adding the following command to your cron: /tmp/src/wwwroot/cgi-bin/awstats.pl -update -config=192.168.2.143 Or if you have several config files and prefer having only one command: /tmp/src/tools/awstats_updateall.pl now Press ENTER to continue... A SIMPLE config file has been created: /etc/awstats/awstats.192.168.2.143.conf You should have a look inside to check and change manually main parameters. You can then manually update your statistics for '192.168.2.143' with command: > perl awstats.pl -update -config=192.168.2.143 You can also build static report pages for '192.168.2.143' with command: > perl awstats.pl -output=pagetype -config=192.168.2.143 Press ENTER to finish... |
| # vim /etc/awstats/awstats.192.168.2.143.conf - LogFile="/var/log/httpd/mylog.log"修改成---> LogFile="/usr/local/nginx/logs/access_%YYYY-0%MM-0%DD-0.log" |
Nginx 产生日志 –> 日志切割 –> Nginx 继续产生日志 –> 另存切割日志 –> 交由Awstats统计 –> 生成结果
四、执行Awstats 日志更新程序开始统计分析
| #/usr/local/awstats/wwwroot/cgi-bin/awstats.pl -update -config=192.168.2.143 Create/Update database for config "/etc/awstats/awstats.192.168.2.143.conf" by AWStats version 7.0 (build 1.971) From data in log file "/usr/local/nginx/logs/access_20121207.log"... Phase 1 : First bypass old records, searching new record... Searching new records from beginning of log file... Phase 2 : Now process new records (Flush history on disk after 20000 hosts)... Jumped lines in file: 0 Parsed lines in file: 66466 Found 0 dropped records, Found 0 comments, Found 1 blank records, Found 58472 corrupted records, Found 0 old records, Found 7993 new qualified records. |
五、Awstats生成静态文件
| # cp -rf /usr/local/awstats/wwwroot/ /usr/local/nginx/logs/ # mkdir /usr/local/nginx/logs/wwwroot/awstats # /usr/local/awstats/tools/awstats_buildstaticpages.pl -update -config=192.168.2.143 -lang=cn -dir=/usr/local/nginx/logs/wwwroot/awstats/ -awstatsprog=/usr/local/awstats/wwwroot/cgi-bin/awstats.pl |
-update -config=192.168.2.143 #更新配置选项
-lang=cn #语音中文
-dir=/usr/local/nginx/logs/wwwroot/awstats/ #统计结果输出目录
-awstatsprog=/usr/local/awstats/wwwroot/cgi-bin/awstats.pl #日志更新程序路径
六、修改nginx配置文件
| # vim /usr/local/nginx/conf/nginx.conf server { listen 8080; server_name localhost; location ~ ^/awstats/ { # html 静态页面目录 root /usr/local/nginx/logs/wwwroot/awstats; index index.html; access_log off; error_log off; charset gb2312; } location ~ ^/icon/ { # 图标目录 root /usr/local/nginx/logs/wwwroot; index index.html; access_log off; error_log off; charset gb2312; } } |
| # vim /usr/local/nginx/sbin/cut_nginx_log.sh 23 59 * * * root /usr/local/nginx/sbin/cut_nginx_log.sh 00 01 * * * /usr/local/awstats/tools/awstats_buildstaticpages.pl -update -config=192.168.2.143 -lang=cn -dir=/usr/local/nginx/logs/wwwroot/awstats/ -awstatsprog=/usr/local/awstats/wwwroot/cgi-bin/awstats.pl |
本文出自 “Darrenpan” 博客,请务必保留此出处http://darren.blog.51cto.com/1081720/1081974
[背景]
给公司同事装了个nginx的平台,想监控下来自那里的人访问,就想到了awstats。可也让我头疼了一会,awstats跑的是perl cgi,而我按照张宴的配置是不可以跑perl的cgi的。就有了现在这篇文章。本文章是借助coolerfeng兄弟的大作http://coolerfeng.blog.51cto.com/133059/97723的延续,也可以说是完整版吧!呵呵!
[过程]
Perl的cgi配置按照coolerfeng大哥的就可以了。不过有几点注意,在这里要说明下
(1)
location ~ ^/cgi-bin/.*\.cgi$
{
gzip off; #gzip makes scripts feel slower since
they have to complete before getting gzipped
fastcgi_pass unix:/var/run/nginx/cgi.sock;
fastcgi_index index.cgi;
fastcgi_param SCRIPT_FILENAME
/var/www/cgi-bin$fastcgi_script_name;
此处要修改为:
fastcgi_param SCRIPT_FILENAME $document_root$fastcgi_script_name;
fastcgi_param QUERY_STRING $query_string;
fastcgi_param REQUEST_METHOD $request_method;
fastcgi_param CONTENT_TYPE $content_type;
fastcgi_param CONTENT_LENGTH $content_length;
fastcgi_param GATEWAY_INTERFACE CGI/1.1;
fastcgi_param SERVER_SOFTWARE nginx;
fastcgi_param SCRIPT_NAME $fastcgi_script_name;
fastcgi_param REQUEST_URI $request_uri;
fastcgi_param DOCUMENT_URI $document_uri;
fastcgi_param DOCUMENT_ROOT $document_root;
fastcgi_param SERVER_PROTOCOL $server_protocol;
fastcgi_param REMOTE_ADDR $remote_addr;
fastcgi_param REMOTE_PORT $remote_port;
fastcgi_param SERVER_ADDR $server_addr;
fastcgi_param SERVER_PORT $server_port;
fastcgi_param SERVER_NAME $server_name;
(2)
./cgiwrap-fcgi.pl >/dev/null 2>&1 &执行后,需要再执行
Chown –R www:www /usr/local/webserver/perl/nginx/fcgi/cgi.sock
每次运行一个后台进程后,都要再执行下chown
(3)
/var/log/nginx { #说真的,我一开始就被这个搞晕了,修改为/home/wiki/www/logs/wikilogs.log,这样就可以轮替wikilogs.log了。
/home/wiki/www/logs/wikilogs.log {
daily
missingok
rotate 7
compress
delaycompress notifempty #如果日志为空,延时压缩
create 644 nginx root #注意,这个要修改与你的nginx运行的用户权限一样,如我的是www, 那么就要改成create
644 www root
sharedscripts
prerotate
/usr/local/awstats/wwwroot/cgi-bin/awstats.pl --config=www.mysite.com
-update #改成你在执行awstats_configure.pl时配置的website名称,如我的wikiob.xxxx.com,那么就是
/usr/local/awstats/wwwroot/cgi-bin/awstats.pl --config=wikiob.xxxx.com -update
endscript
postrotate
if [ -f /usr/local/nginx/nginx.pid ]; then
kill -USR1 `cat /usr/local/nginx/nginx.pid` #要修改成自己的nginx.pid的路径,如我的/usr/local/webserver/nginx/nginx.pid
fi
endscript
}
注意:可以用logrotate -vf /etc/logrotate.d/nginx调试,用这个来排除错误!
(4)
只需要修改nginx的logformat,不需要更改 awstats的logformat,保留为1便可,如果按照cooler兄的更改,我这便报这个问题,
Found 6 corrupted records, ==》显示不了数据.
几点注意后,我们来安装awstats
(1)下载,解压
如:/usr/local/awstats 这个路径很重要,因为awstats的配置默认路径就是这个,我曾将tools下的工具移到其他目录下,再去执行配置时,会报一些问题给你的,并且告诉你,他的默认路径就是这个。
(2)cp -r /usr/local/awstats/wwwroot/* /home/wiki/www/awstats/
这样,就把css,classes,icon ,js文件夹移到了/home/wiki/www/awstats/
(3)修改/添加nginx
原先:location ~ ^ /cgi-bin/.*\.cgi$ {
修改为:
location ~ ^/awstats/cgi-bin/.*\.(cgi|pl)?$ {
追加:
location /classes/ {
alias /home/wiki/www/awstats/classes/;
}
location /css/{
alias /home/wiki/www/awstats/css/;
}
location /icon/ {
alias /home/wiki/www/awstats/icon/;
}
(4)生成awstats配置文件
Cd /usr/local/awstats/tools
Perl awstats_configure.pl 按照提示做,基本没问题。(配置文件会生成在/etc/awstats下)
为什么不将tools目录也移走呢?
答案:因为awstats的默认目录在/usr/local/awstats,如果我移走了这个,在生成配置文件时,需要从wwwroot下读取一个默认的配置文件,可惜我改了名字,所以不能移动了。除非我将有这样的一个目录/usr/local/webserver/awstats/wwwroot/cgi-bin等在第二步拷过来的目录,可惜我只有/usr/local/webserver/awstats/
cgi-bin,这样,我需要修改nginx.cfg那样,我访问的时候就要
http://wikiob.xxxx.com/awstats/wwwroot/cgi-bin/awststs.pl,这样不容易记忆,也不习惯。曾想用alias来实现,
location /awstats/ {
alias /home/wiki/www/awstats/wwwroot/;
}
Location ~ ^/awstats /cgi-bin/.*\.(cgi|pl)?${
但后面还是出现了很多问题,
所以,只能不移了。
(5)修改awstats的配置文件
Vi /etc/awstats/awstats.wikiob.xxxx.com
Logfile=”/home/wiki/www/logs/wikilogs.log”
Mkdir /var/lib/awstats
Chown –R www:www /var/lib/awstats
(6)添加crontab
Crontab –e
*/5 * * * * /usr/local/awstats/wwwroot/cgi-bin/awstats.pl -update -config=wikiob.xxxx.com
[完成]
http://wikiob.xxxx.com/awstats/cgi-bin/awstats.pl
便可以正常访问了。
[总结]
朋友的力量是无穷的…….天助自助者。嘻嘻。。。。本文仅供参考.
本文出自 “坏男孩” 博客,请务必保留此出处http://5ydycm.blog.51cto.com/115934/140029

相关文章推荐
- nginx+awstats 统计web服务器log 推荐
- Nginx+awstats统计web服务器log(延续版)
- awstats 线上web服务器访问统计
- 轻松使用Nginx搭建web服务器
- 三大WEB服务器对比分析(apache ,lighttpd,nginx)
- nginx 作为web服务器
- Ubuntu 16.04 上的 NGINX Web 服务器!
- 高性能Web服务器 Nginx
- 三大WEB服务器对比分析apache、lighttpd、nginx
- Nginx 0.7.x + PHP 5.2.9(FastCGI)搭建胜过Apache十倍的Web服务器
- 轻松使用Nginx搭建web服务器 推荐
- 20步打造最安全的Nginx Web服务器
- Linux+Nginx+Tomcat实现Web服务器的负载均衡集群
- uWSGI教程-----使用uWSGI和nginx配置你的web服务器
- Ubuntu+Django+Nginx+uWSGI+Mysql搭建Python Web服务器
- 高性能Web服务器Nginx的配置与部署研究(5)Nginx配置符号
- Linux+Nginx+Php架设高性能WEB服务器
- 高性能Web服务器Nginx的配置与部署研究(14)平滑升级你的Nginx
- 高性能Web服务器Nginx的配置与部署研究(11)应用模块之Memcached模块的两大应用场景