使用VC++调用C#封装的DLL库实现Excel文件的操作(不用安装office软件环境)
2012-08-17 16:38
851 查看
使用VC++调用C#封装的DLL库实现Excel文件操作(不用安装office环境)
【注】这里只是简单实现了,更详细操作,还有待认真研究。
参考网页:
http://support.microsoft.com/kb/828736/en-us (好像有篇中文的文章)
用Visual Studio 2005创建C# 的Class Libtary,把下面的代码拷贝进来。
Studio 2005 Command Prompt “输入”
sn.exe -k MyKeyFile.SNK “创建密钥文件,将 MyKeyFile.SNK文件从C:\Program
Files\Microsoft Visual Studio 8\vc\bin目录拷贝到你的工程目录下,打开AssemblyInfo.cs文件。替换代码:
使用
编译连接就能够生成Dll文件。
为了能够调用新建的托管DLL文件,需要将这个组件进行注册。
打开Visual Studio 2005 Command Prompt,切换到包含刚才生成的DLL目录,输入命令”RegAsm.exe
ManagedDLL.dll /tlb:ManagedDLL.tlb /codebase ”,会提示注册成功。
接下来新建C++的Win32
Project 项目,打开代码视图,引入RegAsm.exe生成的库文件。
注意文件路径,和DLL文件在同一路径下。
完整文件的代码如下:
C++ Client
Note:
注意更改通用语言运行库支持的编译器选项为(//clr:oldSyntax)。
步骤如下:右键项目属性=》配置属性=》常规=》公共语言运行时支持=》原来的语法(clr:oldSyntax)
到此,C++调用C#的Dll库文件的Demo已经完成。
下面是在此基础上在C#的DLL文件里添加Excel文件的操作实现。
参考网页;
http://blog.bossma.cn/dotnet/myxls-export-excel/
添加引用到你的项目:

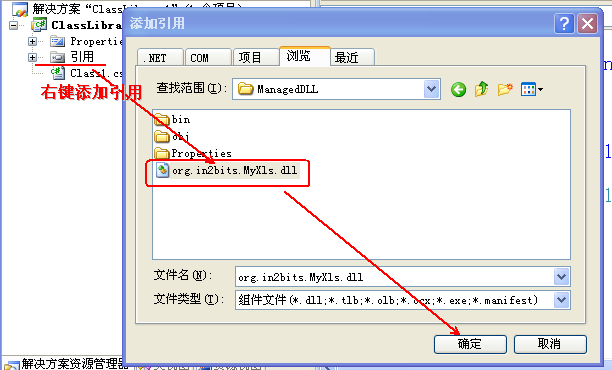
其实我只添加了org.in2bits.MyXls.dll文件,这个文件可以自己百度。这也有,地址:http://sourceforge.net/projects/myxls/files/
点击C#的项目,点击引用,右键添加引用,找到org.in2bits.MyXls.dll文件如下图:
添加代码:using org.in2bits.MyXls;
这时进行编译,你可能遇到如下提示的错误,

这就要用到了我的另一篇转载文章,地址:/article/10452008.html 注意命令行中的空格,我纠结了好久。。。。
哈哈,终于要成功了。
经过以上操作,引用DLL文件已经成功,接下来就可以使用DLL文件里的类和方法、属性了。
可以参考怎么调试C#的DLL,这个自己百度解决。
Have A Good Time!开始你的冒险之旅吧。。。。
参考:
导出Excel的测试,转载至上面的一个链接,在这里谢谢了。
【注】这里只是简单实现了,更详细操作,还有待认真研究。
参考网页:
http://support.microsoft.com/kb/828736/en-us (好像有篇中文的文章)
用Visual Studio 2005创建C# 的Class Libtary,把下面的代码拷贝进来。
// Class1.cs
// A simple managed DLL that contains a method to add two numbers.
using System;

namespace ManagedDLL
{
// Interface declaration.
public interface ICalculator
{
int Add(int Number1, int Number2);
};

// Interface implementation.
public class ManagedClass:ICalculator
{
public int Add(int Number1,int Number2)
{
return Number1+Number2;
}
}
}
打开 ” 工具=》 VisualStudio 2005 Command Prompt “输入”
sn.exe -k MyKeyFile.SNK “创建密钥文件,将 MyKeyFile.SNK文件从C:\Program
Files\Microsoft Visual Studio 8\vc\bin目录拷贝到你的工程目录下,打开AssemblyInfo.cs文件。替换代码:
[assembly: ComVisible(false)]
[assembly: AssemblyDelaySign(false)]
[assembly: AssemblyKeyFile("")]
使用
[assembly: ComVisible(true)]
[assembly: AssemblyDelaySign(false)]
[assembly: AssemblyKeyFile("..\\..\\MyKeyFile.SNK")]
编译连接就能够生成Dll文件。
为了能够调用新建的托管DLL文件,需要将这个组件进行注册。
打开Visual Studio 2005 Command Prompt,切换到包含刚才生成的DLL目录,输入命令”RegAsm.exe
ManagedDLL.dll /tlb:ManagedDLL.tlb /codebase ”,会提示注册成功。
接下来新建C++的Win32
Project 项目,打开代码视图,引入RegAsm.exe生成的库文件。
// Import the type library.
#import "..\ManagedDLL\bin\Debug\ManagedDLL.tlb" raw_interfaces_only
注意文件路径,和DLL文件在同一路径下。
完整文件的代码如下:
C++ Client
// CPPClient.cpp: Defines the entry point for the console application.
// C++ client that calls a managed DLL.

#include "stdafx.h"
#include "tchar.h"
// Import the type library.

#import "..\ManagedDLL\bin\Debug\ManagedDLL.tlb" raw_interfaces_only
using namespace ManagedDLL;
int _tmain(int argc, _TCHAR* argv[])
{
// Initialize COM.
HRESULT hr = CoInitialize(NULL);

// Create the interface pointer.
ICalculatorPtr pICalc(__uuidof(ManagedClass));

long lResult = 0;

// Call the Add method.
pICalc->Add(5, 10, &lResult);

wprintf(L"The result is %d\n", lResult);

// Uninitialize COM.
CoUninitialize();
return 0;
}
Note:
注意更改通用语言运行库支持的编译器选项为(//clr:oldSyntax)。
步骤如下:右键项目属性=》配置属性=》常规=》公共语言运行时支持=》原来的语法(clr:oldSyntax)
到此,C++调用C#的Dll库文件的Demo已经完成。
下面是在此基础上在C#的DLL文件里添加Excel文件的操作实现。
参考网页;
http://blog.bossma.cn/dotnet/myxls-export-excel/
添加引用到你的项目:
其实我只添加了org.in2bits.MyXls.dll文件,这个文件可以自己百度。这也有,地址:http://sourceforge.net/projects/myxls/files/
点击C#的项目,点击引用,右键添加引用,找到org.in2bits.MyXls.dll文件如下图:
添加代码:using org.in2bits.MyXls;
这时进行编译,你可能遇到如下提示的错误,
这就要用到了我的另一篇转载文章,地址:/article/10452008.html 注意命令行中的空格,我纠结了好久。。。。
哈哈,终于要成功了。
经过以上操作,引用DLL文件已经成功,接下来就可以使用DLL文件里的类和方法、属性了。
可以参考怎么调试C#的DLL,这个自己百度解决。
Have A Good Time!开始你的冒险之旅吧。。。。
参考:
导出Excel的测试,转载至上面的一个链接,在这里谢谢了。
protected void ExportBtn_Click(object sender, EventArgs e)
{
XlsDocument xls = new XlsDocument();
xls.FileName = "TestList.xls";

int rowIndex = 1;
Worksheet sheet = xls.Workbook.Worksheets.Add("测试表");//Sheet名称

Cells cells = sheet.Cells;
Cell cell = cells.Add(1, 1, "编号");
cell.Font.Bold = true;
cell = cells.Add(1, 2, "名称");
cell.Font.Bold = true;

foreach (DataRow row in table.Rows)
{
cells.Add(rowIndex, 1, rowIndex);
cells.Add(rowIndex, 2, "名称"+rowIndex);

rowIndex++;
}
xls.Send();//如果改成Save()函数,就能保存Excel文件到本地了。文件在C++项目的源文件目录下。
}
哦,忘记了,注意还需要把org.in2bits.MyXls.dll文件,拷贝到VC++生成的EXE文件夹目录下(这个可以根据Visual Studio 的输出提示,我没看到,差点功亏一篑),经过这步在Visual Studio 环境下调试可以进到DLL源码中。

相关文章推荐
- 使用Apache Phoenix 实现 SQL 操作HBase【包括部分软件安装】
- c#操作excel方式三:使用Microsoft.Office.Interop.Excel.dll读取Excel文件
- C#通过引用Office Excel (2007) 组件实现对Excel文件的操作
- 使用PInvoke实现C#调用非托管C代码DLL库
- c#操作excel方式三:使用Microsoft.Office.Interop.Excel.dll读取Excel文件
- c#操作excel方式三:使用Microsoft.Office.Interop.Excel.dll读取Excel文件
- c#操作excel方式三:使用Microsoft.Office.Interop.Excel.dll读取Excel文件
- C#实现多级子目录Zip压缩解压实例 NET4.6下的UTC时间转换 [译]ASP.NET Core Web API 中使用Oracle数据库和Dapper看这篇就够了 asp.Net Core免费开源分布式异常日志收集框架Exceptionless安装配置以及简单使用图文教程 asp.net core异步进行新增操作并且需要判断某些字段是否重复的三种解决方案 .NET Core开发日志
- C#通过引用Office Excel (2007) 组件实现对Excel文件的操作
- C#通过引用Office Excel (2007) 组件实现对Excel文件的操作
- C#通过引用Office Excel (2007) 组件实现对Excel文件的操作
- c#操作excel方式三:使用Microsoft.Office.Interop.Excel.dll读取Excel文件
- 实现c# 直接连接Oracle数据库操作,不用安装各种插件
- c#操作excel方式三:使用Microsoft.Office.Interop.Excel.dll读取Excel文件
- [原创]C#通过引用Office Excel (2007) 组件实现对Excel文件的操作
- 不用AJAX实现前台JS调用后台C#方法
- VC++实现监视系统的键盘操作(3)调用键盘钩子DLL
- 不用前台ajax,实现javascript调用后台c#
- 使用IDispatch::Invoke函数在C++中调用C#实现的托管类库方法
- C# WEBSOCKET FLECK 调用非托管C++ DLL 实现通信(使用CHAR*接收)