Spring学习笔记 使用annotation配置实现Bean的auto-wiring (自动绑定)
2012-07-23 21:38
991 查看
使用@Autowired标注来进行porperty与Bean的auto-wiring。
1.在配置文件中增加context命名空间定义,并添加<context:annotation-config /> 标签配置。
完整代码:
2.直接加入AutowiredAnnotationBeanPostProcessor的Bean定义
@Autowired可以使用在JAVA代码中的三个位置:属性,setter方法和构造方法上方。示例如下:
在XML配置autowiring时可以定义autowire的方式,byName,byType,constructor,而使用@Autowired,由放置位置不同可以区别具体进行自动绑定的属性或构造方法,但是不管放置在属性,setter方法还是构造方法上仍然需要确定是根据byName还是byType进行绑定。很多资料上说,@Autowired是根据类型绑定的也就是byType。但是根据下边的Demo代码,可以看到实际上,也有byName的匹配方式存在。
代码Demo
上边配置文件中配置了三个同类型但是不同id的bean定义。
以下根据bean定义使用@Autowired进行了标注:
执行main方法:
Message类代码:
通过运行结果可以看到,当有多个类型可以匹配时,Spring使用了byName的方式进行了匹配,而且匹配的顺序是constructor,field,setter。
而当有多个类型可以匹配,却没有通过byName方式可以匹配成功的话,会抛出有多于一个的相同类型的bean可以匹配的异常。
准备
首先要使用@Autowired需要在spring-config.xml 中增加配置,一般有两种方式:1.在配置文件中增加context命名空间定义,并添加<context:annotation-config /> 标签配置。
完整代码:
<?xml version="1.0" encoding="UTF-8"?>
<beans xmlns="http://www.springframework.org/schema/beans"
xmlns:xsi="http://www.w3.org/2001/XMLSchema-instance"

xsi:schemaLocation="http://www.springframework.org/schema/beans http://www.springframework.org/schema/beans/spring-beans-3.0.xsd http://www.springframework.org/schema/context http://www.springframework.org/schema/context/spring-context-3.0.xsd"> <!-- 注意上方定义中的 xmlns:context="http://www.springframework.org/schema/context"
与xsi:schemaLocation中的http://www.springframework.org/schema/context http://www.springframework.org/schema/context/spring-context-3.0.xsd 都需要进行定义,否则下边使用<context:annotation-config />在运行时会抛出
The prefix "context" for element "context:annotation-config" is not bound.异常
-->
<context:annotation-config />

<!-- 其他代码 -->
</beans>
2.直接加入AutowiredAnnotationBeanPostProcessor的Bean定义
<?xml version="1.0" encoding="UTF-8"?>
<beans xmlns="http://www.springframework.org/schema/beans"
xmlns:xsi="http://www.w3.org/2001/XMLSchema-instance"
xsi:schemaLocation="http://www.springframework.org/schema/beans http://www.springframework.org/schema/beans/spring-beans-3.0.xsd">
<bean class="org.springframework.beans.factory.annotation.AutowiredAnnotationBeanPostProcessor"/>

<!-- 其他代码 -->
</beans>
@Autowired标注的使用方式
@Autowired可以使用在JAVA代码中的三个位置:属性,setter方法和构造方法上方。示例如下:package autowiring;
import org.springframework.beans.factory.annotation.Autowired;
public class MessageLooper
{
@Autowired
private Message message;
public Message getMessage()
{
return message;
}
@Autowired
public void setMessage(Message message3)
{
System.out.println("setter autowired");
System.out.println(message3.getMessageContent());
this.message = message3;
}
public MessageLooper(){};
@Autowired
public MessageLooper(Message message2)
{
System.out.println("constructor autowired");
System.out.println(message2.getMessageContent());
this.message = message2;
};
public void printMessage()
{
if(message != null)
{
System.out.println("final result");
System.out.println(message.getMessageContent());
}
else
System.out.println("no message");
}
}在XML配置autowiring时可以定义autowire的方式,byName,byType,constructor,而使用@Autowired,由放置位置不同可以区别具体进行自动绑定的属性或构造方法,但是不管放置在属性,setter方法还是构造方法上仍然需要确定是根据byName还是byType进行绑定。很多资料上说,@Autowired是根据类型绑定的也就是byType。但是根据下边的Demo代码,可以看到实际上,也有byName的匹配方式存在。
代码Demo
spring-config.xml
<?xml version="1.0" encoding="UTF-8"?> <beans xmlns="http://www.springframework.org/schema/beans" xmlns:xsi="http://www.w3.org/2001/XMLSchema-instance" xmlns:context="http://www.springframework.org/schema/context" xsi:schemaLocation="http://www.springframework.org/schema/beans http://www.springframework.org/schema/beans/spring-beans-3.0.xsd http://www.springframework.org/schema/context http://www.springframework.org/schema/context/spring-context-3.0.xsd"> <context:annotation-config /> <bean id="messageLooper" class="autowiring.MessageLooper" /> <bean id="message" class="autowiring.Message" > <property name="messageContent" value="How are you ?" /> </bean> <bean id="message2" class="autowiring.Message" > <property name="messageContent" value="How are you ???????" /> </bean> <bean id="message3" class="autowiring.Message" > <property name="messageContent" value="How are you !!!!!!" /> </bean> </beans>
上边配置文件中配置了三个同类型但是不同id的bean定义。
以下根据bean定义使用@Autowired进行了标注:
package autowiring;

import org.springframework.beans.factory.annotation.Autowired;

public class MessageLooper
{
@Autowired
private Message message;

public Message getMessage()
{
return message;
}

@Autowired
public void setMessage(Message message3)
{
System.out.println("setter autowired");
System.out.println(message3.getMessageContent());
this.message = message3;
}

public MessageLooper(){};
@Autowired
public MessageLooper(Message message2)
{
System.out.println("constructor autowired");
System.out.println(message2.getMessageContent());
this.message = message2;
};

public void printMessage()
{
if(message != null)
{
System.out.println("final result");
System.out.println(message.getMessageContent());
}
else
System.out.println("no message");
}
}执行main方法:
package autowiring;

import org.springframework.context.ApplicationContext;
import org.springframework.context.support.ClassPathXmlApplicationContext;

public class AutowingMain
{

/**
* @comment	[注释说明]
* @author	荣磊, 2012-7-20
*/
public static void main(String[] args)
{
String configString = "autowiring/spring-config.xml";
ApplicationContext context = new ClassPathXmlApplicationContext(configString);
MessageLooper messageLooper = context.getBean("messageLooper", MessageLooper.class);
messageLooper.printMessage();
}

}
Message类代码:
package autowiring;

public class Message
{
String messageContent;

public String getMessageContent()
{
return messageContent;
}
public void setMessageContent(String messageContent)
{
this.messageContent = messageContent;
}

}
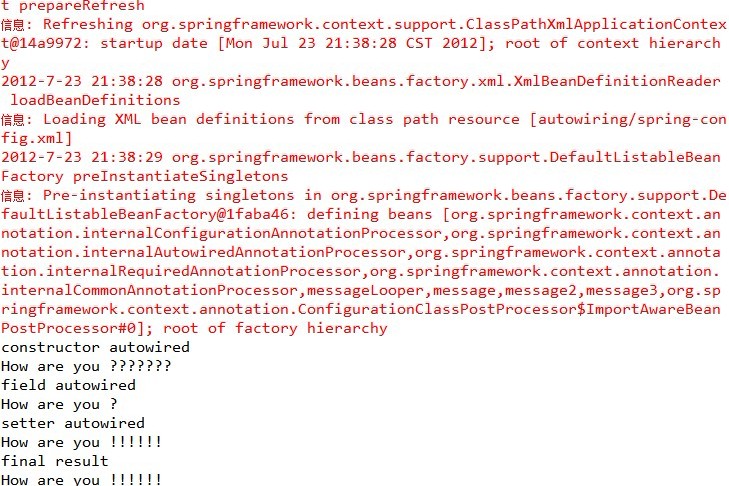
运行结果:
通过运行结果可以看到,当有多个类型可以匹配时,Spring使用了byName的方式进行了匹配,而且匹配的顺序是constructor,field,setter。
而当有多个类型可以匹配,却没有通过byName方式可以匹配成功的话,会抛出有多于一个的相同类型的bean可以匹配的异常。

相关文章推荐
- Spring学习笔记 使用XML配置实现Bean的auto-wiring (自动绑定)
- [原创]java WEB学习笔记99:Spring学习---Spring Bean配置:自动装配,配置bean之间的关系(继承/依赖),bean的作用域(singleton,prototype,web环境作用域),使用外部属性文件
- 使用BeanNameAutoProxyCreator实现spring的自动代理
- spring学习笔记(12)——使用注解方式配置bean
- 使用BeanNameAutoProxyCreator实现spring的自动代理
- spring学习笔记(4)——配置文件配置bean自动装配
- Java框架spring 学习笔记(十):bean管理(注解和配置文件混合使用)
- SPRING IN ACTION 第4版笔记-第二章-001-用@Autowired\@ComponentScan、@Configuration、@Component实现自动装载bean
- 使用BeanNameAutoProxyCreator实现spring的自动代理
- SpringBoot学习笔记(5) Spring Boot集成Redis实现自动配置
- Spring学习笔记 —— AOP(面向切面编程) 之使用ProxyFactoryBean实现AOP
- Spring学习笔记(18)----使用Spring配置文件实现事务管理
- 使用BeanNameAutoProxyCreator实现spring的自动代理
- spring 使用annotation 自动注册bean,并保证@Required,@Autowired的属性被注入
- ITCAST视频-Spring学习笔记(使用Spring配置文件实现AOP)
- 【spring学习笔记一】使用xml文件配置bean
- 使用BeanNameAutoProxyCreator实现spring的自动代理
- Spring学习笔记(4)----Bean节点信息配置
- spring学习笔记九 通过工厂方法配置bean
- Spring 3.0 学习-DI 依赖注入_创建Spring 配置-使用一个或多个XML 文件作为配置文件,使用自动注入(byName),在代码中使用注解代替自动注入,使用自动扫描代替xml中bea