Linux 安装MySQL+apache+openssl+php
2012-06-04 10:45
435 查看
平台环境:virtual PC 2007 + CentOS 5.8(软件只装基本+开发)
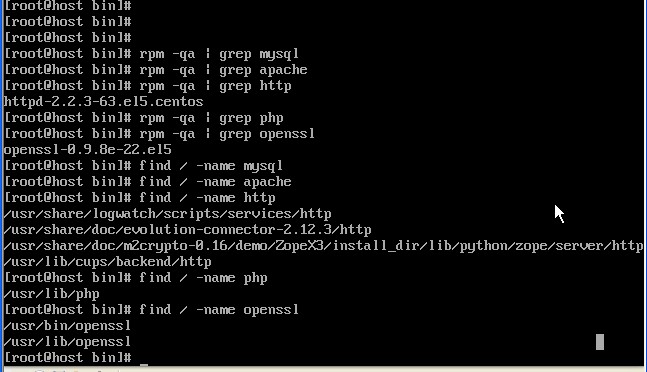
在刚装好的CentOS 5.8上发现已默认安装 http-2.2.3-63.el5.centos,openssl-0.9.8e-22.el5,如下图,需要更新到最新版本。
下载的新安装包均放于/usr/local/src
1、更新openssl
下载最新的包:openssl-1.0.1c.tar.gz
#cd /usr/local/src
#tar -xzvf openssl-1.0.1c.tar.gz
#mv -xzvf openssl-1.0.1c.tar.gz openssl
#./config shared
#make
#make test
#make install
【注意openssl默认安装路径 : /usr/local/ssl】
#mv /usr/bin/openssl /usr/bin/openssl.OFF
#mv /usr/lib/openssl /usr/lib/openssl.OFF
#ln –s /usr/local/ssl/bin/openssl /usr/bin/openssl
#ln –s /usr/local/ssl/include/openssl /usr/include/openssl
配置库文件搜索路径
#echo “/usr/local/ssl/lib” >> /etc/ld.so.conf
#ldconfig –v
查看openssl 版本号,验证安装正确性
#openssl version –a

参考:Openssh+Openssl更新步骤 http://linux.chinaunix.net/techdoc/net/2008/12/20/1053890.shtml
源码方式升级openssl和openssh http://init7.blog.51cto.com/860934/178782
2.卸载旧的apache
rpm -e httpd-2.2.3-63.el5.386 #卸载http时提示与 gnome-user-share-0.10-6.i386关联,那就先卸载gnome-user-share
3.安装MySQL
官网下载6个包:
MySQL-client-5.5.24-1.linux2.6.i386.rpm
MySQL-devel-5.5.24-1.linux2.6.i386.rpm
MySQL-embedded-5.5.24-1.linux2.6.i386.rpm
MySQL-server-5.5.24-1.linux2.6.i386.rpm
MySQL-shared-5.5.24-1.linux2.6.i386.rpm
MySQL-shared-compat-5.5.24-1.linux2.6.i386.rpm
#cd /usr/local/src
#rpm –ivh Mysql-*.rpm
#service mysql start #启动MYSQL服务
#/usr/bin/mysqladmin -u root password 123456 #设置root的密码
# /sbin/chkconfig – add mysql #把MySQL添加到你系统的启动服务组里面去
【MySQL默认的目录】
1、数据库目录 /var/lib/mysql/
2、配置文件目录 /usr/share/mysql(mysql.server命令及配置文件)
3、相关命令目录 /usr/bin(mysqladmin mysqldump等命令)
4、启动脚本目录 /etc/rc.d/init.d/(启动脚本文件mysql的目录)
【更改MYSQL数据库目录】
cd /home
mkdir data #home目录下建立data目录
mysqladmin -u root -p shutdown #把MySQL服务进程停掉:
mv /var/lib/mysql /home/data/ #把MySQL的数据文件移动到了/home/data/mysql下
cp /usr/share/mysql/my-medium.cnf /etc/my.cnf #/etc/目录下没有my.cnf配置文件,请到/usr/share/mysql/下找到*.cnf文件,拷贝其中一个到/etc/并改名为my.cnf)中
【修改my.snf】
vi /etc/my.cnf
将client,server项均修改成以下内容
#socket = /var/lib/mysql/mysql.sock ##原内容,为了更稳妥用“#”注释此行
socket = /home/data/mysql/mysql.sock #加上此行
【修改MySQL启动脚本,更新datadir为实际存放路径】
vi /etc/rc.d/init.d/mysql
#datadir=/var/lib/mysql##注释此行
datadir=/home/data/mysql ##
/etc/rc.d/init.d/mysql start //重新启动MySQL服务,如果工作正常移动就成功了,
【修改后的MySQL目录】
1、数据库目录 /home/data/mysql
2、配置文件目录 /etc/my.cnf ; /usr/share/mysql(mysql.server命令及配置文件)
3、相关命令目录 /usr/bin(mysqladmin mysqldump等命令)
4、启动脚本目录 /etc/rc.d/init.d/(启动脚本文件mysql的目录)
参考;rpm安装mysql http://my.oschina.net/wenic705/blog/6126
4.安装apache
下载 httpd-2.2.22.tar.gz
#cd /usr/local/src
#tar -zxvf httpd-2.2.22.tar.gz
#mv httpd-2.2.22 http
【apache安装到/usr/local/apache目录下,httpd.conf安装到:/etc/httpd目录下】
#./configure --prefix=/usr/local/apache --sysconfdir=/etc/httpd --enable-so --enable-rewrite --enable-mods-shared=most
#make
#make install
# /usr/local/apache/bin/apachectl start //启动http服务
【将apache注册为系统服务】
首先将apachectl命令拷贝至/etc/rc.d/init.d目录下,改名为httpd
cp /usr/local/apache/bin/apachectl /etc/rc.d/init.d/httpd
使用编辑器打开httpd文件,并在第一行#!/bin/sh下增加两行文字如下
# chkconfig: 35 70 30
# description: Apache
接着注册该服务
chkconfig --add httpd
service httpd start
chkconfig httpd on
参考:
http://tonychiu.blog.51cto.com/656605/313693
5.安装php
下载php-5.4.3.tar.gz
#cd /usr/local/src
#tar -zxvf php-5.4.3.tar.gz
# cd php
#./configure --prefix=/usr/local/php --with-apxs2=/usr/local/apache/bin/apxs --with-config-file-path=/etc
/* ./configure 时提示libxml2没找到,在centos5.8光盘找到libxml2-2.6.26-2.1.12.el5_7.2.i386.rpm,libxml2-devel-2.6.26-2.1.12.el5_7.2.i386.rpm,zlib-devel-1.2.3-4.el5.i386.rpm,zlib-1.2.3-4.el5.i386.rpm全装上先 */
#make
#make install
#cd /usr/local/src/php
#cp php.ini-development /etc
#cd /etc
#mv php.ini-development php.ini
【修改apache的httpd.conf】
#vi /etc/httpd/httpd.conf
添加:
AddType application/x-httpd-php .php
AddType application/x-httpd-php-source .phps
注意将这两行添加在其它AddType后面
确保文件中有下面一段,如果没有地话就添加在所有LoadModule之后
LoadModulephp5_module modules/libphp5.so (一般安装php时带--with-apxs2=XXX时会自动添加)
找到DirectoryIndex index.html index.html.var 这一行,在其后面写上index.php
【】
在/usr/local/apache/htdocs/下面建立php文件。
# vi /usr/local/apache/htdocs/index.php
输入:
<?
phpinfo();
?>
重启apache服务器
# /usr/local/apache/bin/apachectl restart
【重启httpd时提示:cannot restore segment prot after reloc: Permission denied】
在linux上安装有些东西时会出现 Permission denied 的情况:以下就是解决它的办法之一
编辑/etc/selinux/config,找到这段:
# This file controls the state of SELinux on the system.
# SELINUX= can take one of these three values:
# enforcing - SELinux security policy is enforced.
# permissive - SELinux prints warnings instead of enforcing.
# disabled - SELinux is fully disabled.
SELINUX=enforcing
把 SELINUX=enforcing 注释掉:#SELINUX=enforcing ,然后新加一行为:
SELINUX=disabled保存,关闭。
……
编辑/etc/sysconfig/selinux,找到:
# This file controls the state of SELinux on the system.
# SELINUX= can take one of these three values:
# enforcing - SELinux security policy is enforced.
# permissive - SELinux prints warnings instead of enforcing.
# disabled - SELinux is fully disabled.
SELINUX=enforcing如果SELINUX已经是 SELINUX=disabled,那么就不用改了,否则就把SELINUX=enforcing 注释掉,新加一行:
SELINUX=disabled保存,退出。
如果你碰到其他类似提示:
cannot restore segment prot after reloc: Permission denied
哪应该是SELinux的问题,可以考虑把它关闭。
————————————————————————————-
如果还不行,在你保证SElinux 被disable后.还执行下
chcon -t texrel_shlib_t
如: chcon -t texrel_shlib_t /路径/路径/名字.so (这个文件视具体执行文件.)
参考:
1、linux下apache+php+mysql安装配置文档 http://blog.csdn.net/irwin_chen/article/details/7359022
2、linux下apache+php+mysql升级安装过程 http://school.21tx.com/2008/10/20/13911.html
在刚装好的CentOS 5.8上发现已默认安装 http-2.2.3-63.el5.centos,openssl-0.9.8e-22.el5,如下图,需要更新到最新版本。
下载的新安装包均放于/usr/local/src
1、更新openssl
下载最新的包:openssl-1.0.1c.tar.gz
#cd /usr/local/src
#tar -xzvf openssl-1.0.1c.tar.gz
#mv -xzvf openssl-1.0.1c.tar.gz openssl
#./config shared
#make
#make test
#make install
【注意openssl默认安装路径 : /usr/local/ssl】
#mv /usr/bin/openssl /usr/bin/openssl.OFF
#mv /usr/lib/openssl /usr/lib/openssl.OFF
#ln –s /usr/local/ssl/bin/openssl /usr/bin/openssl
#ln –s /usr/local/ssl/include/openssl /usr/include/openssl
配置库文件搜索路径
#echo “/usr/local/ssl/lib” >> /etc/ld.so.conf
#ldconfig –v
查看openssl 版本号,验证安装正确性
#openssl version –a
参考:Openssh+Openssl更新步骤 http://linux.chinaunix.net/techdoc/net/2008/12/20/1053890.shtml
源码方式升级openssl和openssh http://init7.blog.51cto.com/860934/178782
2.卸载旧的apache
rpm -e httpd-2.2.3-63.el5.386 #卸载http时提示与 gnome-user-share-0.10-6.i386关联,那就先卸载gnome-user-share
3.安装MySQL
官网下载6个包:
MySQL-client-5.5.24-1.linux2.6.i386.rpm
MySQL-devel-5.5.24-1.linux2.6.i386.rpm
MySQL-embedded-5.5.24-1.linux2.6.i386.rpm
MySQL-server-5.5.24-1.linux2.6.i386.rpm
MySQL-shared-5.5.24-1.linux2.6.i386.rpm
MySQL-shared-compat-5.5.24-1.linux2.6.i386.rpm
#cd /usr/local/src
#rpm –ivh Mysql-*.rpm
#service mysql start #启动MYSQL服务
#/usr/bin/mysqladmin -u root password 123456 #设置root的密码
# /sbin/chkconfig – add mysql #把MySQL添加到你系统的启动服务组里面去
【MySQL默认的目录】
1、数据库目录 /var/lib/mysql/
2、配置文件目录 /usr/share/mysql(mysql.server命令及配置文件)
3、相关命令目录 /usr/bin(mysqladmin mysqldump等命令)
4、启动脚本目录 /etc/rc.d/init.d/(启动脚本文件mysql的目录)
【更改MYSQL数据库目录】
cd /home
mkdir data #home目录下建立data目录
mysqladmin -u root -p shutdown #把MySQL服务进程停掉:
mv /var/lib/mysql /home/data/ #把MySQL的数据文件移动到了/home/data/mysql下
cp /usr/share/mysql/my-medium.cnf /etc/my.cnf #/etc/目录下没有my.cnf配置文件,请到/usr/share/mysql/下找到*.cnf文件,拷贝其中一个到/etc/并改名为my.cnf)中
【修改my.snf】
vi /etc/my.cnf
将client,server项均修改成以下内容
#socket = /var/lib/mysql/mysql.sock ##原内容,为了更稳妥用“#”注释此行
socket = /home/data/mysql/mysql.sock #加上此行
【修改MySQL启动脚本,更新datadir为实际存放路径】
vi /etc/rc.d/init.d/mysql
#datadir=/var/lib/mysql##注释此行
datadir=/home/data/mysql ##
/etc/rc.d/init.d/mysql start //重新启动MySQL服务,如果工作正常移动就成功了,
【修改后的MySQL目录】
1、数据库目录 /home/data/mysql
2、配置文件目录 /etc/my.cnf ; /usr/share/mysql(mysql.server命令及配置文件)
3、相关命令目录 /usr/bin(mysqladmin mysqldump等命令)
4、启动脚本目录 /etc/rc.d/init.d/(启动脚本文件mysql的目录)
参考;rpm安装mysql http://my.oschina.net/wenic705/blog/6126
4.安装apache
下载 httpd-2.2.22.tar.gz
#cd /usr/local/src
#tar -zxvf httpd-2.2.22.tar.gz
#mv httpd-2.2.22 http
【apache安装到/usr/local/apache目录下,httpd.conf安装到:/etc/httpd目录下】
#./configure --prefix=/usr/local/apache --sysconfdir=/etc/httpd --enable-so --enable-rewrite --enable-mods-shared=most
#make
#make install
# /usr/local/apache/bin/apachectl start //启动http服务
【将apache注册为系统服务】
首先将apachectl命令拷贝至/etc/rc.d/init.d目录下,改名为httpd
cp /usr/local/apache/bin/apachectl /etc/rc.d/init.d/httpd
使用编辑器打开httpd文件,并在第一行#!/bin/sh下增加两行文字如下
# chkconfig: 35 70 30
# description: Apache
接着注册该服务
chkconfig --add httpd
service httpd start
chkconfig httpd on
参考:
http://tonychiu.blog.51cto.com/656605/313693
5.安装php
下载php-5.4.3.tar.gz
#cd /usr/local/src
#tar -zxvf php-5.4.3.tar.gz
# cd php
#./configure --prefix=/usr/local/php --with-apxs2=/usr/local/apache/bin/apxs --with-config-file-path=/etc
/* ./configure 时提示libxml2没找到,在centos5.8光盘找到libxml2-2.6.26-2.1.12.el5_7.2.i386.rpm,libxml2-devel-2.6.26-2.1.12.el5_7.2.i386.rpm,zlib-devel-1.2.3-4.el5.i386.rpm,zlib-1.2.3-4.el5.i386.rpm全装上先 */
#make
#make install
#cd /usr/local/src/php
#cp php.ini-development /etc
#cd /etc
#mv php.ini-development php.ini
【修改apache的httpd.conf】
#vi /etc/httpd/httpd.conf
添加:
AddType application/x-httpd-php .php
AddType application/x-httpd-php-source .phps
注意将这两行添加在其它AddType后面
确保文件中有下面一段,如果没有地话就添加在所有LoadModule之后
LoadModulephp5_module modules/libphp5.so (一般安装php时带--with-apxs2=XXX时会自动添加)
找到DirectoryIndex index.html index.html.var 这一行,在其后面写上index.php
【】
在/usr/local/apache/htdocs/下面建立php文件。
# vi /usr/local/apache/htdocs/index.php
输入:
<?
phpinfo();
?>
重启apache服务器
# /usr/local/apache/bin/apachectl restart
【重启httpd时提示:cannot restore segment prot after reloc: Permission denied】
在linux上安装有些东西时会出现 Permission denied 的情况:以下就是解决它的办法之一
编辑/etc/selinux/config,找到这段:
# This file controls the state of SELinux on the system.
# SELINUX= can take one of these three values:
# enforcing - SELinux security policy is enforced.
# permissive - SELinux prints warnings instead of enforcing.
# disabled - SELinux is fully disabled.
SELINUX=enforcing
把 SELINUX=enforcing 注释掉:#SELINUX=enforcing ,然后新加一行为:
SELINUX=disabled保存,关闭。
……
编辑/etc/sysconfig/selinux,找到:
# This file controls the state of SELinux on the system.
# SELINUX= can take one of these three values:
# enforcing - SELinux security policy is enforced.
# permissive - SELinux prints warnings instead of enforcing.
# disabled - SELinux is fully disabled.
SELINUX=enforcing如果SELINUX已经是 SELINUX=disabled,那么就不用改了,否则就把SELINUX=enforcing 注释掉,新加一行:
SELINUX=disabled保存,退出。
如果你碰到其他类似提示:
cannot restore segment prot after reloc: Permission denied
哪应该是SELinux的问题,可以考虑把它关闭。
————————————————————————————-
如果还不行,在你保证SElinux 被disable后.还执行下
chcon -t texrel_shlib_t
如: chcon -t texrel_shlib_t /路径/路径/名字.so (这个文件视具体执行文件.)
参考:
1、linux下apache+php+mysql安装配置文档 http://blog.csdn.net/irwin_chen/article/details/7359022
2、linux下apache+php+mysql升级安装过程 http://school.21tx.com/2008/10/20/13911.html

相关文章推荐
- linux下apache、mysql、php安装配置详细笔记
- Linux+Apache+Mysql+Php源码安装
- Linux下源码包安装Apache+Mysql+Php
- CentOS 6.3下源码安装LAMP(Linux+Apache+Mysql+Php)环境
- CentOS 6下源码安装LAMP(Linux+Apache+Mysql+Php)环境
- Ubuntu上安装PHP环境-mysql+apache+php-Linux操作系统
- Linux+Apache+MySQL+php (LAMP)安装配置
- linux下apache+mysql+php安装
- CentOS 6.3 源码安装LAMP(Linux+Apache+Mysql+Php)环境
- linux中编译安装Apache、PHP、MySQL(上)
- CentOS环境下yum安装LAMP(Linux+Apache+Mysql+php)
- 修改原CentOS 6.3下源码安装LAMP(Linux+Apache+Mysql+Php)环境产生错误
- Linux下源码包安装mysql、apache以及php
- Linux下Apache PHP MYSQL 默认安装路径
- linux下的php+mysql+apache安装
- linux下源码安装mysql+apache+php+phpMyAdmin小记
- linux nginx+apache+php+mysql 安装配置
- LAMP----linux+apache+mysql+php详细安装步骤之二mysql篇
- LAMP----linux+apache+mysql+php详细安装步骤之三php篇
- php_linux_centos6.4_安装mysql_apache_php