用程序实现HTTP压缩和缓存
2012-06-03 12:22
239 查看
用Asp.Net开发Web应用时,为了减少请求次数和流量,可以在IIS里配置gzip压缩以及开启客户端缓存。园子里已经有很多文章介绍了如何在IIS里开启压缩和缓存,但我想搞清楚该如何自己写代码来实现http压缩或者缓存,这样做的原因主要有下面两点:
1.IIS的版本不同,启用IIS的http压缩的方式也不同,IIS7还好一些,但对于IIS6来说,稍微麻烦一点;
2.如果我把应用部署在虚拟空间上,是没办法去设置虚拟主机的IIS的
所以了解如何用程序实现http压缩和缓存还是很有必要的。
实现压缩:在.net的System.IO.Compression命名空间里,有两个类可以帮助我们压缩response中的内容:DeflateStream和GZIPStream,分别实现了deflate和gzip压缩,可以利用这两个类来实现http压缩。
实现缓存:通过在response的header中加入ETag、Expires或LastModified,即可启用浏览器缓存。
下面我们创建一个小小的Asp.net Mvc2 App,然后逐步为它加入压缩和缓存。
首先新建一个Asp.net Mvc2的web application,建好后整个solution如下图:
实现缓存
要缓存的文件包括js、css、图片等静态文件。我在上面已经提到了,要使浏览器能够缓存这些文件,需要在response的header中加入相应的标记。要做到这一点,我们首先要使我们的程序可以控制到这些文件的response输出。用mvc的controller是一个不错的方法,所以首先在Global.asax.cs中加入下面的路由规则:
上面加粗的代码增加了一条url路由规则,匹配以Cache开头的url,并且指定了Controller为Cache。参数action指定请求的是css还是js,resourceName指定请求的资源的文件名,version是css或js文件的版本。加入这个version参数的目的是为了刷新客户端的缓存,当css或js文件做了改动时,只需要在url中改变这个version值,客户端浏览器就会认为这是一个新的资源,从而请求服务器获取最新版本。
可能你会有疑问,加了这个路由规则之后,在View中引用css和js的方法是不是得变一下才行呢?没错,既然我要用程序控制js或css的输出,那么在View中引用js和css的方式也得做些改变。引用js和css的常规方法如下:
这种引用方式是不会匹配到我们新加的路由的,所以在View中,要改成如下的方式:
下面我们先实现这个CacheController。添加一个新的Controller,名为CacheController,并为它添加两个Action:
添加的两个Action为Css和Js,分别用于处理对css和js的请求。其实对css和对js请求的逻辑是差不多的,都是读取服务器上相应资源的文件内容,然后发送到客户端,不同的只是css和js文件所在的目录不同而已,所以我们添加一个类来处理对资源的请求。
在Controllers下添加一个类,名为ResourceHandler,代码如下:
在上面的代码中,ProecesRequest负责处理对css和js的请求,先判断资源是否在客户端浏览器中缓存了,如果没有缓存,再读取css或js文件,并在header中加入和缓存相关的header,发送到客户端。
在这里有必要解释一下IsCachedOnBrowser这个方法。你可能会质疑这个方法是否有存在的必要:既然浏览器已经缓存了某个资源,那么在缓存过期之前,浏览器就不会再对服务器发出请求了,所以这个方法是不会被调用的。这个方法一旦被调用,那说明浏览器在重新请求服务器,再次读取资源文件不就行了吗,为什么还要判断一次呢?
其实,即使客户端缓存的资源没有过期,浏览器在某些时候也会重新请求服务器的,例如按F5刷新的时候。用户按了浏览器的刷新按钮之后,浏览器就会重新请求服务器,并利用LastModified或ETag来询问服务器资源是否已经改变,所以IsCachedOnBrowser这个方法就是用来处理这种情况的:读出Request中的If-Modified-Since,然后和资源的最后修改时间做比较,如果资源没被修改,则直接返回304的代码,告知浏览器只需要从缓存里取就行了。
下面在CacheController中使用这个ResourceHandler。先增加一个CacheResult的类,继承自ActionReult:
修改CacheController如下:
可以看到,由于version只是用来改变url更新缓存的,对于我们处理资源的请求是没用的,所以我们在这两个Action中都忽略了这两个参数。
缓存的逻辑到这里就完成大部分了,下面我们为UrlHelper加两个扩展方法,方便我们在View中使用。增加一个UrlHelperExtensions的类,代码如下:
version配置在web.config的appSettings节点下。然后修改Site.Master中对css和js的引用:
这样,缓存基本上算是完成了,但我们还漏了一个很重要的问题,那就是css中对图片的引用。假设在site.css中有下面一段css:
然后再访问~/Home/Index时就会有一个404的错误,如下图:

由于css中对图片的链接采用的是相对路径,所以浏览器自动计算出http://localhost:37311/Cache/Css/12/images/bg.jpg这个路径,但服务器上并不存在这个文件,所以就有了404的错误。解决这个问题的方法是再加一个路由规则:
这样就把对~/Cache/Css/12/images/bg.jpg的请求路由到了CacheController的CssImage这个Action上。下面我们为CacheController加上CssImage这个Action:
然后修改ResourceHandler类,让他支持image资源的处理如下:
再次访问~/Home/Index,可以看到css中的image已经正常了:
到这里,缓存的实现可以说已经完成了,但总觉得还有个问题很纠结,那就是在修改css或js之后,如何更新缓存?上面的代码中,可以修改web.config中的一个配置来改变version值,从而达到更新缓存的目的,但这是一个全局的配置,改变这个配置后,所有的css和js的url都会跟着变。这意味着即使我们只改动其中一个css文件,所有的资源文件的缓存都失效了,因为url都变了。为了改进这一点,我们需要修改version的取值方式,让他不再读取web.config中的配置,而是以资源的最后修改时间作为version值,这样一旦某个资源文件的最后修改时间变了,该资源的缓存也就跟着失效了,但并不影响其他资源的缓存。修改UrlHelperExtensions的Cache方法如下:
实现HTTP压缩
在文章的开头已经提到,DeflateStream和GZIPStream可以帮助我们实现Http压缩。让我们来看一下如何使用这两类。
首先要清楚的是我们要压缩的是文本内容,例如css、js以及View(aspx),图片不需要压缩。
为了压缩css和js,需要修改ResourceHandler类:
加粗的代码是修改的内容,并且只用了gzip压缩,并没有用deflate压缩,有兴趣的同学可以改一改。
为了压缩View(aspx),我们需要添加一个ActionFilter,代码如下:
然后为HomeController添加这个Filter:
这样就可以压缩View了。
最终的效果如下图:
第一次访问:
第二次访问:
1.IIS的版本不同,启用IIS的http压缩的方式也不同,IIS7还好一些,但对于IIS6来说,稍微麻烦一点;
2.如果我把应用部署在虚拟空间上,是没办法去设置虚拟主机的IIS的
所以了解如何用程序实现http压缩和缓存还是很有必要的。
实现压缩:在.net的System.IO.Compression命名空间里,有两个类可以帮助我们压缩response中的内容:DeflateStream和GZIPStream,分别实现了deflate和gzip压缩,可以利用这两个类来实现http压缩。
实现缓存:通过在response的header中加入ETag、Expires或LastModified,即可启用浏览器缓存。
下面我们创建一个小小的Asp.net Mvc2 App,然后逐步为它加入压缩和缓存。
首先新建一个Asp.net Mvc2的web application,建好后整个solution如下图:

实现缓存
要缓存的文件包括js、css、图片等静态文件。我在上面已经提到了,要使浏览器能够缓存这些文件,需要在response的header中加入相应的标记。要做到这一点,我们首先要使我们的程序可以控制到这些文件的response输出。用mvc的controller是一个不错的方法,所以首先在Global.asax.cs中加入下面的路由规则:
public static void RegisterRoutes(RouteCollection routes)
{routes.IgnoreRoute("{resource}.axd/{*pathInfo}");routes.MapRoute(
"Default", // 路由名称
"{controller}/{action}/{id}", // 带有参数的 URLnew { controller = "Home", action = "Index", id = UrlParameter.Optional } // 参数默认值);
routes.MapRoute([/b]
"Cache", // [/b]路由名称[/b][/b]
"Cache/{action}/{version}/{resourceName}",[/b]new[/b]
{[/b]controller = "Cache",[/b]
action = "Css",[/b]
resourceName = "",[/b]
version = "1"[/b]
} // [/b]参数默认值[/b][/b]
);[/b]
}
上面加粗的代码增加了一条url路由规则,匹配以Cache开头的url,并且指定了Controller为Cache。参数action指定请求的是css还是js,resourceName指定请求的资源的文件名,version是css或js文件的版本。加入这个version参数的目的是为了刷新客户端的缓存,当css或js文件做了改动时,只需要在url中改变这个version值,客户端浏览器就会认为这是一个新的资源,从而请求服务器获取最新版本。
可能你会有疑问,加了这个路由规则之后,在View中引用css和js的方法是不是得变一下才行呢?没错,既然我要用程序控制js或css的输出,那么在View中引用js和css的方式也得做些改变。引用js和css的常规方法如下:
<link href="../../Content/Site.css" rel="stylesheet" type="text/css" />
<script src="../../Scripts/jquery-1.4.1.js" language="javascript" type="text/javascript"></script>
这种引用方式是不会匹配到我们新加的路由的,所以在View中,要改成如下的方式:
<link href="/Cache/Css/1/site" rel="Stylesheet" type="text/css" />
<script src="/Cache/Js/1/jquery-1.4.1" language="javascript" type="text/javascript"></script>
下面我们先实现这个CacheController。添加一个新的Controller,名为CacheController,并为它添加两个Action:
using System.Web.Mvc;
namespace MvcApplication1.Controllers
{public class CacheController : Controller
{public ActionResult Css(string resourceName, string version)
{throw new System.NotImplementedException();
}
public ActionResult Js(string resourceName, string version)
{throw new System.NotImplementedException();
}
}
}
添加的两个Action为Css和Js,分别用于处理对css和js的请求。其实对css和对js请求的逻辑是差不多的,都是读取服务器上相应资源的文件内容,然后发送到客户端,不同的只是css和js文件所在的目录不同而已,所以我们添加一个类来处理对资源的请求。
在Controllers下添加一个类,名为ResourceHandler,代码如下:
using System;
using System.IO;
using System.Web;
namespace MvcApplication1.Controllers
{public class ResourceHandler
{private static readonly TimeSpan CacheDuration = TimeSpan.FromDays(30);
private string _contentType;
private string _resourcePath;
private HttpContextBase _context;
public ResourceHandler(string resourceName, string resourceType, HttpContextBase context)
{ParseResource(resourceName, resourceType, context);
}
public string PhysicalResourcePath { get; private set; }public DateTime LastModifiedTime { get; private set; }private void ParseResource(string resourceName, string resourceType, HttpContextBase context)
{if (resourceType.ToLower() == "css")
{_contentType = @"text/css";
_resourcePath = string.Format("~/Content/{0}.css", resourceName);}
if (resourceType.ToLower() == "js")
{_contentType = @"text/javascript";
_resourcePath = string.Format("~/Scripts/{0}.js", resourceName);}
_context = context;
PhysicalResourcePath = context.Server.MapPath(_resourcePath);
LastModifiedTime = File.GetLastWriteTime(PhysicalResourcePath);
}
public void ProcessRequest()
{if (IsCachedOnBrowser()) return;
byte[] bts = File.ReadAllBytes(PhysicalResourcePath);
WriteBytes(bts);
}
protected bool IsCachedOnBrowser()
{var ifModifiedSince = _context.Request.Headers["If-Modified-Since"];
if (!string.IsNullOrEmpty(ifModifiedSince))
{var time = DateTime.Parse(ifModifiedSince);
//加1秒的原因是request的header里的modified time没有精确到毫秒,而_lastModified是精确到毫秒的
if (time.AddSeconds(1) >= LastModifiedTime)
{var response = _context.Response;
response.ClearHeaders();
response.Cache.SetLastModified(LastModifiedTime);
response.Status = "304 Not Modified";
response.AppendHeader("Content-Length", "0");return true;
}
}
return false;
}
private void WriteBytes(byte[] bytes)
{var response = _context.Response;
response.AppendHeader("Content-Length", bytes.Length.ToString());response.ContentType = _contentType;
response.Cache.SetCacheability(HttpCacheability.Public);
response.Cache.SetExpires(DateTime.Now.Add(CacheDuration));
response.Cache.SetMaxAge(CacheDuration);
response.Cache.SetLastModified(LastModifiedTime);
response.OutputStream.Write(bytes, 0, bytes.Length);
response.Flush();
}
}
}
在上面的代码中,ProecesRequest负责处理对css和js的请求,先判断资源是否在客户端浏览器中缓存了,如果没有缓存,再读取css或js文件,并在header中加入和缓存相关的header,发送到客户端。
在这里有必要解释一下IsCachedOnBrowser这个方法。你可能会质疑这个方法是否有存在的必要:既然浏览器已经缓存了某个资源,那么在缓存过期之前,浏览器就不会再对服务器发出请求了,所以这个方法是不会被调用的。这个方法一旦被调用,那说明浏览器在重新请求服务器,再次读取资源文件不就行了吗,为什么还要判断一次呢?
其实,即使客户端缓存的资源没有过期,浏览器在某些时候也会重新请求服务器的,例如按F5刷新的时候。用户按了浏览器的刷新按钮之后,浏览器就会重新请求服务器,并利用LastModified或ETag来询问服务器资源是否已经改变,所以IsCachedOnBrowser这个方法就是用来处理这种情况的:读出Request中的If-Modified-Since,然后和资源的最后修改时间做比较,如果资源没被修改,则直接返回304的代码,告知浏览器只需要从缓存里取就行了。
下面在CacheController中使用这个ResourceHandler。先增加一个CacheResult的类,继承自ActionReult:
using System;
using System.Web.Mvc;
namespace MvcApplication1.Controllers
{public class CacheResult : ActionResult
{private readonly string _resourceName;
private readonly string _type;
public CacheResult(string resourceName, string type)
{_resourceName = resourceName;
_type = type;
}
public override void ExecuteResult(ControllerContext context)
{if (context == null)
throw new ArgumentNullException("context");var handler = new ResourceHandler(_resourceName, _type, context.HttpContext);[/b]
handler.ProcessRequest();[/b]
}
}
}
修改CacheController如下:
using System.Web.Mvc;
namespace MvcApplication1.Controllers
{public class CacheController : Controller
{public ActionResult Css(string resourceName, string version)
{return new CacheResult(resourceName, "css");
}
public ActionResult Js(string resourceName, string version)
{return new CacheResult(resourceName, "js");
}
}
}
可以看到,由于version只是用来改变url更新缓存的,对于我们处理资源的请求是没用的,所以我们在这两个Action中都忽略了这两个参数。
缓存的逻辑到这里就完成大部分了,下面我们为UrlHelper加两个扩展方法,方便我们在View中使用。增加一个UrlHelperExtensions的类,代码如下:
using System.Web.Mvc;
namespace MvcApplication1
{public static class UrlHelperExtensions
{public static string CssCache(this UrlHelper helper, string fileName)
{return helper.Cache("Css", fileName);}
public static string JsCache(this UrlHelper helper, string fileName)
{return helper.Cache("Js", fileName);}
private static string Cache(this UrlHelper helper, string resourceType, string resourceName)
{var version = System.Configuration.ConfigurationManager.AppSettings["ResourceVersion"];
var action = helper.Action(resourceType, "Cache");
return string.Format("{0}/{1}/{2}", action, version, resourceName);}
}
}
version配置在web.config的appSettings节点下。然后修改Site.Master中对css和js的引用:
<link href="<%=Url.CssCache("site") %>" rel="Stylesheet" type="text/css" /><script src="<%=Url.JsCache("jquery-1.4.1") %>" language="javascript" type="text/javascript"></script>这样,缓存基本上算是完成了,但我们还漏了一个很重要的问题,那就是css中对图片的引用。假设在site.css中有下面一段css:
body
{background-image:url(images/bg.jpg);
}
然后再访问~/Home/Index时就会有一个404的错误,如下图:

由于css中对图片的链接采用的是相对路径,所以浏览器自动计算出http://localhost:37311/Cache/Css/12/images/bg.jpg这个路径,但服务器上并不存在这个文件,所以就有了404的错误。解决这个问题的方法是再加一个路由规则:
routes.MapRoute(
"CacheCssImage", // 路由名称
"Cache/Css/{version}/images/{resourceName}",new
{controller = "Cache",
action = "CssImage",
resourceName = "",
version = "1",
image = ""
} // 参数默认值
);
这样就把对~/Cache/Css/12/images/bg.jpg的请求路由到了CacheController的CssImage这个Action上。下面我们为CacheController加上CssImage这个Action:
using System.Web.Mvc;
namespace MvcApplication1.Controllers
{public class CacheController : Controller
{public ActionResult Css(string resourceName, string version)
{return new CacheResult(resourceName, "css");
}
public ActionResult Js(string resourceName, string version)
{return new CacheResult(resourceName, "js");
}
public ActionResult CssImage(string resourceName, string version)[/b]
{[/b]return new CacheResult(resourceName, "image");[/b]
}[/b]
}
}
然后修改ResourceHandler类,让他支持image资源的处理如下:
using System;
using System.IO;
using System.Web;
namespace MvcApplication1.Controllers
{public class ResourceHandler
{...
private void ParseResource(string resourceName, string resourceType, HttpContextBase context)
{if (resourceType.ToLower() == "css")
{_contentType = @"text/css";
_resourcePath = string.Format("~/Content/{0}.css", resourceName);}
if (resourceType.ToLower() == "js")
{_contentType = @"text/javascript";
_resourcePath = string.Format("~/Scripts/{0}.js", resourceName);}
if (resourceType.ToLower() == "image")[/b]
{[/b]string ext = Path.GetExtension(resourceName);[/b]
if (string.IsNullOrEmpty(ext))[/b]
{[/b]ext = ".jpg";[/b]
}[/b]
_contentType = string.Format("image/{0}", ext.Substring(1));[/b]_resourcePath = string.Format("~/Content/images/{0}", resourceName);[/b]}[/b]
...
}
...
}
}
再次访问~/Home/Index,可以看到css中的image已经正常了:

到这里,缓存的实现可以说已经完成了,但总觉得还有个问题很纠结,那就是在修改css或js之后,如何更新缓存?上面的代码中,可以修改web.config中的一个配置来改变version值,从而达到更新缓存的目的,但这是一个全局的配置,改变这个配置后,所有的css和js的url都会跟着变。这意味着即使我们只改动其中一个css文件,所有的资源文件的缓存都失效了,因为url都变了。为了改进这一点,我们需要修改version的取值方式,让他不再读取web.config中的配置,而是以资源的最后修改时间作为version值,这样一旦某个资源文件的最后修改时间变了,该资源的缓存也就跟着失效了,但并不影响其他资源的缓存。修改UrlHelperExtensions的Cache方法如下:
private static string Cache(this UrlHelper helper, string resourceType, string resourceName)
{//var version = System.Configuration.ConfigurationManager.AppSettings["ResourceVersion"];
var handler = new ResourceHandler(resourceName, resourceType, helper.RequestContext.HttpContext);[/b]
var version = handler.LastModifiedTime.Ticks;[/b]
var action = helper.Action(resourceType, "Cache");
return string.Format("{0}/{1}/{2}", action, version, resourceName);}
实现HTTP压缩
在文章的开头已经提到,DeflateStream和GZIPStream可以帮助我们实现Http压缩。让我们来看一下如何使用这两类。
首先要清楚的是我们要压缩的是文本内容,例如css、js以及View(aspx),图片不需要压缩。
为了压缩css和js,需要修改ResourceHandler类:
using System;
using System.IO;
using System.IO.Compression;
using System.Web;
namespace MvcApplication1.Controllers
{public class ResourceHandler
{private static readonly TimeSpan CacheDuration = TimeSpan.FromDays(30);
private string _contentType;
private string _resourcePath;
private HttpContextBase _context;
private bool _needCompressed = true;[/b]
public ResourceHandler(string resourceName, string resourceType, HttpContextBase context)
{ParseResource(resourceName, resourceType, context);
}
public string PhysicalResourcePath { get; private set; }public DateTime LastModifiedTime { get; private set; }private void ParseResource(string resourceName, string resourceType, HttpContextBase context)
{if (resourceType.ToLower() == "css")
{_contentType = @"text/css";
_resourcePath = string.Format("~/Content/{0}.css", resourceName);}
if (resourceType.ToLower() == "js")
{_contentType = @"text/javascript";
_resourcePath = string.Format("~/Scripts/{0}.js", resourceName);}
if (resourceType.ToLower() == "image")
{string ext = Path.GetExtension(resourceName);
if (string.IsNullOrEmpty(ext))
{ext = ".jpg";
}
_contentType = string.Format("image/{0}", ext.Substring(1));_resourcePath = string.Format("~/Content/images/{0}", resourceName);_needCompressed = false;[/b]
}
_context = context;
PhysicalResourcePath = context.Server.MapPath(_resourcePath);
LastModifiedTime = File.GetLastWriteTime(PhysicalResourcePath);
}
public void ProcessRequest()
{if (IsCachedOnBrowser()) return;
byte[] bts = File.ReadAllBytes(PhysicalResourcePath);
WriteBytes(bts);
}
public static bool CanGZip(HttpRequestBase request)[/b]
{[/b]string acceptEncoding = request.Headers["Accept-Encoding"];[/b]
if (!string.IsNullOrEmpty(acceptEncoding) && (acceptEncoding.Contains("gzip")))[/b]return true;[/b]
return false;[/b]
}[/b]
protected bool IsCachedOnBrowser()
{var ifModifiedSince = _context.Request.Headers["If-Modified-Since"];
if (!string.IsNullOrEmpty(ifModifiedSince))
{var time = DateTime.Parse(ifModifiedSince);
//加1秒的原因是request的header里的modified time没有精确到毫秒,而_lastModified是精确到毫秒的
if (time.AddSeconds(1) >= LastModifiedTime)
{var response = _context.Response;
response.ClearHeaders();
response.Cache.SetLastModified(LastModifiedTime);
response.Status = "304 Not Modified";
response.AppendHeader("Content-Length", "0");return true;
}
}
return false;
}
private void WriteBytes(byte[] bytes)
{var response = _context.Response;
var needCompressed = CanGZip(_context.Request) && _needCompressed;[/b]
if (needCompressed)[/b]
{[/b]response.AppendHeader("Content-Encoding", "gzip");[/b]using (var stream = new MemoryStream())[/b]
{[/b]using (var writer = new GZipStream(stream, CompressionMode.Compress))[/b]
{[/b]writer.Write(bytes, 0, bytes.Length);[/b]
}[/b]
bytes = stream.ToArray();[/b]
}[/b]
}[/b]
response.AppendHeader("Content-Length", bytes.Length.ToString());response.ContentType = _contentType;
response.Cache.SetCacheability(HttpCacheability.Public);
response.Cache.SetExpires(DateTime.Now.Add(CacheDuration));
response.Cache.SetMaxAge(CacheDuration);
response.Cache.SetLastModified(LastModifiedTime);
response.OutputStream.Write(bytes, 0, bytes.Length);
response.Flush();
}
}
}
加粗的代码是修改的内容,并且只用了gzip压缩,并没有用deflate压缩,有兴趣的同学可以改一改。
为了压缩View(aspx),我们需要添加一个ActionFilter,代码如下:
using System.IO.Compression;
using System.Web;
using System.Web.Mvc;
namespace MvcApplication1.Controllers
{public class CompressFilterAttribute : ActionFilterAttribute
{public override void OnActionExecuting(ActionExecutingContext filterContext)
{var response = filterContext.HttpContext.Response;
HttpRequestBase request = filterContext.HttpContext.Request;
if (!ResourceHandler.CanGZip(request)) return;
response.AppendHeader("Content-encoding", "gzip");response.Filter = new GZipStream(response.Filter, CompressionMode.Compress);
}
}
}
然后为HomeController添加这个Filter:
using System.Web.Mvc;
namespace MvcApplication1.Controllers
{[HandleError]
[CompressFilterAttribute][/b]
public class HomeController : Controller
{public ActionResult Index()
{ViewData["Message"] = "欢迎使用 ASP.NET MVC!";
return View();
}
public ActionResult About()
{return View();
}
}
}
这样就可以压缩View了。
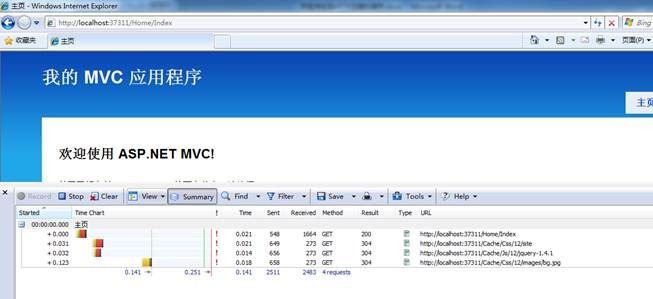
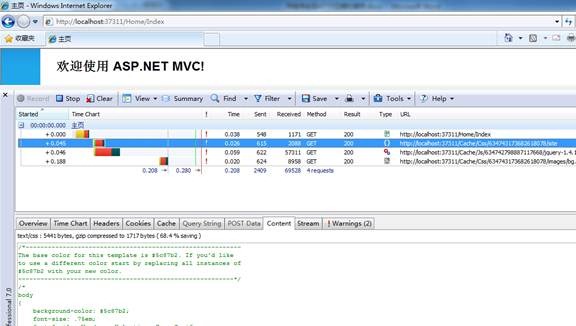
最终的效果如下图:
第一次访问:

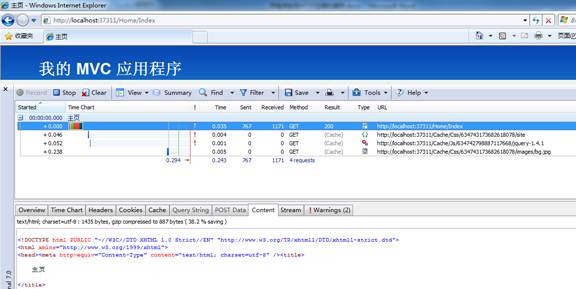
第二次访问:


相关文章推荐
- 用程序实现HTTP压缩和缓存
- C语言实现的一个简单的HTTP程序
- Fragment中存放GridView,结合LruCache、DiskLruCache和HttpURLConnection实现图片下载、缓存
- C语言实现的一个简单的HTTP程序
- Java程序实现压缩某目录
- C语言实现的一个简单的HTTP程序
- 编程实现禁用HTTP缓存与定时刷新
- HTTP COMPRESSION HTTP 压缩实现 (iis6)(翻译自微软知识库文章)
- java 程序实现对图片的压缩生成缩略图并可设定长宽、尺寸压缩率、图片质量
- 实现HTTP页面、资源文件压缩
- CSS,Gzip压缩以及HTTP缓存
- ASIHTTPRequest和ASIDownloadCache实现本地缓存
- C语言实现的一个简单的HTTP程序
- 用ASIHttpRequest实现数据缓存和队列
- 基础知识之php内存缓存实现程序代码
- python实现图片批量压缩程序
- asp.net利用自定义Http处理程序实现URL伪静态之初探
- 程序中内嵌Http服务的实现原型
- 用程序实现压缩access(*.mdb)数据库的方法