iOS开发2:读取plist文件
2012-04-02 21:23
495 查看
在Xcode中建立一个iOS项目后,会自己产生一个.plist文件,点击时会看见它显示的是类似于excel表格:
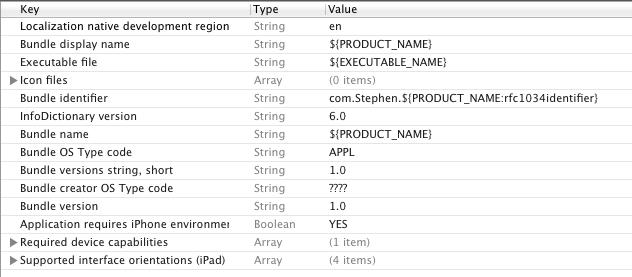
但是,如果打开方式选择Source Code,你会看见它其实是一个xml文件。
我们会做一个小例子,在这个例子中我们自己建立一个plist文件并填入数据,然后运行时读取这个plist文件,并将数据填写在界面上。
首先要知道读取plist文件的方法,一般来说,使用代码
已经足够了,此时可以使用NSLog例程查看array和dictionary的内容。不过,有时候受plist文件内容的限制,array内容可能为空。
其实,用dictionary就已经足够了,在下面的例子里我们也只用dictionary。
1、运行Xcode4.2,新建一个Single View Application,名称为ReadPlistFile,其他设置如下图:

2、新建我们自己的plist文件:
File —> New —> New File,选择Mac OS X下的Property List

文件名为 customInfo,Group选择Supporting Files。
3、单击新建的customInfo.plist,我们添加数据,如下图:
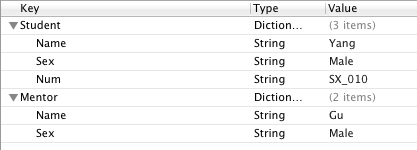
注意,Type一项的类型,选择的是Dictionary,以Source Code打开,显示如下:
4、为视图添加控件:
单击BIDViewController.xib,打开IB,拖几个控件上去,并设置好布局,如下图:
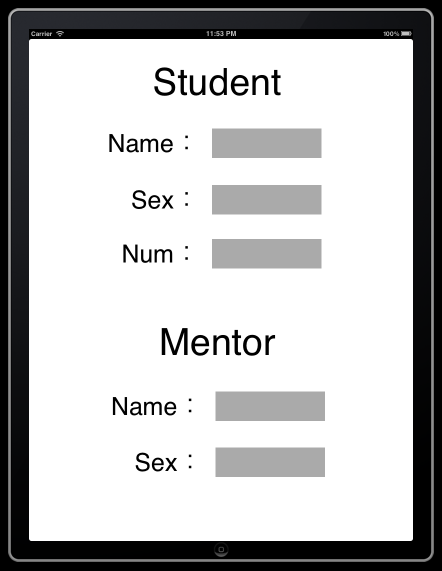
上图中所有的控件都是Label,并设置了字体大小。
5、接下来就是映射呗,把五个灰色的Label都映射到BIDViewController.h文件中,类型都死OutLet,名称依次是stuName,stuSex,stuNum,mtName,mtSex。

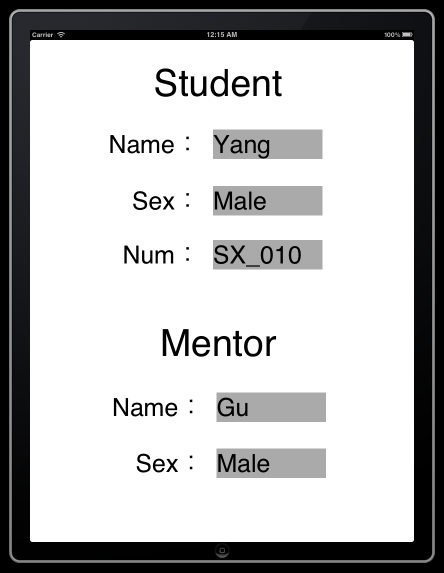
6、单击BIDViewController.m,在viewDidLoad方法中的[super viewDidLoad]之后添加如下代码:
7、运行,查看效果:
但是,如果打开方式选择Source Code,你会看见它其实是一个xml文件。
我们会做一个小例子,在这个例子中我们自己建立一个plist文件并填入数据,然后运行时读取这个plist文件,并将数据填写在界面上。
首先要知道读取plist文件的方法,一般来说,使用代码
1 | NSString *plistPath = [[NSBundle mainBundle] pathForResource:@ "listFileName" ofType:@ "plist" ]; |
2 | NSArray *array = [[NSArray alloc] initWithContentsOfFile:plistPath]; |
3 | NSDictionary *dictionary = [[NSDictionary alloc] initWithContentsOfFile:plistPath]; |
其实,用dictionary就已经足够了,在下面的例子里我们也只用dictionary。
1、运行Xcode4.2,新建一个Single View Application,名称为ReadPlistFile,其他设置如下图:
2、新建我们自己的plist文件:
File —> New —> New File,选择Mac OS X下的Property List
文件名为 customInfo,Group选择Supporting Files。
3、单击新建的customInfo.plist,我们添加数据,如下图:
注意,Type一项的类型,选择的是Dictionary,以Source Code打开,显示如下:
01 | <? xml version = "1.0" encoding = "UTF-8" ?> |
02 | <!DOCTYPE plist PUBLIC "-//Apple//DTD PLIST 1.0//EN" "http://www.apple.com/DTDs/PropertyList-1.0.dtd"> |
03 | < plist version = "1.0" > |
04 | < dict > |
05 | < key >Student</ key > |
06 | < dict > |
07 | < key >Name</ key > |
08 | < string >Yang</ string > |
09 | < key >Sex</ key > |
10 | < string >Male</ string > |
11 | < key >Num</ key > |
12 | < string >SX_010</ string > |
13 | </ dict > |
14 | < key >Mentor</ key > |
15 | < dict > |
16 | < key >Name</ key > |
17 | < string >Gu</ string > |
18 | < key >Sex</ key > |
19 | < string >Male</ string > |
20 | </ dict > |
21 | </ dict > |
22 | </ plist > |
单击BIDViewController.xib,打开IB,拖几个控件上去,并设置好布局,如下图:
上图中所有的控件都是Label,并设置了字体大小。
5、接下来就是映射呗,把五个灰色的Label都映射到BIDViewController.h文件中,类型都死OutLet,名称依次是stuName,stuSex,stuNum,mtName,mtSex。
6、单击BIDViewController.m,在viewDidLoad方法中的[super viewDidLoad]之后添加如下代码:
01 | //首先读取studentInfo.plist中的数据 |
02 | NSString *plistPath = [[NSBundle mainBundle] pathForResource:@ "customInfo" ofType:@ "plist" ]; |
03 | NSDictionary *dictionary = [[NSDictionary alloc] initWithContentsOfFile:plistPath]; |
04 |
05 | //将学生信息填入视图 |
06 | NSDictionary *tmpInfo = [dictionary objectForKey: @ "Student" ]; |
07 | self.stuName.text = [NSString stringWithFormat:@ "%@" , [tmpInfo objectForKey: @ "Name" ]]; |
08 | self.stuSex.text = [NSString stringWithFormat:@ "%@" , [tmpInfo objectForKey: @ "Sex" ]]; |
09 | self.stuNum.text = [NSString stringWithFormat:@ "%@" , [tmpInfo objectForKey: @ "Num" ]]; |
10 |
11 | //将导师信息写入视图 |
12 | tmpInfo = [dictionary objectForKey: @ "Mentor" ]; |
13 | self.mtName.text = [NSString stringWithFormat:@ "%@" , [tmpInfo objectForKey: @ "Name" ]]; |
14 | self.mtSex.text = [NSString stringWithFormat:@ "%@" , [tmpInfo objectForKey: @ "Sex" ]]; |

相关文章推荐
- iOS开发2:读取plist文件
- iOS开发读取plist文件、iphone中plist文件的
- iOS开发中plist文件的创建与简单读取
- ioS开发中plist文件的创建与简单读取
- iOS开发中plist文件的创建与简单读取(一)
- iOS开发:读取plist文件
- iOS开发时读取plist文件创建和读取的方法
- ios开发中读取本地的plist文件
- iOS开发中plist文件的创建与简单读取(一)
- iOS开发之高级视图—— UITableView(三)读取plist文件
- ios本地文件内容读取json .plist 文件读取
- 关于iOS开发中info.plist文件的解读
- iOS开发之Info.plist文件
- 在IOS中如何读取系统产生的plist文件和自定义的plist文件
- ios开发-程序启动原理&项目中的常见文件(pch文件 & Info.plist)
- IOS开发之_文件规定与Plist文件读写
- ios开发系列之文件的写入读取,NSUserDefaults存储数据,NSFileManager操作文件和文件夹
- iOS开发之数据的写入与读取(plist存储)
- IOS复习Plist文件的读取和写入
- ios开发入门- plist 文件读写