VS高级调试技巧 转自CodeProject (http://www.codeproject.com/KB/debug/Advanced_Debugging.aspx)
2012-01-19 11:57
846 查看
Many of us developers do not look beyond the basic F9, F10, F11, F5 and Watch windows while debugging in Visual Studio. Due to this we end up wasting hours debugging an issue or simulating a condition which ideally could have been achieved in a matter of
minutes if we utilized the rich debugging features available out of the box in Visual Studio.
Advanced debugging tips are scattered all over the web but I thought that a consolidated list would be very useful for developers to embrace and start using the techniques.
1. Magic of "Make Object Id"
2. Attach to process - using macro
3. Immediate Window
- Calling functions directly
- Setting and Displaying variables
4. Debugging a Windows Service
5. Having fun with breakpoints
- Trace Points
- Condition
- Hit Count
- Filter
- Changing breakpoint location
6. Locals/Auto/ Call Stack
Bonus Tip!
Enable Sound when Breakpoint is hit
debugger. Follow the below steps to try it yourself.
Set a Breakpoint on a line of code which uses a variable your want to track as shown below.
Run your application in debug mode and let it stop at the Breakpoint.
Right Click on
In your Watch 1 window, right-click the object variable
You will now see

We can track the object value using this ID even after

If we continue the iteration of for loop
Lastly if you move out of the function then all instances of

exe) is a common requirement. The usual way would be using the Attach To Process window from
Debug -> Attach To Process in Visual Studio. But this can become cumbersome and irritating if we have to do it again and again to test iterative changes. This is where macros come to our rescue.
1. Create a simple console application with a Mainmethod and a method

2. Build the console application. This will generate the exe file in the debug folder. Double click and start the application using this exe.
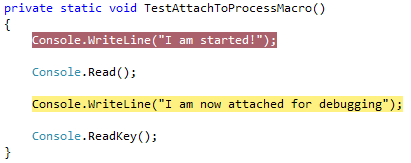
3. The first break point shown in the code above will not be hit (as we are not yet debugging) and you will see the below output in console window.
4. We want to debug from the second breakpoint by attaching to this process so, Now we start recording our macro in 5 simple steps –
i. Click
ii. Recording is started. Now perform the necessary actions to attach to the process as below:
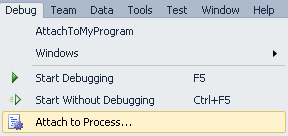
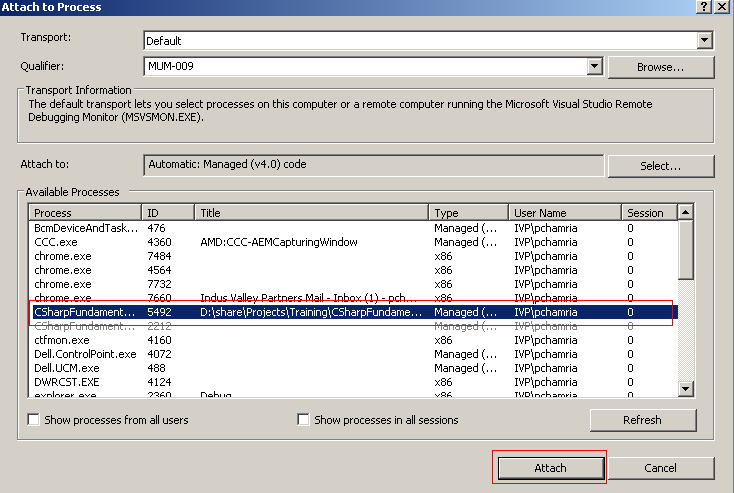
Click Debug -> Attach to Process
In the popup below find your process and click Attach.
iii. Stop recording the macro using Tools -> Macros as below:

iv. Save the macro using Tools -> Macros as below:

v. Upon saving, the macro will appear in the Macro Explorer. I have named it
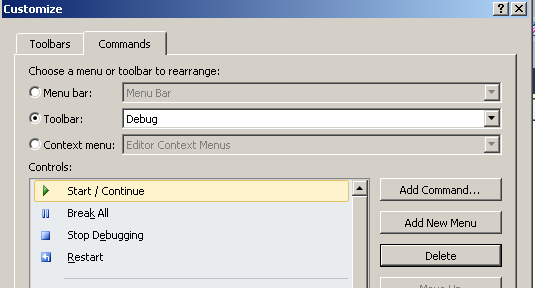
5. Lastly we can also place a shortcut to this macro on the Debug toolbar to make things even simpler.
i. Go to Tools -> Customize -> Commands and under Toolbar dropdown select Debug as below:
ii. Hit the Add Command button and on the below popup select macros under Categories and
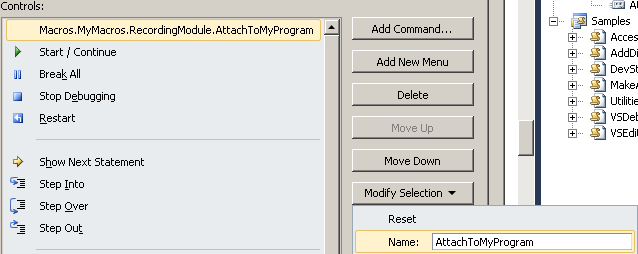
iii. Now from under the Modify Selection rename the command as shown below:
iv. Now the

6. Now close the console application and start again. We will again see the “I am started” message. Now simply hit the
This is where the Immediate window comes is handy. You can open it using the keyboard shortcut Ctrl + Alt + I.
And this is how it works:
We can call this function from Immediate window directly as below:
Upon hitting enter in Immediate window, the breakpoint in the
On proceeding you get the output in the Immediate window too as below:

You can play around with the
Using commands in the Immediate window as shown below we can declare, set and pass a variable to our function.
Below is yet another example to call a function passing a complex object type like object of class
Immediate window commands to test the function:
There is much more you can do with the Immediate window but I leave it up to you to explore more if interested.
what happens in the
Step 1: Set the Output type of the Windows Service to Console Application:
Step 2 : Next get rid of the

Collapse |
Copy Code
and risk forgetting to remove it when done. Better still, this way you can utilize other features of breakpoint by superimposing different conditions of breakpoint on a TracePoint.
Lets see a trace point in action.
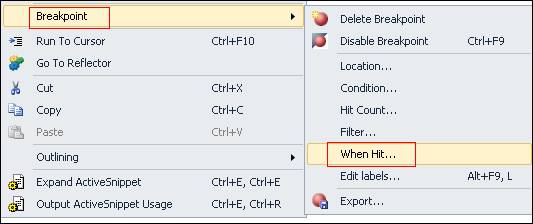
Set a break point at call to

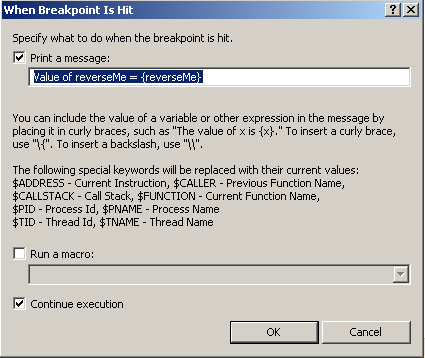
Then right click and click "When Hit.." then check Print a message. In test box copy "Value of reverseMe= {
The breakpoint will get converted into a TracePoint (diamond shaped) as shown below.

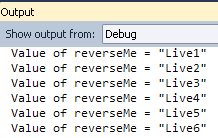
Now whenever the breakpoint is hit, it does not break in the code but continues execution and you will see the value of
Right click the tracepoint we set above and click Condition from under Breakpoints. Then type "
Now the breakpoint will be activated only when
Now the breakpoint will be hit after every 5 iterations. Notice below output is effect of both the Condition and the Hit Count breakpoint.
The hit count shown below says that the breakpoint was hit 54 times between from

Right Click -> Breakpoint -> Filter
Debug -> Windows in the Visual Studio menu bar.
AUTOS: The Autos window displays variables used in the current statement and the previous statement. Helps you concentrate only on the variables being used in and around the current line.
(For Visual Basic.Net, it displays variables in the current statement and three statements on either side of the current statement.)
LOCALS: The Locals window displays variables local to the current context. You can observe values of local variables in a function here. Note that class level variable will not be visible under locals.
CALL STACK: The Call Stack displays the entire tree of function calls leading to the current function call. Can help you trace back the culprit!
Bonus Tip!
Enable Sound when Breakpoint is hit
1. Go to Control Panel -> Sounds and Audio Devices (Windows XP). Its
Control Panel -> Sound in Windows 7.
2. Find and Select “Breakpoint Hit” under Program events in Sounds tab. (see pic below)
3. Choose the sound of your choice and click OK.
4. Now when a breakpoint is hit, you will hear the sound!
minutes if we utilized the rich debugging features available out of the box in Visual Studio.
Advanced debugging tips are scattered all over the web but I thought that a consolidated list would be very useful for developers to embrace and start using the techniques.
Environment
The tips in this article should work in Visual Studio 2008/ 2010. Many of these might still be valid for the next version of Visual Studio.
Tip List
To make going through this article easier, I am breaking it into six different tips which I will present with the help of sample code and screenshots.1. Magic of "Make Object Id"
2. Attach to process - using macro
3. Immediate Window
- Calling functions directly
- Setting and Displaying variables
4. Debugging a Windows Service
5. Having fun with breakpoints
- Trace Points
- Condition
- Hit Count
- Filter
- Changing breakpoint location
6. Locals/Auto/ Call Stack
Bonus Tip!
Enable Sound when Breakpoint is hit
1. Magic of “Make Object Id”
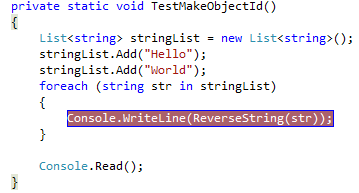
Sometimes we want to track an object even after it went out of the scope. We may need this ability to debug an issue which requires us to track the object until it is garbage collected. This ability is provided with the Object Id feature in Visual Studiodebugger. Follow the below steps to try it yourself.
Set a Breakpoint on a line of code which uses a variable your want to track as shown below.
Run your application in debug mode and let it stop at the Breakpoint.
Right Click on
strand click Add Watch.
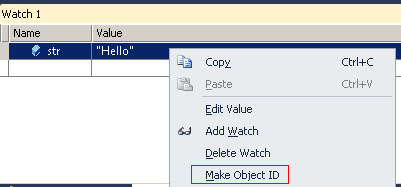
In your Watch 1 window, right-click the object variable
strand choose "Make Object Id" from the context menu.
You will now see
1#appended in the Value column. This is the unique ID given by the debugger to your variable for the current debug session.
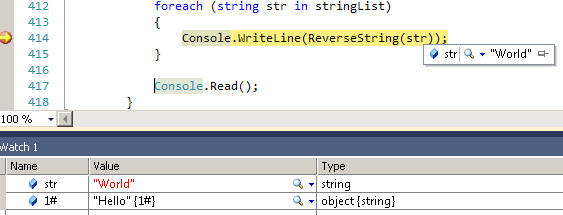
We can track the object value using this ID even after
strgoes out of scope as shown below. Simply put the object id
1#in the watch window to watch its value.
If we continue the iteration of for loop
strchanges its value but
1#remains the same. This tells us that although the previous
strobject has gone out of scope we can still keep track of its value using the Object Id that we assigned to it.
Lastly if you move out of the function then all instances of
strwould go out of scope and you would no longer be able to track
strusing the Watch window. It gets grayed out. However the Object Id
1#is still active and you can continue to track its value as you move through other functions.
2. Attach to process – using macro
There are many tasks that we do in Visual Studio that are repetitive and which can be automated using macros. One such example is attaching to process for debugging. Having the ability to debug an existing running process (Ex: Process of a .net console applicationexe) is a common requirement. The usual way would be using the Attach To Process window from
Debug -> Attach To Process in Visual Studio. But this can become cumbersome and irritating if we have to do it again and again to test iterative changes. This is where macros come to our rescue.
1. Create a simple console application with a Mainmethod and a method
TestAttachToProcessMacroshown below. Make a call to this method from the
Mainfunction.
2. Build the console application. This will generate the exe file in the debug folder. Double click and start the application using this exe.
3. The first break point shown in the code above will not be hit (as we are not yet debugging) and you will see the below output in console window.

i. Click
Record TemporaryMacrofrom the Tool -> Macros menu as shown below:

Click Debug -> Attach to Process
iv. Save the macro using Tools -> Macros as below:
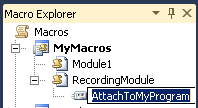
v. Upon saving, the macro will appear in the Macro Explorer. I have named it
AttachToMyProgram.
5. Lastly we can also place a shortcut to this macro on the Debug toolbar to make things even simpler.
i. Go to Tools -> Customize -> Commands and under Toolbar dropdown select Debug as below:
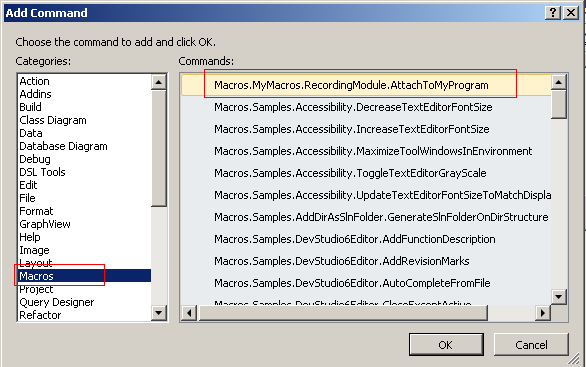
ii. Hit the Add Command button and on the below popup select macros under Categories and
AttachToMyProgramunder commands:
iii. Now from under the Modify Selection rename the command as shown below:
iv. Now the
AttachToMyProgramshortcut show appear in the Debug toolbar as shown below:
6. Now close the console application and start again. We will again see the “I am started” message. Now simply hit the
AttachToMyProcessshortcut on the Debug bar and press any key in the console application window. There you are! You are in the debug session and the second breakpoint is hit. Now you can easily attach to your process with a click of a button.
3. Immediate window
So many times we write a function and wish to debug just that function directly, again and again until it gives the output we need. Many of us have been running the entire application in effort to reach that function every time we debug. Well, that’s unnecessary.This is where the Immediate window comes is handy. You can open it using the keyboard shortcut Ctrl + Alt + I.
And this is how it works:
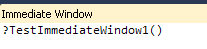
Calling functions directly
Let us try to call the below function directly from the Immediate window:
Upon hitting enter in Immediate window, the breakpoint in the
TestImmediateWindow1()function is hit without you having to debug the entire application.

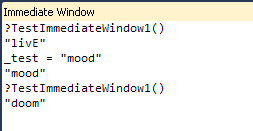
You can play around with the
_testvariable by changing its values and testing the reverse output:
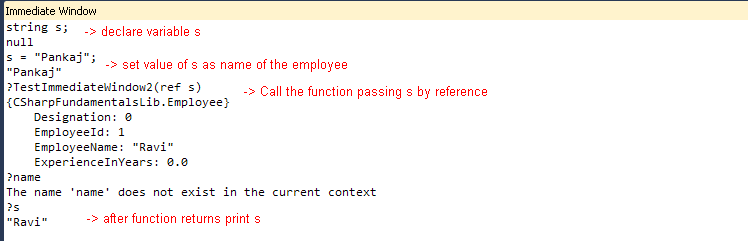
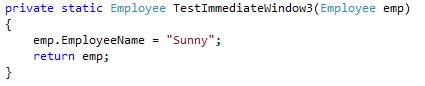
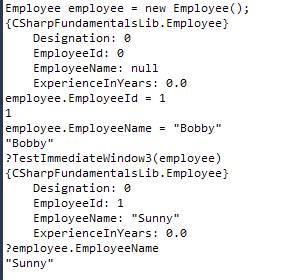
Setting & Displaying variables
We may want to pass a variable to the function we call from the Immediate window. Lets take an example of a function below:Using commands in the Immediate window as shown below we can declare, set and pass a variable to our function.

Employee.
Immediate window commands to test the function:
There is much more you can do with the Immediate window but I leave it up to you to explore more if interested.
4. Debugging a Windows Service
Debugging the windows service can become a daunting task if you are not aware about this tip. You would build and deploy the service and start it. Then from Visual Studio you would use Attach to Process to start debugging. Even then if you need to debugwhat happens in the
OnStartmethod, then you would have to do a
Thread.Sleep()or something so that the
OnStartmethod waits for you while you attach to the process. We can avoid all the pain by this simple tip.
Step 1: Set the Output type of the Windows Service to Console Application:

Program.csfile and instead paste the below code in the Service file which inherits from
ServiceBase. That’s it. Now you can run the windows service in debug and it will run as a console application. Or you can deploy as usual and it will function as a windows service.
Collapse |
Copy Code
partial class MyService : ServiceBase
{ public static void Main(string[] args){/*EDIT: 18th January 2012
* As per suggestion from Blaise in his commments I have added the Debugger.Launch condition so that you
* can attach a debugger to the published service when it is about to start.
* Note: Remember to either remove this code before you release to production or
* do not release to production only in the 'Release' configuration.
* Ref: http://weblogs.asp.net/paulballard/archive/2005/07/12/419175.aspx
*/
#if DEBUG
System.Diagnostics.Debugger.Launch();
#endif
/*EDIT: 18 January 2012
Below is Psuedo code for an alternative way suggested by RudolfHenning in his comment. However, I find
Debugger.Launch() a better option.
#if DEBUG
//The following code is simply to ease attaching the debugger to the service to debug the startup routine
DateTime startTime = DateTime.Now;
// Waiting until debugger is attached
while ((!Debugger.IsAttached) && ((TimeSpan)DateTime.Now.Subtract(startTime)).TotalSeconds < 20) { RequestAdditionalTime(1000);
// Prevents the service from timeout
Thread.Sleep(1000);
// Gives you time to attach the debugger
}
// increase as needed to prevent timeouts
RequestAdditionalTime(5000);
// for Debugging the OnStartmethod <- set breakpoint here,
#endif
*/
var service = new MyService();
/* The flag Environment.UserInteractive is the key here. If its true means the app is running
* in debug mode. So manually call the functions OnStart() and OnStop() else use the ServiceBase
* class to handle it.*/
if (Environment.UserInteractive)
{ service.OnStart(args);
Console.WriteLine("Press any key to stop the service..");Console.Read();
service.OnStop();
}
else
{ServiceBase.Run(service);
}
}
public MyService()
{InitializeComponent();
}
protected override void OnStart(string[] args)
{}
protected override void OnStop()
{}
}
5. Having fun with breakpoints
You can use below variations of breakpoints in isolation or combine them together and enjoy the cocktail!Trace Points (When Hit..)
Sometimes we want to observe the value of one or more variables each time a particular line of code is executed. Doing this by setting a normal breakpoint can be very time consuming. So we usually useConsole.WriteLineto print the value. Instead if it’s a temporary check using TracePoints is better. It serves the same purpose as a Console.WriteLine would. The advantage is that you don’t have to disturb the code by adding the your Console.WriteLine
and risk forgetting to remove it when done. Better still, this way you can utilize other features of breakpoint by superimposing different conditions of breakpoint on a TracePoint.
Lets see a trace point in action.
Set a break point at call to
ReverseStringfunction as shown below.
Then right click and click "When Hit.." then check Print a message. In test box copy "Value of reverseMe= {
reverseMe}". Keep "Continue Execution" checked and click OK.
The breakpoint will get converted into a TracePoint (diamond shaped) as shown below.
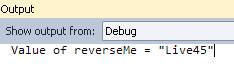
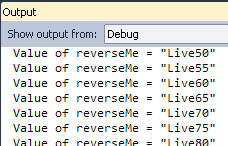
Now whenever the breakpoint is hit, it does not break in the code but continues execution and you will see the value of
reverseMevariable at each hit as below in the output window:
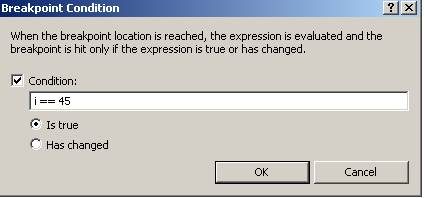
Condition
Condition breakpoints can be used to avoid having to write extra if/ else conditions in our code if we want a breakpoint to be hit only for a particular value.Right click the tracepoint we set above and click Condition from under Breakpoints. Then type "
i==45" in condition text box & click OK. (IMP: NEVER use single "=" in condition. Always use "==".)
Now the breakpoint will be activated only when
i= 45; so the tracepoint should print only “Live45”.
Hit Count
Hit count can be used to find out how many times a breakpoint is hit. Also you can choose when you want break at the breakpoint.Change the Condition breakpoint toi> 45. Then Right Click -> Breakpoint -> Hit Count. Select "break when hit count is a multiple of " and type 5 as the value. Click OK.
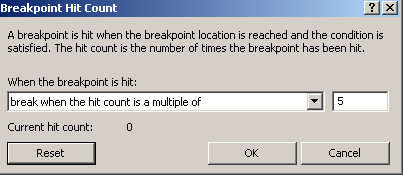
i= 46 to
i= 99, but it broke the execution only after every 5 iterations.
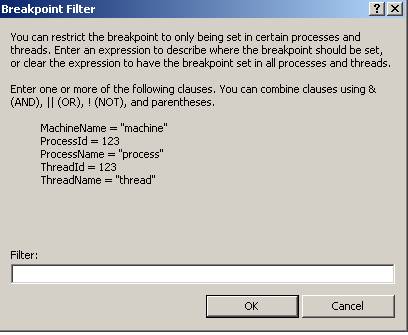
Filter
Useful for multithreaded applications. If multiple threads are calling the same function, you can use filter to specify on which thread should the breakpoint be hit.Right Click -> Breakpoint -> Filter
Changing Breakpoint Location
If you wish to move the breakpoint to a different line then use this option.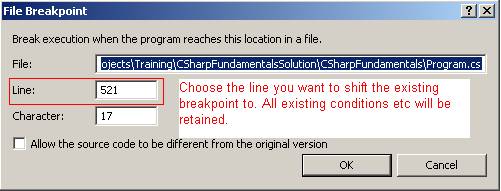
6. Locals/ Autos/ Call Stack
The following three windows can come in handy while debugging. You can access them after you start debugging. Go toDebug -> Windows in the Visual Studio menu bar.
AUTOS: The Autos window displays variables used in the current statement and the previous statement. Helps you concentrate only on the variables being used in and around the current line.
(For Visual Basic.Net, it displays variables in the current statement and three statements on either side of the current statement.)
LOCALS: The Locals window displays variables local to the current context. You can observe values of local variables in a function here. Note that class level variable will not be visible under locals.
CALL STACK: The Call Stack displays the entire tree of function calls leading to the current function call. Can help you trace back the culprit!
Bonus Tip!
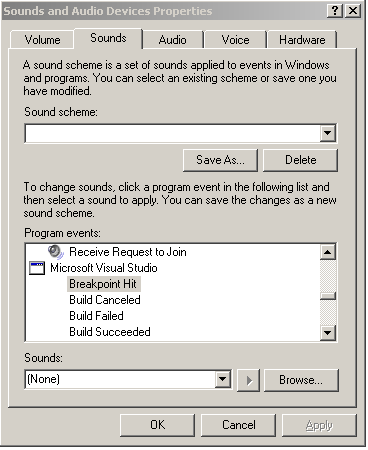
Enable Sound when Breakpoint is hit
1. Go to Control Panel -> Sounds and Audio Devices (Windows XP). Its
Control Panel -> Sound in Windows 7.
2. Find and Select “Breakpoint Hit” under Program events in Sounds tab. (see pic below)
3. Choose the sound of your choice and click OK.
4. Now when a breakpoint is hit, you will hear the sound!

相关文章推荐
- .net 垃圾回收学习[http://www.codeproject.com/KB/dotnet/idisposable.aspx][翻译&&学习][2]
- http://www.codeproject.com/KB/IP/persistentevents.aspx
- .net 垃圾回收学习[http://www.codeproject.com/KB/dotnet/idisposable.aspx][翻译&&学习][2]
- ASP.NET Internals: Viewstate and Page Life Cycle(http://www.codeproject.com/KB/aspnet/aspnetviewstatepagecycle.aspx)
- http://www.codeproject.com/KB/validation/MultipleDataAnnotations.aspx
- ASP.NET Internals: Request Architecture(http://www.codeproject.com/KB/aspnet/aspnetrequestarchitecture.aspx)
- 抓屏的各种方法(http://www.codeproject.com/KB/dialog/screencap.aspx)
- .net 垃圾回收学习[http://www.codeproject.com/KB/dotnet/idisposable.aspx][翻译&&学习][2]
- http://www.codeproject.com/KB/database/Building_Dynamic_SQL.aspx?azid=2
- vc曲线库 http://www.codeproject.com/KB/miscctrl/pgllib.aspx
- Exploring Caching in ASP.NET (http://www.codeproject.com/KB/aspnet/ExploringCaching.aspx)
- http://www.codeproject.com/KB/cs/Hierarchical_Tree.aspx
- Cache Management in ASP.NET(http://www.codeproject.com/KB/web-cache/cachemanagementinaspnet.aspx)
- 数组作为参数传给存储过程(from:http://www.codeproject.com/KB/database/SQLArrayParameterHandling.aspx)
- ListControl參考:http://www.codeproject.com/KB/list/SubItemSel.aspx
- http://www.codeproject.com/script/Articles/ViewDownloads.aspx?aid=9332 多broser
- 如何在 VS 2005 里调试 Javascript http://blog.joycode.com/saucer/archive/2006/10/26/85679.aspx
- http://www.codeplex.com/dasBlog/Release/ProjectReleases.aspx?ReleaseId=12829
- 文件比较 转自http://www.codeproject.com/cpp/vdiff.asp
- 和matlab开发应用有关的网址http://www.codeproject.com/dotnet/matlabeng.asp