创建一个较复杂的 eclipse+android+maven 工程
2011-11-18 11:06
615 查看
转自:http://www.cnblogs.com/luhouxiang/archive/2011/08/29/2158200.html
前面已经说过了怎样通过插件创建一个简单的工程,有了前面的基础,创建一个较复杂的工程就容易了很多。同样是通过已经有了插件,同样如果插件系统中并未存在,还是需要通过Add Archetype进行添加,详细情况请参照上一节。
我们知道还有一种类型android-release-archetype刚好是用来创建较复杂的含有多模块的andriod工程,我们就选用它。
1、同样通过eclipse创建一个新工程
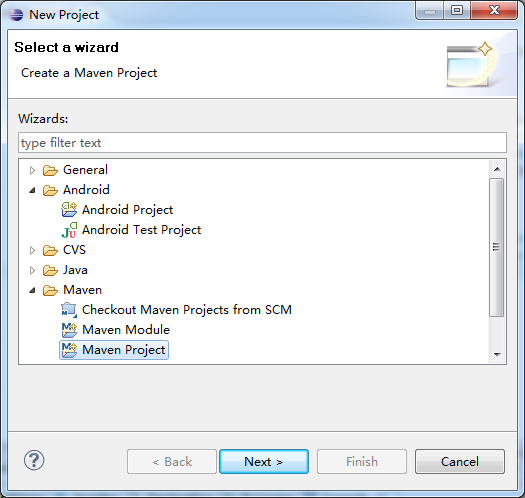
2、点击Next后,采用默认设置,再次点击Next按钮:
如果系统中不存在android-release插件,采用Add Archetype进行添加,添加后我们在列表栏中应能看到此插件

备注:上面是已经添加后才有的 如果没有添加 应点击add Archetype 之后输入
groupid:de.akquinet.android.archetypes
artifactid:android-release
version:1.0.6
添加即可
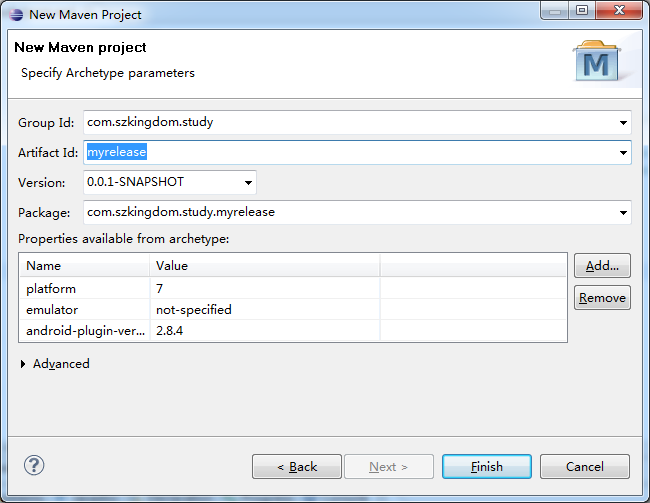
3、选中android-reloease,点击Next按钮,在弹出的对话框中依次填入新工程的
groupid,artifactid,及package
4、点击Finish,对于某些电脑,某些配置可能会报错,形如:
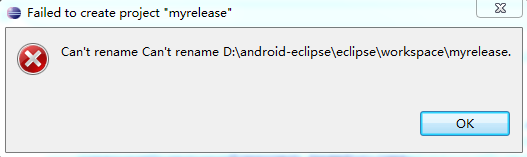
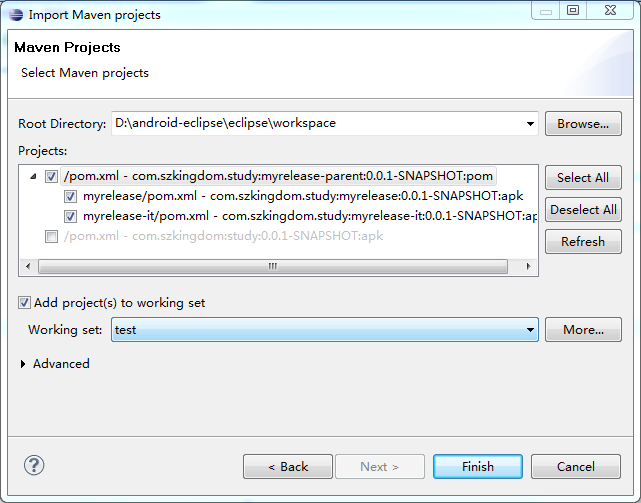
5、不理这些错误,直接通过import将创建的工程映射进来,然后点击Finish完成。如下所示:
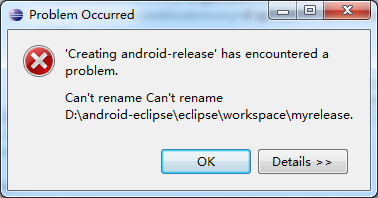
6、应该是插件本身的问题,因为我们这次创建的工程总共有三个,一个父工程,为pom,两个子工程,为apk,实际显示出来的只有两个工程,通过检查,发现是父工程和其中一个子工程重名所致。

7、将父工程改名为myrelease-project,表示此为管理工程。直接选中最上面的myrelease,按F2,表示rename,
一般情况下会弹出如下提示框,

只需再次选中父工程,按F5刷新即可。然后再次按F2重命名为myrelease-project,完成后,对于某些机器某些插件,往往还是不能显示为
正常,将现有的工程删除(删除的时候若发现有提示No input element provided,退出eclipse,重启动eclipse),保证将错误的引用删除干净。
8、再次import进来。
如下图所示:
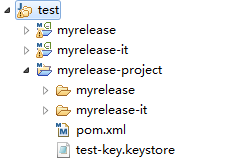
此用例为较复杂模块的雏形,具备向外发布的功能,因此myrelease-project中的pom.xml比较复杂
<?xml version="1.0" encoding="UTF-8"?>
<project xmlns="http://maven.apache.org/POM/4.0.0" xmlns:xsi="http://www.w3.org/2001/XMLSchema-instance"
xsi:schemaLocation="http://maven.apache.org/POM/4.0.0 http://maven.apache.org/maven-v4_0_0.xsd">[/code]<modelVersion>4.0.0</modelVersion><groupId>com.szkingdom.study</groupId><artifactId>myrelease-parent</artifactId><version>0.0.1-SNAPSHOT</version><packaging>pom</packaging><name>myrelease - Parent</name><modules><module>myrelease</module><module>myrelease-it</module></modules><dependencyManagement><dependencies><dependency><groupId>com.google.android</groupId><artifactId>android</artifactId><version> 2.1.2 </version><scope>provided</scope></dependency><dependency><groupId>com.google.android</groupId><artifactId>android-test</artifactId><version>2.1.2</version><scope>provided</scope></dependency><!-- Androlog is a logging and reporting library for Android --><dependency><groupId>de.akquinet.android.androlog</groupId><artifactId>androlog</artifactId><version>1.0.3</version></dependency><dependency><groupId>junit</groupId><artifactId>junit</artifactId><version>4.8.1</version><scope>provided</scope></dependency></dependencies></dependencyManagement><build><pluginManagement><plugins><plugin><groupId>com.jayway.maven.plugins.android.generation2</groupId><artifactId>maven-android-plugin</artifactId><version>2.8.4</version><inherited>true</inherited><configuration><androidManifestFile>${project.basedir}/AndroidManifest.xml</androidManifestFile><assetsDirectory>${project.basedir}/assets</assetsDirectory><resourceDirectory>${project.basedir}/res</resourceDirectory><nativeLibrariesDirectory>${project.basedir}/src/main/native</nativeLibrariesDirectory><sdk><platform>7</platform></sdk><deleteConflictingFiles>true</deleteConflictingFiles><undeployBeforeDeploy>true</undeployBeforeDeploy></configuration></plugin><plugin><artifactId>maven-compiler-plugin</artifactId><version>2.3.2</version><inherited>true</inherited><configuration><source>1.5</source><target>1.5</target></configuration></plugin><plugin><artifactId>maven-enforcer-plugin</artifactId><version>1.0</version></plugin><plugin><artifactId>maven-release-plugin</artifactId><version>2.1</version><configuration><autoVersionSubmodules>true</autoVersionSubmodules></configuration></plugin><plugin><artifactId>maven-jarsigner-plugin</artifactId><version>1.2</version><inherited>true</inherited><configuration><removeExistingSignatures>true</removeExistingSignatures><archiveDirectory /><archive>${project.build.directory}/${project.build.finalName}.${project.packaging}</archive><verbose>true</verbose><certs>true</certs><keystore>${sign.keystore}</keystore><alias>${sign.alias}</alias><storepass>${sign.storepass}</storepass><keypass>${sign.keypass}</keypass></configuration></plugin><plugin><groupId>com.pyx4me</groupId><artifactId>proguard-maven-plugin</artifactId><version>2.0.4</version><dependencies><dependency><groupId>net.sf.proguard</groupId><artifactId>proguard</artifactId><version>4.4</version><scope>runtime</scope></dependency></dependencies><configuration><proguardVersion>4.4</proguardVersion></configuration></plugin></plugins></pluginManagement></build><profiles><profile><id>release</id><activation><property><name>performRelease</name><value>true</value></property></activation><build><plugins><plugin><artifactId>maven-enforcer-plugin</artifactId><executions><execution><id>enforce-signing-properties</id><goals><goal>enforce</goal></goals><configuration><rules><requireProperty><property>sign.keystore</property><message>The 'sign.keystore' property is missing. It must contain the path to thekeystore used to sign the application.</message></requireProperty><requireFilesExist><files><file>${sign.keystore}</file></files><message>The 'sign.keystore' property does not point to a file. It must contain thepath to the keystore used to sign the application.</message></requireFilesExist><requireProperty><property>sign.alias</property><message>The 'sign.alias' property is missing. It must contain the key alias used tosign the application.</message></requireProperty><requireProperty><property>sign.storepass</property><message>The 'sign.storepass' property is missing. It must contain the password ofthe keystore used to sign the application.</message></requireProperty><requireProperty><property>sign.keypass</property><message>The 'sign.keypass' property is missing. It must contain the password of thekey used to sign the application.</message></requireProperty></rules></configuration></execution></executions></plugin></plugins></build></profile><profile><id>linux</id><activation><os><family>unix</family></os></activation><properties><rt.jar.path>${java.home}/jre/lib/rt.jar</rt.jar.path><jsse.jar.path>${java.home}/jre/lib/jsse.jar</jsse.jar.path></properties></profile><!-- mac profile has to be after unix since running on mac will trigger both --><profile><id>mac</id><activation><os><family>mac</family></os></activation><properties><!-- absolute path --><!--<rt.jar.path>/System/Library/Frameworks/JavaVM.framework/Versions/1.6.0/Classes/classes.jar</rt.jar.path> --><!-- or with JAVA_HOME /System/Library/Frameworks/JavaVM.framework/Versions/1.6.0/Home/ --><rt.jar.path>${java.home}/../Classes/classes.jar</rt.jar.path><jsse.jar.path>${java.home}/../Classes/jsse.jar</jsse.jar.path></properties></profile><profile><id>windows</id><activation><os><family>windows</family></os></activation><properties><rt.jar.path>${java.home}/jre/lib/rt.jar</rt.jar.path><jsse.jar.path>${java.home}/jre/lib/jsse.jar</jsse.jar.path></properties></profile></profiles></project>

相关文章推荐
- maven 学习笔记(三)创建一个较复杂的 eclipse+android+maven 工程
- maven 学习笔记(三)创建一个较复杂的 eclipse+android+maven 工程
- 创建一个较简单的 eclipse+android+maven 工程
- maven 学习笔记(二)创建一个简单的 eclipse+android+maven 工程
- maven 学习笔记(二)创建一个简单的 eclipse+android+maven 工程
- 创建一个简单的 eclipse+android+maven 工程
- Eclipse创建一个简单的Springmvc程序(Maven工程)
- 转:maven2创建一个eclipse工程,设置M2_REPO
- Maven教程-使用eclipse插件创建一个web工程(不使用archetype)
- eclipse创建一个Android应用工程产生的问题汇总
- 使用eclipse创建一个maven+springMVC工程
- 使用STS(eclipse)+maven+spring mvc创建一个简单的工程
- eclipse创建的android maven工程使用ant编译,最后在studio里打开使用
- eclipse用maven创建android工程的插件
- maven2创建一个eclipse工程,设置M2_REPO
- eclipse安装maven插件,创建Android工程
- 【Java_SSM】(二)使用eclipse创建一个Maven web工程
- Android(2)--- Android工程三步创建一个活动(eclipse)
- eclipse下创建一个Maven工程
- eclipse开发环境下,如何根据已有代码创建一个 Android 工程