CentOS 5.5上安装配置oracle 11g R2
2011-09-29 14:04
796 查看
------------------ CentOS 5.5上安装配置oracle 11g R2 ----------------- +
+-------------------------------- by kerryhu ----------------------------------+
一、运行环境
系统环境:centos 5.5 32位(图形安装)
硬盘分区:
/boot 150M
swap 4096M(最少要3G以上)
/ 10G
/home 5G
/tmp 5G
/usr 10G
/usr/local 10G
/var 10G
/opt 10G
/data 剩余所有
df -h

#同步时钟
yum -y install ntp
ntpdate time.nist.gov
echo "* */2 * * * /sbin/ntpdate time.nist.gov" >> /etc/crontab
关闭服务:
iptables
selinux
portmap
rpc.statd
cupsd
avahi-daemon
sendmail
killall iptables
chkconfig --level 2345 iptables off
killall portmap
chkconfig --level 2345 portmap off
killall avahi-daemon
chkconfig --level 2345 avahi-daemon off
killall sendmail
chkconfig --level 2345 sendmail off
二、安装oracle 11gR2 依赖的组件包
#需要以下组件:
Downloading Packages:
(1/22): libaio-devel-0.3.106-5.i386.rpm | 12 kB
(2/22): numactl-devel-0.9.8-11.el5.i386.rpm | 17 kB
(3/22): elfutils-libelf-devel-0.137-3.el5.i386.rpm | 24 kB
(4/22): elfutils-libelf-devel-static-0.137-3.el5.i386.rpm | 66 kB
(5/22): libgomp-4.4.4-13.el5.i386.rpm | 72 kB
(6/22): libgcc-4.1.2-50.el5.i386.rpm | 96 kB
(7/22): nscd-2.5-58.el5_6.3.i386.rpm | 167 kB
(8/22): sysstat-7.0.2-3.el5_5.1.i386.rpm | 170 kB
(9/22): pdksh-5.2.14-36.el5.i386.rpm | 198 kB
(10/22): compat-libstdc++-33-3.2.3-61.i386.rpm | 232 kB
(11/22): libstdc++-4.1.2-50.el5.i386.rpm | 362 kB
(12/22): glibc-headers-2.5-58.el5_6.3.i386.rpm | 603 kB
(13/22): unixODBC-devel-2.2.11-7.1.i386.rpm | 739 kB
(14/22): unixODBC-2.2.11-7.1.i386.rpm | 832 kB
(15/22): kernel-headers-2.6.18-238.9.1.el5.i386.rpm | 1.1 MB
(16/22): glibc-devel-2.5-58.el5_6.3.i386.rpm | 2.0 MB
(17/22): cpp-4.1.2-50.el5.i386.rpm | 2.7 MB
(18/22): libstdc++-devel-4.1.2-50.el5.i386.rpm | 2.8 MB
(19/22): gcc-c++-4.1.2-50.el5.i386.rpm | 3.4 MB
(20/22): gcc-4.1.2-50.el5.i386.rpm | 5.2 MB
(21/22): glibc-2.5-58.el5_6.3.i686.rpm | 5.3 MB
(22/22): glibc-common-2.5-58.el5_6.3.i386.rpm
yum -y install binutils compat-libstdc++-33 elfutils-libelf elfutils-libelf-devel glibc glibc-common glibc-devel gcc gcc-c++ libaio-devel libaio libgcc libstdc++ libstdc++-devel make sysstat unixODBC unixODBC-devel pdksh numactl-devel glibc-headers
/sbin/ldconfig
三、调整内核参数
vi /etc/sysctl.conf
fs.file-max = 6815744
kernel.shmall = 2097152
kernel.shmmax = 536870912
kernel.shmmni = 4096
kernel.sem = 250 32000 100 128
net.ipv4.ip_local_port_range = 9000 65500
net.core.rmem_default = 262144
net.core.rmem_max = 4194304
net.core.wmem_default = 262144
net.core.wmem_max = 1048576
fs.aio-max-nr = 1048576
#让内核参数生效
sysctl -p
#修改limits.conf
vi /etc/security/limits.conf
#oracle settings
oracle soft nproc 2047
oracle hard nproc 16384
oracle soft nofile 1024
oracle hard nofile 65536
#修改系统版本(Redhat 5.×系列系统略过这步)
cp /etc/redhat-release /etc/redhat-release.bk
vi /etc/redhat-release
#修改内容为:
Red Hat Enterprise Linux AS release 5 (Taroon)
#修改/etc/pam.d/login
#添加以下内容:
session required /lib/security/pam_limits.so
session required pam_limits.so
#修改/etc/profile
vi /etc/profile
#添加以下内容:
if [ $USER = "oracle" ]; then
if [ $SHELL = "/bin/ksh" ]; then
ulimit -p 16384
ulimit -n 65536
else
ulimit -u 16384 -n 65536
fi
fi
#修改/etc/csh.login
vi /etc/csh.login
#添加以下内容:
if ( $USER == "oracle" ) then
limit maxproc 16384
limit deors 65536
endif
四、创建oracle用户
groupadd oinstall
groupadd dba
useradd -g oinstall -G dba oracle
passwd oracle #753951
mkdir -p /data/oracle
mkdir -p /data/oralnventory
mkdir -p /data/software
chown -R oracle:oinstall /data/oracle
chown -R oracle:oinstall /data/software
chown -R oracle:oinstall /data/oralnventory
#设置用户环境变量
#su - oracle
$ vi .bash_profile
#添加以下内容:
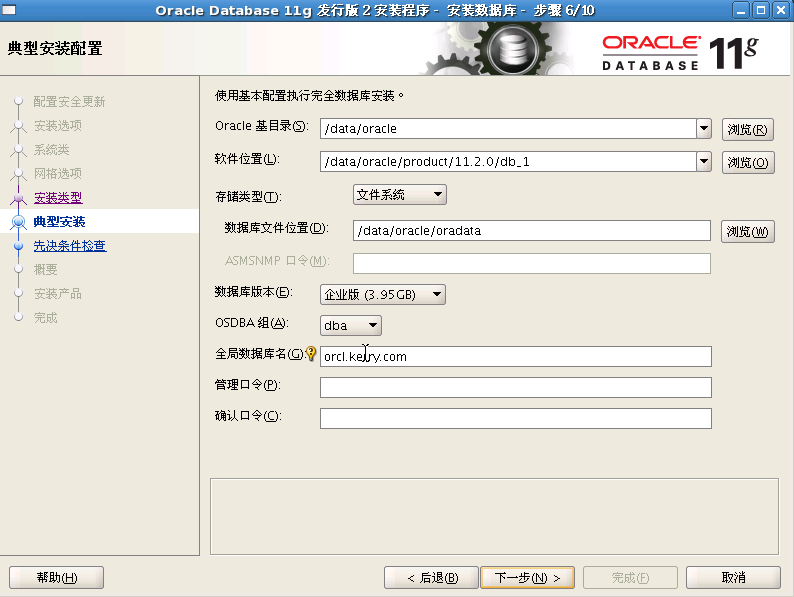
ORACLE_SID=kerry; export ORACLE_SID
ORACLE_BASE=/data/oracle; export ORACLE_BASE
ORACLE_HOME=$ORACLE_BASE/product/11.2.0/db_1; export ORACLE_HOME
PATH=$PATH:$ORACLE_HOME/bin:$HOME/bin; export PATH
ORACLE_BASE下是admin和product
ORACLE_HOME下则是ORACLE的命令、连接库、安装助手、listener等等一系列的东东。
这只是ORACLE自己的定义习惯。ORACLE_HOME比ORACLE_BASE目录要更深一些。也就是说:ORACLE_HOME=$ORACLE_BASE/product/version
ORACLE_BASE是oracle的根目录,ORACLE_HOME是oracle产品的目录。
简单说,你如果装了2个版本的oracle,那么ORACLE_BASE可以是一个,但ORACLE_HOME是2个
全局数据库名用于区别分布式数据库各个不同机器上的实例。
SID用于区别同一台机器上的不同实例,
即一个用于外部区分。
一个用于内部区分。
$source .bash_profile
五、安装oracle
#上传oracle安装文件到/data/software目录下,并解压
cd /data/software
unzip linux_11gR2_database_1of2.zip
unzip linux_11gR2_database_2of2.zip
xhost + #(这里使用root用户执行,一定要执行以下2步,如果没有执行,将无法启动图形安装界面)
xhost + localhost
su - oralce
cd /data/software/database
$./runInstaller #(到oracle安装文件所在目录执行该命令)
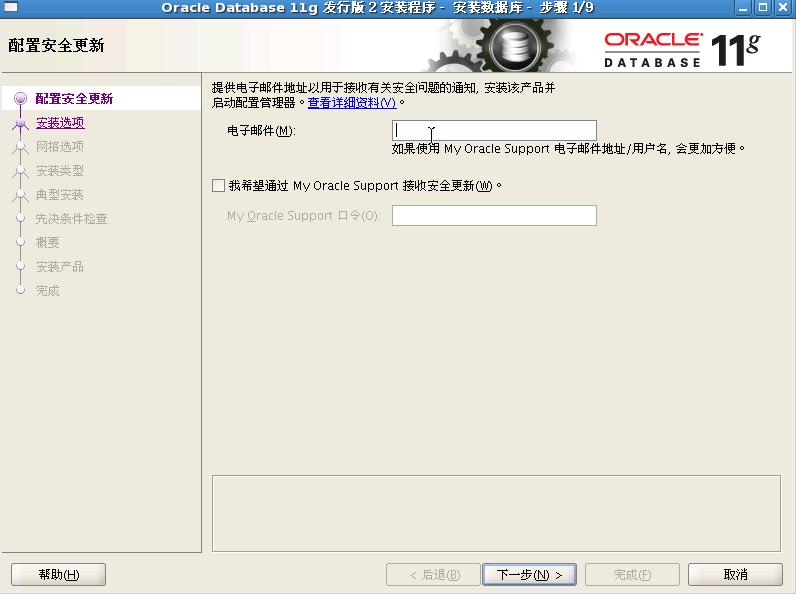


#方案口令:大写字母+数字+小写字母
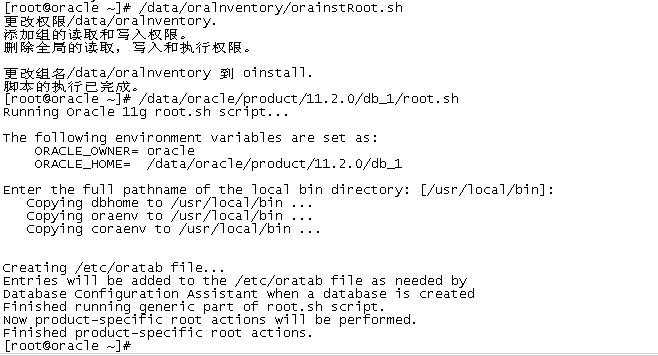
#以root身份执行脚本
su -
/data/oralnventory/orainstRoot.sh
/data/oracle/product/11.2.0/db_1/root.sh
六、开机启动设置
#自动启动和关闭数据库实例和监听
vi /oracle/oracle/product/11.2.0/db_1/bin/dbstart
ORACLE_HOME_LISTNER=$1
#修改为:
ORACLE_HOME_LISTNER=$ORACLE_HOME
vi /etc/init.d/oracle
#!/bin/sh
# chkconfig: 345 61 61
# description: Oracle 11g AutoRun Services
# /etc/init.d/oracle
#
# Run-level Startup script for the Oracle Instance, Listener, and
# Web Interface
export ORACLE_BASE=/data/oracle
export ORACLE_HOME=$ORACLE_BASE/product/11.2.0/db_1
export ORACLE_SID=kerry
export PATH=$PATH:$ORACLE_HOME/bin
ORA_OWNR="oracle"
# if the executables do not exist -- display error
if [ ! -f $ORACLE_HOME/bin/dbstart -o ! -d $ORACLE_HOME ]
then
echo "Oracle startup: cannot start"
exit 1
fi
# depending on parameter -- startup, shutdown, restart
# of the instance and listener or usage display
case "$1" in
start)
# Oracle listener and instance startup
su $ORA_OWNR -lc $ORACLE_HOME/bin/dbstart
echo "Oracle Start Succesful!OK."
;;
stop)
# Oracle listener and instance shutdown
su $ORA_OWNR -lc $ORACLE_HOME/bin/dbshut
echo "Oracle Stop Succesful!OK."
;;
reload|restart)
$0 stop
$0 start
;;
*)
echo $"Usage: `basename $0` {start|stop|reload|reload}"
exit 1
esac
exit 0
chmod 750 /etc/init.d/oracle
ln -s /etc/init.d/oracle /etc/rc1.d/K61oracle
ln -s /etc/init.d/oracle /etc/rc3.d/S61oracle
chkconfig --level 345 oracle on
chkconfig --add oracle
#启动oracle
service oracle start

#自动启动和关闭 EM
vi /etc/init.d/oraemctl
#!/bin/sh
# chkconfig: 345 61 61
# description: Oracle 11g AutoRun Services
# /etc/init.d/oraemctl
#
# Run-level Startup script for the Oracle Instance, Listener, and
# Web Interface
export ORACLE_BASE=/data/oracle
export ORACLE_HOME=$ORACLE_BASE/product/11.2.0/db_1
export ORACLE_SID=kerry
export PATH=$PATH:$ORACLE_HOME/bin
ORA_OWNR="oracle"
case "$1" in
start)
echo -n $"Starting Oracle EM DB Console:"
su - $ORACLE_OWNER -c "$ORACLE_HOME/bin/emctl start dbconsole"
echo "OK"
;;
stop)
echo -n $"Stopping Oracle EM DB Console:"
su - $ORACLE_OWNER -c "$ORACLE_HOME/bin/emctl stop dbconsole"
echo "OK"
;;
*)
echo $"Usage: $0 {start|stop}"
esac
chmod 750 /etc/init.d/oraemctl
#启动EM
service oraemctl start
七、安装过程中排错总结
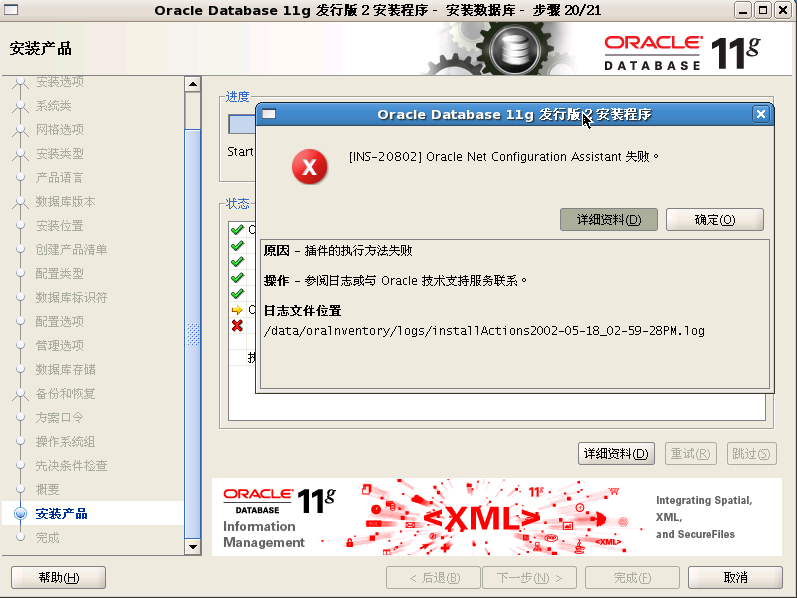
#1、机器CPU如果是AMD64位,装Linux32系统,再装32位Oracle会出现netca无法执行的错误,网上说,需要打p8670579_112010_LINUX.zip这个补丁就可以了
#下载地址:http://www.megaupload.com/?d=6A29ZU8T
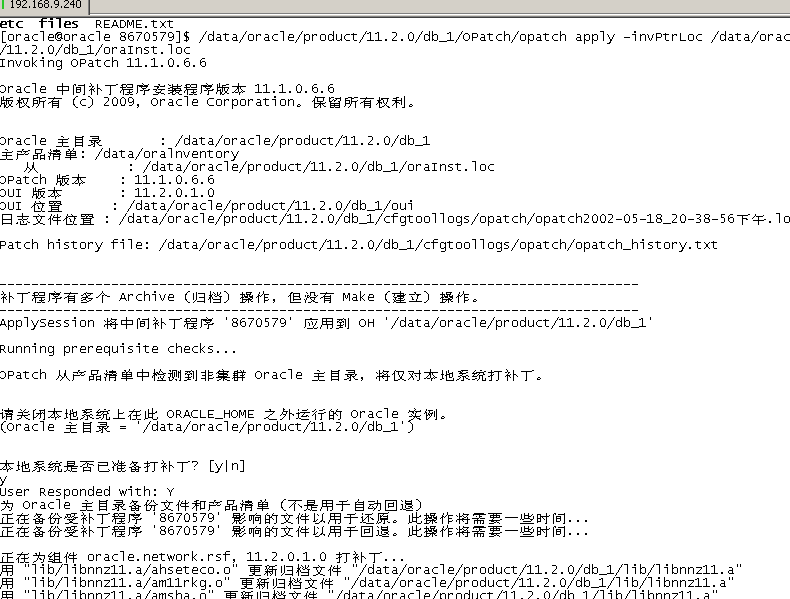
su - oracle
cd /data/software
unzip p8670579_112010_LINUX.zip
cd 8670579
/data/oracle/product/11.2.0/db_1/OPatch/opatch apply -invPtrLoc /data/oracle/product/11.2.0/db_1/oraInst.loc
#其中/apps/oracle/product/11.2.0/db_1/为ORACLE_HOME,可使用$ORACLE_HOME代替
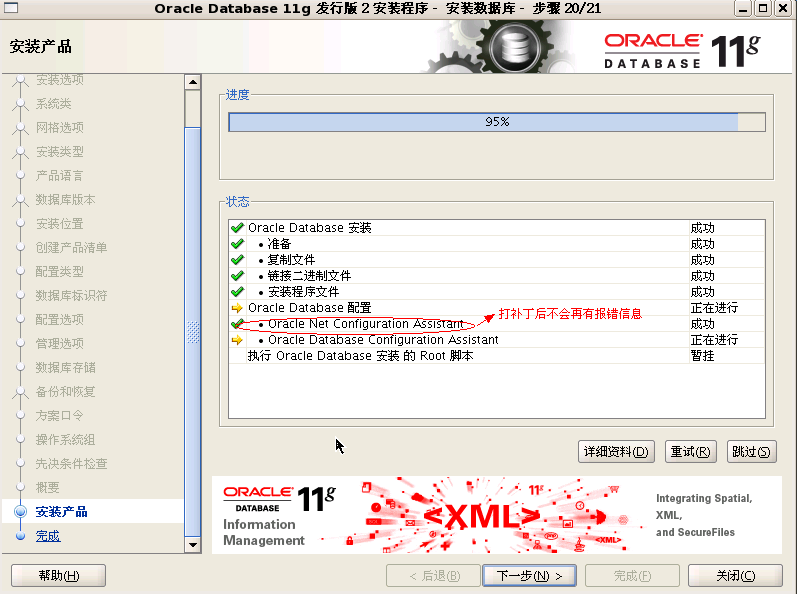
#补丁打好后,点击安装程序的retry,继续安装即可。
#2、libail程序包缺失

yum -y install libaio-devel libaio
/sbin/ldconfig
#3、严重: 无法在指定的范围内为以下进程分配端口: JMS [5540-5559],RMI [5520-5539],Database Control [5500-5519],EM Agent [3938] | [1830-1849]
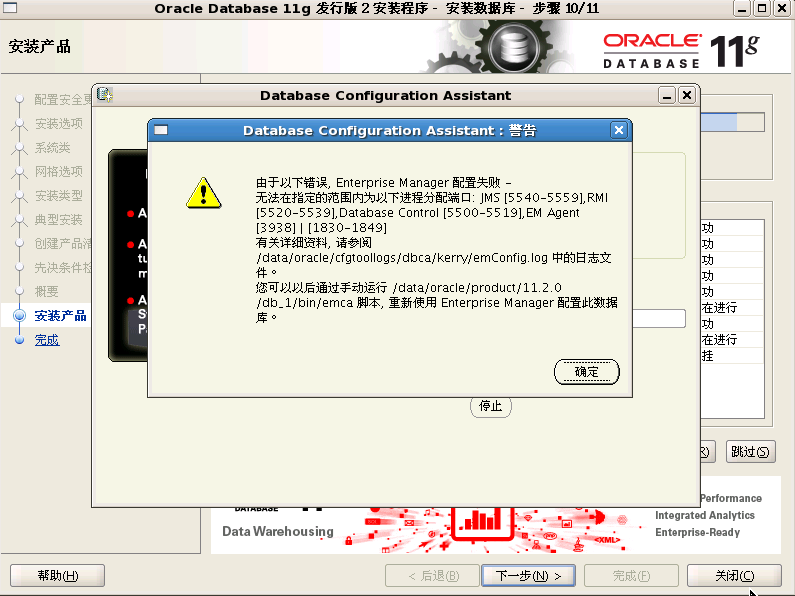
#主机名与IP不对导致
vi /etc/hosts
+-------------------------------- by kerryhu ----------------------------------+
一、运行环境
系统环境:centos 5.5 32位(图形安装)
硬盘分区:
/boot 150M
swap 4096M(最少要3G以上)
/ 10G
/home 5G
/tmp 5G
/usr 10G
/usr/local 10G
/var 10G
/opt 10G
/data 剩余所有
df -h
#同步时钟
yum -y install ntp
ntpdate time.nist.gov
echo "* */2 * * * /sbin/ntpdate time.nist.gov" >> /etc/crontab
关闭服务:
iptables
selinux
portmap
rpc.statd
cupsd
avahi-daemon
sendmail
killall iptables
chkconfig --level 2345 iptables off
killall portmap
chkconfig --level 2345 portmap off
killall avahi-daemon
chkconfig --level 2345 avahi-daemon off
killall sendmail
chkconfig --level 2345 sendmail off
二、安装oracle 11gR2 依赖的组件包
#需要以下组件:
Downloading Packages:
(1/22): libaio-devel-0.3.106-5.i386.rpm | 12 kB
(2/22): numactl-devel-0.9.8-11.el5.i386.rpm | 17 kB
(3/22): elfutils-libelf-devel-0.137-3.el5.i386.rpm | 24 kB
(4/22): elfutils-libelf-devel-static-0.137-3.el5.i386.rpm | 66 kB
(5/22): libgomp-4.4.4-13.el5.i386.rpm | 72 kB
(6/22): libgcc-4.1.2-50.el5.i386.rpm | 96 kB
(7/22): nscd-2.5-58.el5_6.3.i386.rpm | 167 kB
(8/22): sysstat-7.0.2-3.el5_5.1.i386.rpm | 170 kB
(9/22): pdksh-5.2.14-36.el5.i386.rpm | 198 kB
(10/22): compat-libstdc++-33-3.2.3-61.i386.rpm | 232 kB
(11/22): libstdc++-4.1.2-50.el5.i386.rpm | 362 kB
(12/22): glibc-headers-2.5-58.el5_6.3.i386.rpm | 603 kB
(13/22): unixODBC-devel-2.2.11-7.1.i386.rpm | 739 kB
(14/22): unixODBC-2.2.11-7.1.i386.rpm | 832 kB
(15/22): kernel-headers-2.6.18-238.9.1.el5.i386.rpm | 1.1 MB
(16/22): glibc-devel-2.5-58.el5_6.3.i386.rpm | 2.0 MB
(17/22): cpp-4.1.2-50.el5.i386.rpm | 2.7 MB
(18/22): libstdc++-devel-4.1.2-50.el5.i386.rpm | 2.8 MB
(19/22): gcc-c++-4.1.2-50.el5.i386.rpm | 3.4 MB
(20/22): gcc-4.1.2-50.el5.i386.rpm | 5.2 MB
(21/22): glibc-2.5-58.el5_6.3.i686.rpm | 5.3 MB
(22/22): glibc-common-2.5-58.el5_6.3.i386.rpm
yum -y install binutils compat-libstdc++-33 elfutils-libelf elfutils-libelf-devel glibc glibc-common glibc-devel gcc gcc-c++ libaio-devel libaio libgcc libstdc++ libstdc++-devel make sysstat unixODBC unixODBC-devel pdksh numactl-devel glibc-headers
/sbin/ldconfig
三、调整内核参数
vi /etc/sysctl.conf
fs.file-max = 6815744
kernel.shmall = 2097152
kernel.shmmax = 536870912
kernel.shmmni = 4096
kernel.sem = 250 32000 100 128
net.ipv4.ip_local_port_range = 9000 65500
net.core.rmem_default = 262144
net.core.rmem_max = 4194304
net.core.wmem_default = 262144
net.core.wmem_max = 1048576
fs.aio-max-nr = 1048576
#让内核参数生效
sysctl -p
#修改limits.conf
vi /etc/security/limits.conf
#oracle settings
oracle soft nproc 2047
oracle hard nproc 16384
oracle soft nofile 1024
oracle hard nofile 65536
#修改系统版本(Redhat 5.×系列系统略过这步)
cp /etc/redhat-release /etc/redhat-release.bk
vi /etc/redhat-release
#修改内容为:
Red Hat Enterprise Linux AS release 5 (Taroon)
#修改/etc/pam.d/login
#添加以下内容:
session required /lib/security/pam_limits.so
session required pam_limits.so
#修改/etc/profile
vi /etc/profile
#添加以下内容:
if [ $USER = "oracle" ]; then
if [ $SHELL = "/bin/ksh" ]; then
ulimit -p 16384
ulimit -n 65536
else
ulimit -u 16384 -n 65536
fi
fi
#修改/etc/csh.login
vi /etc/csh.login
#添加以下内容:
if ( $USER == "oracle" ) then
limit maxproc 16384
limit deors 65536
endif
四、创建oracle用户
groupadd oinstall
groupadd dba
useradd -g oinstall -G dba oracle
passwd oracle #753951
mkdir -p /data/oracle
mkdir -p /data/oralnventory
mkdir -p /data/software
chown -R oracle:oinstall /data/oracle
chown -R oracle:oinstall /data/software
chown -R oracle:oinstall /data/oralnventory
#设置用户环境变量
#su - oracle
$ vi .bash_profile
#添加以下内容:
ORACLE_SID=kerry; export ORACLE_SID
ORACLE_BASE=/data/oracle; export ORACLE_BASE
ORACLE_HOME=$ORACLE_BASE/product/11.2.0/db_1; export ORACLE_HOME
PATH=$PATH:$ORACLE_HOME/bin:$HOME/bin; export PATH
ORACLE_BASE下是admin和product
ORACLE_HOME下则是ORACLE的命令、连接库、安装助手、listener等等一系列的东东。
这只是ORACLE自己的定义习惯。ORACLE_HOME比ORACLE_BASE目录要更深一些。也就是说:ORACLE_HOME=$ORACLE_BASE/product/version
ORACLE_BASE是oracle的根目录,ORACLE_HOME是oracle产品的目录。
简单说,你如果装了2个版本的oracle,那么ORACLE_BASE可以是一个,但ORACLE_HOME是2个
全局数据库名用于区别分布式数据库各个不同机器上的实例。
SID用于区别同一台机器上的不同实例,
即一个用于外部区分。
一个用于内部区分。
$source .bash_profile
五、安装oracle
#上传oracle安装文件到/data/software目录下,并解压
cd /data/software
unzip linux_11gR2_database_1of2.zip
unzip linux_11gR2_database_2of2.zip
xhost + #(这里使用root用户执行,一定要执行以下2步,如果没有执行,将无法启动图形安装界面)
xhost + localhost
su - oralce
cd /data/software/database
$./runInstaller #(到oracle安装文件所在目录执行该命令)
#方案口令:大写字母+数字+小写字母
#以root身份执行脚本
su -
/data/oralnventory/orainstRoot.sh
/data/oracle/product/11.2.0/db_1/root.sh
六、开机启动设置
#自动启动和关闭数据库实例和监听
vi /oracle/oracle/product/11.2.0/db_1/bin/dbstart
ORACLE_HOME_LISTNER=$1
#修改为:
ORACLE_HOME_LISTNER=$ORACLE_HOME
vi /etc/init.d/oracle
#!/bin/sh
# chkconfig: 345 61 61
# description: Oracle 11g AutoRun Services
# /etc/init.d/oracle
#
# Run-level Startup script for the Oracle Instance, Listener, and
# Web Interface
export ORACLE_BASE=/data/oracle
export ORACLE_HOME=$ORACLE_BASE/product/11.2.0/db_1
export ORACLE_SID=kerry
export PATH=$PATH:$ORACLE_HOME/bin
ORA_OWNR="oracle"
# if the executables do not exist -- display error
if [ ! -f $ORACLE_HOME/bin/dbstart -o ! -d $ORACLE_HOME ]
then
echo "Oracle startup: cannot start"
exit 1
fi
# depending on parameter -- startup, shutdown, restart
# of the instance and listener or usage display
case "$1" in
start)
# Oracle listener and instance startup
su $ORA_OWNR -lc $ORACLE_HOME/bin/dbstart
echo "Oracle Start Succesful!OK."
;;
stop)
# Oracle listener and instance shutdown
su $ORA_OWNR -lc $ORACLE_HOME/bin/dbshut
echo "Oracle Stop Succesful!OK."
;;
reload|restart)
$0 stop
$0 start
;;
*)
echo $"Usage: `basename $0` {start|stop|reload|reload}"
exit 1
esac
exit 0
chmod 750 /etc/init.d/oracle
ln -s /etc/init.d/oracle /etc/rc1.d/K61oracle
ln -s /etc/init.d/oracle /etc/rc3.d/S61oracle
chkconfig --level 345 oracle on
chkconfig --add oracle
#启动oracle
service oracle start
#自动启动和关闭 EM
vi /etc/init.d/oraemctl
#!/bin/sh
# chkconfig: 345 61 61
# description: Oracle 11g AutoRun Services
# /etc/init.d/oraemctl
#
# Run-level Startup script for the Oracle Instance, Listener, and
# Web Interface
export ORACLE_BASE=/data/oracle
export ORACLE_HOME=$ORACLE_BASE/product/11.2.0/db_1
export ORACLE_SID=kerry
export PATH=$PATH:$ORACLE_HOME/bin
ORA_OWNR="oracle"
case "$1" in
start)
echo -n $"Starting Oracle EM DB Console:"
su - $ORACLE_OWNER -c "$ORACLE_HOME/bin/emctl start dbconsole"
echo "OK"
;;
stop)
echo -n $"Stopping Oracle EM DB Console:"
su - $ORACLE_OWNER -c "$ORACLE_HOME/bin/emctl stop dbconsole"
echo "OK"
;;
*)
echo $"Usage: $0 {start|stop}"
esac
chmod 750 /etc/init.d/oraemctl
#启动EM
service oraemctl start
七、安装过程中排错总结
#1、机器CPU如果是AMD64位,装Linux32系统,再装32位Oracle会出现netca无法执行的错误,网上说,需要打p8670579_112010_LINUX.zip这个补丁就可以了
#下载地址:http://www.megaupload.com/?d=6A29ZU8T
su - oracle
cd /data/software
unzip p8670579_112010_LINUX.zip
cd 8670579
/data/oracle/product/11.2.0/db_1/OPatch/opatch apply -invPtrLoc /data/oracle/product/11.2.0/db_1/oraInst.loc
#其中/apps/oracle/product/11.2.0/db_1/为ORACLE_HOME,可使用$ORACLE_HOME代替
#补丁打好后,点击安装程序的retry,继续安装即可。
#2、libail程序包缺失
yum -y install libaio-devel libaio
/sbin/ldconfig
#3、严重: 无法在指定的范围内为以下进程分配端口: JMS [5540-5559],RMI [5520-5539],Database Control [5500-5519],EM Agent [3938] | [1830-1849]
#主机名与IP不对导致
vi /etc/hosts

相关文章推荐
- CentOS 5.5上安装配置oracle 11g R2
- CentOS 5.5上安装配置oracle 11g R2
- centos5.5 上安装oracle 11g R2
- 重新整理:CentOS 5.5 安装 Oracle 11g R2
- centos5.5上安装oracle 11g R2
- CentOS 5.5上安装ORACLE 11g R2最完全安装教程
- CentOS6.9_X86_64 Oracle 11g r2 DataGuard安装配置
- Oracle 11g r2 linux centos 6.5 安装配置教程(多图超详细)
- Oracle 11g R2在CentOS 5.5服务器上的安装(上)
- Oracle 11g R2在CentOS 5.5服务器上的安装(中)
- 重新整理:CentOS 5.5 安装 Oracle 11g R2
- CentOS5.5 正式开始安装 Oracle 11g r2(图形界面安装)
- Oracle 11g R2在CentOS 5.5服务器上的安装(上)
- Oracle 11g R2在CentOS 5.5服务器上的安装(下)
- centos5.5上安装oracle 11g R2[转发-参考用]
- centos5.5上安装oracle 11g R2
- CentOS5.5 正式开始安装 Oracle 11g r2(图形界面安装)
- Oracle 11g R2在CentOS 5.5服务器上的安装(中)
- centos5.5上安装oracle 11g R2 推荐
- centos 安装 oracle 11g R2 开机启动配置