图解使用ANT打包java程序
2011-09-19 13:17
465 查看
1:在eclipse中建立如下的工程
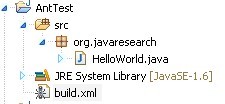
值得注意的就是build.xml文件(这个是重点后面会提到) ,其他HelloWorld中的就是一句简单的输出语句
2: 使用build打包(右键然后选择运行),运行后在console下可以看到如下图的过程
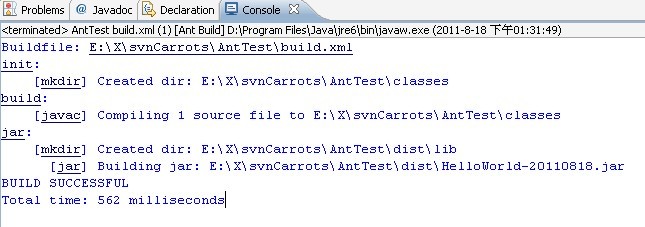
当看到了BUILD SUCCESSFUL 表面打包成功了!!!!
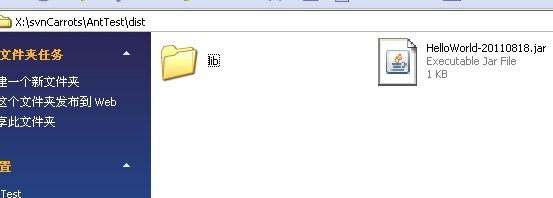
3:然后来到你的**\dist下可以看到刚刚打包成功的包 如下图 :
4:ANT很智能的,如果你已经实现了上面三个过程的打包,再次打包的话它会默认的执行空的操作 (如下图)

5:最重要的bulid.xml文件(此中有很多ANT内置的命令可以具体参考一下ant的用法)
view
plainprint?
<project name="HelloWorld" default="jar" basedir=".">
<description>
building HelloWorld!
</description>
<!-- set global properties for this build -->
<property name="src" location="src"/>
<property name="build" location="classes"/>
<property name="dist" location="dist"/>
<property name="user.name" value="qiuqiu"/>
<target name="init">
<!-- Create the time stamp -->
<tstamp/>
<!-- Create the classes directory structure used by compile -->
<mkdir dir="${build}"/>
</target>
<target name="build" depends="init" description="build the source code" >
<!-- Compile the java code from ${src} into ${build} -->
<javac srcdir="${src}" destdir="${build}"/>
</target>
<target name="jar" depends="build"
description="generate the distribution" >
<!-- Create the distribution directory -->
<mkdir dir="${dist}/lib"/>
<!-- Put everything in ${build} into the MyProject-${DSTAMP}.jar file -->
<jar destfile="${dist}/HelloWorld-${DSTAMP}.jar" basedir="${build}">
<manifest>
<attribute name="Built-By" value="${user.name}"/>
<attribute name="Main-Class" value="org.javaresearch.HelloWorld"/>
</manifest>
</jar>
</target>
<target name="run" depends="build" description="run HelloWorld">
<java classpath="${build}" classname="org.javaresearch.HelloWorld"></java>
</target>
<target name="runjar" depends="jar" description="run HelloWorld in jar file">
<java jar="${dist}/HelloWorld-${DSTAMP}.jar"
fork="true"
failonerror="true"
maxmemory="128m"
>
<arg value="-h"/>
<classpath>
<pathelement location="${dist}/HelloWorld-${DSTAMP}.jar"/>
<pathelement path="${java.class.path}"/>
</classpath>
</java>
</target>
<target name="clean"
description="clean up" >
<!-- Delete the ${build} and ${dist} directory trees -->
<delete dir="${build}"/>
<delete dir="${dist}"/>
</target>
</project>
6:ant使用指南(为了方便没有资源分的朋友下载,这里给大家0资源分):http://download.csdn.net/source/3529167
/article/7635594.html
有不足之处欢迎指正
<?xml version="1.0" encoding="UTF-8"?>
<project name="shopping" basedir="." default="all">
<!-- 系统环境变量的设定 -->
<property name="tomcat.home" value="C:/Program Files/Apache Software Foundation/Tomcat 5.5" />
<!-- 本地系统路径设定 -->
<property name="servlet-api.jar" value="${tomcat.home}/common/lib/servlet-api.jar" />
<property name="jsp-api.jar" value="${tomcat.home}/common/lib/servlet-api.jar" />
<property name="distpath.project" value="${tomcat.home}/webapps" />
<!-- 工程设定 -->
<property name="project.distname" value="shopping" />
<!-- 路径设定 -->
<property name="dir.src" value="src" />
<property name="dir.webinf" value="WebContent/WEB-INF" />
<property name="dir.classes" value="${dir.webinf}/classes" />
<!-- 编译的类路径设定 -->
<path id="compile.classpath">
<pathelement path="${dir.classes}" />
<pathelement path="${classpath}" />
<pathelement path="${servlet-api.jar}" />
<pathelement path="${jsp-api.jar}" />
<fileset dir="${dir.webinf}/lib">
<include name="*.jar" />
</fileset>
</path>
<!-- prepare用于定义前的准备工作 -->
<target name="prepare">
<tstamp />
</target>
<!-- resources用于实现对资源文件和配置文件的部署 -->
<target name="resources">
<copy todir="${dir.classes}" includeEmptyDirs="no">
<fileset dir="${dir.src}">
<patternset>
<include name="**/*.conf" />
<include name="**/*.properties" />
<include name="**/*.xml" />
<include name="**/*_zh_CN.properties" />
</patternset>
</fileset>
</copy>
<native2ascii src="${dir.src}" dest="${dir.classes}" includes="**/*_zh_CN.properties" encoding="gb2312" />
</target>
<!-- compile编译所有的Java文件 -->
<target name="compile" depends="prepare,resources">
<javac srcdir="${dir.src}" destdir="${dir.classes}">
<classpath refid="compile.classpath" />
</javac>
</target>
<!-- clean主要用于清除已经编译的目标文件和已经部署的文件 -->
<target name="clean" description="Prepare for clean build">
<delete dir="${dir.classes}" />
<delete dir="${distpath.project}/${project.distname}" />
<delete dir="${distpath.project}/${project.distname}.war" />
<mkdir dir="${dir.classes}" />
</target>
<!-- project重新编译所有的JAVA文件 -->
<target name="project" depends="clean,prepare,compile" />
<!-- dist用于完成项目的部署工作 -->
<target name="dist" description="Create binary distribution">
<war basedir="WebContent" warfile="${distpath.project}/${project.distname}.war" webxml="${dir.webinf}/web.xml">
<exclude name="${distpath.project}/${project.distname}.war" />
</war>
</target>
<!-- all用于重新编译和部署整个应用 -->
<target name="all" depends="project,dist" />
</project>
以上配置编译和部署通过。
值得注意的就是build.xml文件(这个是重点后面会提到) ,其他HelloWorld中的就是一句简单的输出语句
2: 使用build打包(右键然后选择运行),运行后在console下可以看到如下图的过程
当看到了BUILD SUCCESSFUL 表面打包成功了!!!!
3:然后来到你的**\dist下可以看到刚刚打包成功的包 如下图 :
4:ANT很智能的,如果你已经实现了上面三个过程的打包,再次打包的话它会默认的执行空的操作 (如下图)
5:最重要的bulid.xml文件(此中有很多ANT内置的命令可以具体参考一下ant的用法)
view
plainprint?
<project name="HelloWorld" default="jar" basedir=".">
<description>
building HelloWorld!
</description>
<!-- set global properties for this build -->
<property name="src" location="src"/>
<property name="build" location="classes"/>
<property name="dist" location="dist"/>
<property name="user.name" value="qiuqiu"/>
<target name="init">
<!-- Create the time stamp -->
<tstamp/>
<!-- Create the classes directory structure used by compile -->
<mkdir dir="${build}"/>
</target>
<target name="build" depends="init" description="build the source code" >
<!-- Compile the java code from ${src} into ${build} -->
<javac srcdir="${src}" destdir="${build}"/>
</target>
<target name="jar" depends="build"
description="generate the distribution" >
<!-- Create the distribution directory -->
<mkdir dir="${dist}/lib"/>
<!-- Put everything in ${build} into the MyProject-${DSTAMP}.jar file -->
<jar destfile="${dist}/HelloWorld-${DSTAMP}.jar" basedir="${build}">
<manifest>
<attribute name="Built-By" value="${user.name}"/>
<attribute name="Main-Class" value="org.javaresearch.HelloWorld"/>
</manifest>
</jar>
</target>
<target name="run" depends="build" description="run HelloWorld">
<java classpath="${build}" classname="org.javaresearch.HelloWorld"></java>
</target>
<target name="runjar" depends="jar" description="run HelloWorld in jar file">
<java jar="${dist}/HelloWorld-${DSTAMP}.jar"
fork="true"
failonerror="true"
maxmemory="128m"
>
<arg value="-h"/>
<classpath>
<pathelement location="${dist}/HelloWorld-${DSTAMP}.jar"/>
<pathelement path="${java.class.path}"/>
</classpath>
</java>
</target>
<target name="clean"
description="clean up" >
<!-- Delete the ${build} and ${dist} directory trees -->
<delete dir="${build}"/>
<delete dir="${dist}"/>
</target>
</project>
6:ant使用指南(为了方便没有资源分的朋友下载,这里给大家0资源分):http://download.csdn.net/source/3529167
/article/7635594.html
有不足之处欢迎指正
<?xml version="1.0" encoding="UTF-8"?>
<project name="shopping" basedir="." default="all">
<!-- 系统环境变量的设定 -->
<property name="tomcat.home" value="C:/Program Files/Apache Software Foundation/Tomcat 5.5" />
<!-- 本地系统路径设定 -->
<property name="servlet-api.jar" value="${tomcat.home}/common/lib/servlet-api.jar" />
<property name="jsp-api.jar" value="${tomcat.home}/common/lib/servlet-api.jar" />
<property name="distpath.project" value="${tomcat.home}/webapps" />
<!-- 工程设定 -->
<property name="project.distname" value="shopping" />
<!-- 路径设定 -->
<property name="dir.src" value="src" />
<property name="dir.webinf" value="WebContent/WEB-INF" />
<property name="dir.classes" value="${dir.webinf}/classes" />
<!-- 编译的类路径设定 -->
<path id="compile.classpath">
<pathelement path="${dir.classes}" />
<pathelement path="${classpath}" />
<pathelement path="${servlet-api.jar}" />
<pathelement path="${jsp-api.jar}" />
<fileset dir="${dir.webinf}/lib">
<include name="*.jar" />
</fileset>
</path>
<!-- prepare用于定义前的准备工作 -->
<target name="prepare">
<tstamp />
</target>
<!-- resources用于实现对资源文件和配置文件的部署 -->
<target name="resources">
<copy todir="${dir.classes}" includeEmptyDirs="no">
<fileset dir="${dir.src}">
<patternset>
<include name="**/*.conf" />
<include name="**/*.properties" />
<include name="**/*.xml" />
<include name="**/*_zh_CN.properties" />
</patternset>
</fileset>
</copy>
<native2ascii src="${dir.src}" dest="${dir.classes}" includes="**/*_zh_CN.properties" encoding="gb2312" />
</target>
<!-- compile编译所有的Java文件 -->
<target name="compile" depends="prepare,resources">
<javac srcdir="${dir.src}" destdir="${dir.classes}">
<classpath refid="compile.classpath" />
</javac>
</target>
<!-- clean主要用于清除已经编译的目标文件和已经部署的文件 -->
<target name="clean" description="Prepare for clean build">
<delete dir="${dir.classes}" />
<delete dir="${distpath.project}/${project.distname}" />
<delete dir="${distpath.project}/${project.distname}.war" />
<mkdir dir="${dir.classes}" />
</target>
<!-- project重新编译所有的JAVA文件 -->
<target name="project" depends="clean,prepare,compile" />
<!-- dist用于完成项目的部署工作 -->
<target name="dist" description="Create binary distribution">
<war basedir="WebContent" warfile="${distpath.project}/${project.distname}.war" webxml="${dir.webinf}/web.xml">
<exclude name="${distpath.project}/${project.distname}.war" />
</war>
</target>
<!-- all用于重新编译和部署整个应用 -->
<target name="all" depends="project,dist" />
</project>
以上配置编译和部署通过。

相关文章推荐
- 图解教你如何使用ANT打包java程序
- 图解教你如何使用ANT打包java程序
- 图解教你如何使用ANT打包java程序
- 使用Ant打包java程序
- 使用Ant打包Java程序
- 使用ant打包java程序
- 使用Ant打包java程序
- 使用Ant打包java程序
- Ant系列九:使用Ant将java工程打包成bat可执行性文件 .
- java Web系统中ant打包的使用
- 使用exe4j打包Java程序
- 使用fat jar和exe4j把java程序打包成exe执行文件
- 图解使用Ant构建一个Java项目
- 图解使用VS的安装项目打包程序
- 使用InstallAnywhere 打包JAVA程序
- 使用Ant对程序打包并上传服务器
- android使用ant自动打包(更改java文件中的属性值,批量自动生成)
- 如何把使用命令行或者Eclipse将Java程序打包为jar文件
- 使用jar命令打包java程序
- 利用ant的javac任务来编译程序使用ant的java任务来运行程序