WSO2 WSF/CPP 网络服务开发例子1--HELLO
2011-07-29 16:44
281 查看
WSO2 WSF/CPP 网络服务开发例子1--HELLO
<?xml version="1.0"
encoding="UTF-8"?>
<wsdl:definitions
targetNamespace="axis2.services.hello"
xmlns:apachesoap="http://xml.apache.org/xml-soap"
xmlns:impl="axis2.services.hello"
xmlns:wsdl="http://schemas.xmlsoap.org/wsdl/"
xmlns:wsdlsoap="http://schemas.xmlsoap.org/wsdl/soap/"
xmlns:xsd="http://www.w3.org/2001/XMLSchema">
<wsdl:types>
<schema
elementFormDefault="qualified"
targetNamespace="axis2.services.hello"
xmlns="http://www.w3.org/2001/XMLSchema"
xmlns:apachesoap="http://xml.apache.org/xml-soap"
xmlns:impl="axis2.services.hello"
xmlns:wsdl="http://schemas.xmlsoap.org/wsdl/">
<element name="greetRequest">
<complexType>
<sequence>
<element name="greetInput"
type="xsd:string" />
</sequence>
</complexType>
</element>
<element name="greetResponse">
<complexType>
<sequence>
<element name="greetReturn"
type="xsd:string" />
</sequence>
</complexType>
</element>
</schema>
</wsdl:types>
<wsdl:message
name="greetResponse1">
<wsdl:part
element="impl:greetResponse" name="parameters" />
</wsdl:message>
<wsdl:message
name="greetRequest1">
<wsdl:part
element="impl:greetRequest" name="parameters" />
</wsdl:message>
<wsdl:message
name="greetResponse2">
<wsdl:part
element="impl:greetResponse" name="parameters" />
</wsdl:message>
<wsdl:message name="greetRequest2">
<wsdl:part
element="impl:greetRequest" name="parameters" />
</wsdl:message>
<wsdl:message
name="greetResponse3">
<wsdl:part
element="impl:greetResponse" name="parameters" />
</wsdl:message>
<wsdl:message
name="greetRequest3">
<wsdl:part
element="impl:greetRequest" name="parameters" />
</wsdl:message>
<wsdl:portType name="hello">
<wsdl:operation name="greet1">
<wsdl:input
message="impl:greetRequest1" name="greetRequest1" />
<wsdl:output
message="impl:greetResponse1" name="greetResponse1" />
</wsdl:operation>
<wsdl:operation name="greet2">
<wsdl:input
message="impl:greetRequest2" name="greetRequest2" />
<wsdl:output
message="impl:greetResponse2" name="greetResponse2" />
</wsdl:operation>
<wsdl:operation name="greet3">
<wsdl:input message="impl:greetRequest3"
name="greetRequest3" />
<wsdl:output
message="impl:greetResponse3" name="greetResponse3" />
</wsdl:operation>
</wsdl:portType>
<wsdl:binding
name="HelloSoapBinding" type="impl:hello">
<wsdlsoap:binding
style="document"
transport="http://schemas.xmlsoap.org/soap/http"
/>
<wsdl:operation name="greet1">
<wsdlsoap:operation
soapAction="hello#greet1" />
<wsdl:input
name="greetRequest1">
<wsdlsoap:body use="literal"
/>
</wsdl:input>
<wsdl:output
name="greetResponse1">
<wsdlsoap:body use="literal"
/>
</wsdl:output>
</wsdl:operation>
<wsdl:operation name="greet2">
<wsdlsoap:operation
soapAction="hello#greet2" />
<wsdl:input
name="greetRequest2">
<wsdlsoap:body use="literal"
/>
</wsdl:input>
<wsdl:output
name="greetResponse2">
<wsdlsoap:body use="literal"
/>
</wsdl:output>
</wsdl:operation>
<wsdl:operation name="greet3">
<wsdlsoap:operation
soapAction="hello#greet3" />
<wsdl:input
name="greetRequest3">
<wsdlsoap:body use="literal"
/>
</wsdl:input>
<wsdl:output
name="greetResponse3">
<wsdlsoap:body use="literal"
/>
</wsdl:output>
</wsdl:operation>
</wsdl:binding>
<wsdl:service name="hello">
<wsdl:port
binding="impl:HelloSoapBinding" name="hello">
<wsdlsoap:address location="http://192.168.34.41:9090/axis2/services/hello"
/>
</wsdl:port>
</wsdl:service>
</wsdl:definitions>
生成服务端框架:
WSDL2CPP.sh -uri hello.wsdl -ss -sd -d adb -u
生成客户端存根
WSDL2CPP.sh -uri hello.wsdl -d adb -u
下图为生成后的文件列表:

GreetResponse.h hello.h helloSkeleton.h。
类GreetRequest封装了WSDL中定义的请求消息;类GreetResponse封装了WSDL中定义的回复消息;类hello派生自ServiceSkeleton(在介绍WSF/CPP中有介绍),实现了服务框架的虚函数接口,比如在invoke函数中已经实现了根据请求消息中的信息,分发请求到具体的操作中;类helloSkeleton封装了WSDL中定义的所有操作,这是我们 填写业务逻辑代码的地方。
对于当前这个简单的例子来说,我们只需要在类helloSkeleton提供的对应操作的几个函数里实现业务逻辑代码即可,部分代码如下:
/**
* Auto
generated function definition signature
* for
"greet1|axis2.services.hello" operation.
*
* @param
_greetRequest of the hello_services_axis2::GreetRequest
*
* @return
hello_services_axis2::GreetResponse*
*/
hello_services_axis2::GreetResponse* helloSkeleton::greet1(
wso2wsf::MessageContext
*outCtx,
hello_services_axis2::GreetRequest*
_greetRequest)
{
/*
TODO
fill this with the necessary business logic */
GreetResponse*
_greetResponse = new GreetResponse();
if
(_greetRequest->isGreetInputNil()) {
_greetResponse->setGreetReturn("greet1
recive nothine!");
} else {
_greetResponse->setGreetReturn(
_greetRequest->getGreetInput()
+ "
greet1.");
}
return
_greetResponse;
}
由于所有操作的业务逻辑都一样,所以这里就不帖出另外两个操作函数的业务逻辑代码,完整代码请看附件。
接下来我们需要编译这个工程,MS Window平台这里就不介绍了,因为代码生成工具已经生成了对应的工程文件,下面帖出在linux环境下的makefile文件。
首先是rules.mk:
CPP = g++ -g -O2 -msse3 -Wall -fPIC -DPIC -D_REENTRANT -DG_BYTE_ORDER=G_LITTLE_ENDIAN
-DLINUX
MAKESO = g++ -g -O2 -msse3 -Wall -shared -fPIC -DPIC
-D_REENTRANT -DLINUX
CPPLINK = $(CPP) $(CPPFLAG)
AR =
ar
ARFLAG =
-rc
CP =
cp -f
RM =
rm -f
MV =
mv
#### IFX & MQ INSTALL DIR ####
#### FOR SYSTEM ####
SYSLIB =
-lpthread
TOPSRC=`pwd`
接着是Makefile:
.SUFFIXES: .o .cpp
include rules.mk
SRCS=$(wildcard *.cpp)
OBJS=$(patsubst %.cpp,%.o,$(SRCS))
INCLS=-I/opt/wso2/wsf_cpp/include \
-I/opt/wso2/wsf_cpp/include/axis2-1.6.0
\
-I/opt/wso2/wsf_cpp/include/axis2-1.6.0/platforms
\
-I../include
LIBS =-L/opt/wso2/wsf_cpp/lib \
-laxutil \
-laxis2_axiom
\
-laxis2_engine
\
-laxis2_parser
\
-lpthread \
-laxis2_http_sender
\
-laxis2_http_receiver
\
-lguththila
\
-lwso2_wsf
TARGET = libhello.so
$(TARGET): $(OBJS)
$(MAKESO)
-o $@ $(OBJS) $(LIBS)
.cpp.o:
$(CPP) $(INCLS)
-c $<
all: $(TARGET)
clean:
rm -f $(OBJS) $(TARGET)
现在,只要需要将服务发布出去,我使用的是WSF CPP发布包中包含的Axis2 Server作为服务,在前面介绍WSF CPP的文章中有较详细的介绍,这里简单称述如下几个步骤:
A.在路径/opt/wso2/wsf_cpp/services中新建目录hello。
B.拷贝文件libhello.so hello.wsdl
services.xml到hello目录中。services.xml由代码生成工具生成。
C.重启Axis2 Server。
如上三步完成服务的发布,打开页面http://192.168.34.41:9090/axis2/services/ 可以看到有效服务列表,其中属于hello的部分截图如下:

打开页面http://192.168.34.41:9090/axis2/services/hello?wsdl 可以看到这个服务对应的wsdl。
生成的代码只是提供了必须的东西,并不能生成一个可执行程序,因为其中还没有main函数呢。所以接下来需要实现一个完整的客户端。
A.添加一个新文件hello.cpp到工程的src目录,并在其中编写如下代码:
#include <Environment.h>
#include "helloStub.h"
using namespace std;
using namespace wso2wsf;
using namespace hello_services_axis2;
int main(int
argc, char *argv) {
Environment::initialize("hello.log", AXIS2_LOG_LEVEL_TRACE);
string
endpointUri = "http://192.168.34.41:9090/axis2/services/hello";
string
clientHome = AXIS2_GETENV("WSFCPP_HOME");
if
(clientHome.empty()) {
cout
<< "Please set the WSFCPP_HOME environment variable"
<< endl;
}
helloStub
*stub = new helloStub(clientHome, endpointUri);
GreetRequest
*request = new GreetRequest("hello server");
GreetResponse
*response = stub->greet1(request);
if
(response)
{
cout
<< response->getGreetReturn() << endl;
}
delete
stub;
return
0;
}
其实上面代码所示的动作基本上都是固定的,先初始化,接着实例化一个stub,然后创建一个请求消息,通过同步的方式发送请求并接收回复就结束了。
B.给客户端工程创建一个Makefile文件,由于rules.mk跟服务端的一样,这里就不再帖出详情了,Makefile文件内容如下:
.SUFFIXES: .o .cpp
include rules.mk
SRCS=$(wildcard *.cpp)
OBJS=$(patsubst %.cpp,%.o,$(SRCS))
INCLS=-I/opt/wso2/wsf_cpp/include \
-I/opt/wso2/wsf_cpp/include/axis2-1.6.0
\
-I/opt/wso2/wsf_cpp/include/axis2-1.6.0/platforms
\
-I../include
LIBS =-L/opt/wso2/wsf_cpp/lib \
-laxutil \
-laxis2_axiom
\
-laxis2_engine
\
-laxis2_parser
\
-lpthread \
-laxis2_http_sender
\
-laxis2_http_receiver
\
-lguththila
\
-lwso2_wsf
TARGET = hello
$(TARGET): $(OBJS)
$(CPP)
-o $@ $(OBJS) $(LIBS)
.cpp.o:
$(CPP) $(INCLS)
-c $<
all: $(TARGET)
clean:
rm -f $(OBJS) $(TARGET)
跟服务端所需的引用路径和库都一样,不同的只是最终生成可执行程序而不是库。
C.编译成功后,只剩下执行这个程序了,由于日志等级设置的比较低,所以输出很多,下面只提出关键的输出:
[luochong@pay-db-server src]$ ./hello
hello server greet1.
“hello server greet1.“是客户端将收到的回复打印出来的结果。
[服务端源码]
[客户端源码]
一、根据需求编写WSDL文档
定义一个服务叫做hello,提供三个操作(greet1、greet2、greet3),这三个操作均接受一个输入字符串,并在该字符串后追加自己的名字后返回给客户端。WSDL文件如下:<?xml version="1.0"
encoding="UTF-8"?>
<wsdl:definitions
targetNamespace="axis2.services.hello"
xmlns:apachesoap="http://xml.apache.org/xml-soap"
xmlns:impl="axis2.services.hello"
xmlns:wsdl="http://schemas.xmlsoap.org/wsdl/"
xmlns:wsdlsoap="http://schemas.xmlsoap.org/wsdl/soap/"
xmlns:xsd="http://www.w3.org/2001/XMLSchema">
<wsdl:types>
<schema
elementFormDefault="qualified"
targetNamespace="axis2.services.hello"
xmlns="http://www.w3.org/2001/XMLSchema"
xmlns:apachesoap="http://xml.apache.org/xml-soap"
xmlns:impl="axis2.services.hello"
xmlns:wsdl="http://schemas.xmlsoap.org/wsdl/">
<element name="greetRequest">
<complexType>
<sequence>
<element name="greetInput"
type="xsd:string" />
</sequence>
</complexType>
</element>
<element name="greetResponse">
<complexType>
<sequence>
<element name="greetReturn"
type="xsd:string" />
</sequence>
</complexType>
</element>
</schema>
</wsdl:types>
<wsdl:message
name="greetResponse1">
<wsdl:part
element="impl:greetResponse" name="parameters" />
</wsdl:message>
<wsdl:message
name="greetRequest1">
<wsdl:part
element="impl:greetRequest" name="parameters" />
</wsdl:message>
<wsdl:message
name="greetResponse2">
<wsdl:part
element="impl:greetResponse" name="parameters" />
</wsdl:message>
<wsdl:message name="greetRequest2">
<wsdl:part
element="impl:greetRequest" name="parameters" />
</wsdl:message>
<wsdl:message
name="greetResponse3">
<wsdl:part
element="impl:greetResponse" name="parameters" />
</wsdl:message>
<wsdl:message
name="greetRequest3">
<wsdl:part
element="impl:greetRequest" name="parameters" />
</wsdl:message>
<wsdl:portType name="hello">
<wsdl:operation name="greet1">
<wsdl:input
message="impl:greetRequest1" name="greetRequest1" />
<wsdl:output
message="impl:greetResponse1" name="greetResponse1" />
</wsdl:operation>
<wsdl:operation name="greet2">
<wsdl:input
message="impl:greetRequest2" name="greetRequest2" />
<wsdl:output
message="impl:greetResponse2" name="greetResponse2" />
</wsdl:operation>
<wsdl:operation name="greet3">
<wsdl:input message="impl:greetRequest3"
name="greetRequest3" />
<wsdl:output
message="impl:greetResponse3" name="greetResponse3" />
</wsdl:operation>
</wsdl:portType>
<wsdl:binding
name="HelloSoapBinding" type="impl:hello">
<wsdlsoap:binding
style="document"
transport="http://schemas.xmlsoap.org/soap/http"
/>
<wsdl:operation name="greet1">
<wsdlsoap:operation
soapAction="hello#greet1" />
<wsdl:input
name="greetRequest1">
<wsdlsoap:body use="literal"
/>
</wsdl:input>
<wsdl:output
name="greetResponse1">
<wsdlsoap:body use="literal"
/>
</wsdl:output>
</wsdl:operation>
<wsdl:operation name="greet2">
<wsdlsoap:operation
soapAction="hello#greet2" />
<wsdl:input
name="greetRequest2">
<wsdlsoap:body use="literal"
/>
</wsdl:input>
<wsdl:output
name="greetResponse2">
<wsdlsoap:body use="literal"
/>
</wsdl:output>
</wsdl:operation>
<wsdl:operation name="greet3">
<wsdlsoap:operation
soapAction="hello#greet3" />
<wsdl:input
name="greetRequest3">
<wsdlsoap:body use="literal"
/>
</wsdl:input>
<wsdl:output
name="greetResponse3">
<wsdlsoap:body use="literal"
/>
</wsdl:output>
</wsdl:operation>
</wsdl:binding>
<wsdl:service name="hello">
<wsdl:port
binding="impl:HelloSoapBinding" name="hello">
<wsdlsoap:address location="http://192.168.34.41:9090/axis2/services/hello"
/>
</wsdl:port>
</wsdl:service>
</wsdl:definitions>
二、使用代码生成工具生成服务端框架
wsf/c++提供了代码生成工具,该工具根据输入的wsdl文件生成网络服务服务端代码或者客户端代码。生成服务端框架:
WSDL2CPP.sh -uri hello.wsdl -ss -sd -d adb -u
生成客户端存根
WSDL2CPP.sh -uri hello.wsdl -d adb -u
下图为生成后的文件列表:
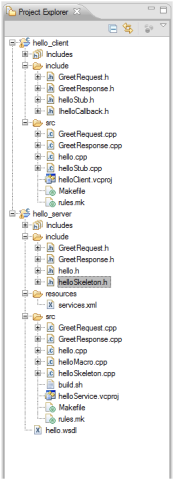
三、在工具生成的代码上实现功能
1、实现服务端业务逻辑代码并发布
生成的服务端代码主要包含在4个类中,分别对应4个头文件:GreetRequest.hGreetResponse.h hello.h helloSkeleton.h。
类GreetRequest封装了WSDL中定义的请求消息;类GreetResponse封装了WSDL中定义的回复消息;类hello派生自ServiceSkeleton(在介绍WSF/CPP中有介绍),实现了服务框架的虚函数接口,比如在invoke函数中已经实现了根据请求消息中的信息,分发请求到具体的操作中;类helloSkeleton封装了WSDL中定义的所有操作,这是我们 填写业务逻辑代码的地方。
对于当前这个简单的例子来说,我们只需要在类helloSkeleton提供的对应操作的几个函数里实现业务逻辑代码即可,部分代码如下:
/**
* Auto
generated function definition signature
* for
"greet1|axis2.services.hello" operation.
*
* @param
_greetRequest of the hello_services_axis2::GreetRequest
*
* @return
hello_services_axis2::GreetResponse*
*/
hello_services_axis2::GreetResponse* helloSkeleton::greet1(
wso2wsf::MessageContext
*outCtx,
hello_services_axis2::GreetRequest*
_greetRequest)
{
/*
TODO
fill this with the necessary business logic */
GreetResponse*
_greetResponse = new GreetResponse();
if
(_greetRequest->isGreetInputNil()) {
_greetResponse->setGreetReturn("greet1
recive nothine!");
} else {
_greetResponse->setGreetReturn(
_greetRequest->getGreetInput()
+ "
greet1.");
}
return
_greetResponse;
}
由于所有操作的业务逻辑都一样,所以这里就不帖出另外两个操作函数的业务逻辑代码,完整代码请看附件。
接下来我们需要编译这个工程,MS Window平台这里就不介绍了,因为代码生成工具已经生成了对应的工程文件,下面帖出在linux环境下的makefile文件。
首先是rules.mk:
CPP = g++ -g -O2 -msse3 -Wall -fPIC -DPIC -D_REENTRANT -DG_BYTE_ORDER=G_LITTLE_ENDIAN
-DLINUX
MAKESO = g++ -g -O2 -msse3 -Wall -shared -fPIC -DPIC
-D_REENTRANT -DLINUX
CPPLINK = $(CPP) $(CPPFLAG)
AR =
ar
ARFLAG =
-rc
CP =
cp -f
RM =
rm -f
MV =
mv
#### IFX & MQ INSTALL DIR ####
#### FOR SYSTEM ####
SYSLIB =
-lpthread
TOPSRC=`pwd`
接着是Makefile:
.SUFFIXES: .o .cpp
include rules.mk
SRCS=$(wildcard *.cpp)
OBJS=$(patsubst %.cpp,%.o,$(SRCS))
INCLS=-I/opt/wso2/wsf_cpp/include \
-I/opt/wso2/wsf_cpp/include/axis2-1.6.0
\
-I/opt/wso2/wsf_cpp/include/axis2-1.6.0/platforms
\
-I../include
LIBS =-L/opt/wso2/wsf_cpp/lib \
-laxutil \
-laxis2_axiom
\
-laxis2_engine
\
-laxis2_parser
\
-lpthread \
-laxis2_http_sender
\
-laxis2_http_receiver
\
-lguththila
\
-lwso2_wsf
TARGET = libhello.so
$(TARGET): $(OBJS)
$(MAKESO)
-o $@ $(OBJS) $(LIBS)
.cpp.o:
$(CPP) $(INCLS)
-c $<
all: $(TARGET)
clean:
rm -f $(OBJS) $(TARGET)
现在,只要需要将服务发布出去,我使用的是WSF CPP发布包中包含的Axis2 Server作为服务,在前面介绍WSF CPP的文章中有较详细的介绍,这里简单称述如下几个步骤:
A.在路径/opt/wso2/wsf_cpp/services中新建目录hello。
B.拷贝文件libhello.so hello.wsdl
services.xml到hello目录中。services.xml由代码生成工具生成。
C.重启Axis2 Server。
如上三步完成服务的发布,打开页面http://192.168.34.41:9090/axis2/services/ 可以看到有效服务列表,其中属于hello的部分截图如下:
打开页面http://192.168.34.41:9090/axis2/services/hello?wsdl 可以看到这个服务对应的wsdl。
2、实现客户端代码并执行
代码生成工具为客户端也生成了4个类,其中GreetRequest和GreetResponse跟服务端的一样只是封装了服务相关的消息;helloStub派生自WSF CPP提供的Stub类,封装了WSF CPP客户端API,通过构造函数完成初始化,另外为每一个Web服务操作提供了同步调用和异步调用的方法;IhelloCallback定义了异步调用Web服务操作时需要使用的回调函数接口。生成的代码只是提供了必须的东西,并不能生成一个可执行程序,因为其中还没有main函数呢。所以接下来需要实现一个完整的客户端。
A.添加一个新文件hello.cpp到工程的src目录,并在其中编写如下代码:
#include <Environment.h>
#include "helloStub.h"
using namespace std;
using namespace wso2wsf;
using namespace hello_services_axis2;
int main(int
argc, char *argv) {
Environment::initialize("hello.log", AXIS2_LOG_LEVEL_TRACE);
string
endpointUri = "http://192.168.34.41:9090/axis2/services/hello";
string
clientHome = AXIS2_GETENV("WSFCPP_HOME");
if
(clientHome.empty()) {
cout
<< "Please set the WSFCPP_HOME environment variable"
<< endl;
}
helloStub
*stub = new helloStub(clientHome, endpointUri);
GreetRequest
*request = new GreetRequest("hello server");
GreetResponse
*response = stub->greet1(request);
if
(response)
{
cout
<< response->getGreetReturn() << endl;
}
delete
stub;
return
0;
}
其实上面代码所示的动作基本上都是固定的,先初始化,接着实例化一个stub,然后创建一个请求消息,通过同步的方式发送请求并接收回复就结束了。
B.给客户端工程创建一个Makefile文件,由于rules.mk跟服务端的一样,这里就不再帖出详情了,Makefile文件内容如下:
.SUFFIXES: .o .cpp
include rules.mk
SRCS=$(wildcard *.cpp)
OBJS=$(patsubst %.cpp,%.o,$(SRCS))
INCLS=-I/opt/wso2/wsf_cpp/include \
-I/opt/wso2/wsf_cpp/include/axis2-1.6.0
\
-I/opt/wso2/wsf_cpp/include/axis2-1.6.0/platforms
\
-I../include
LIBS =-L/opt/wso2/wsf_cpp/lib \
-laxutil \
-laxis2_axiom
\
-laxis2_engine
\
-laxis2_parser
\
-lpthread \
-laxis2_http_sender
\
-laxis2_http_receiver
\
-lguththila
\
-lwso2_wsf
TARGET = hello
$(TARGET): $(OBJS)
$(CPP)
-o $@ $(OBJS) $(LIBS)
.cpp.o:
$(CPP) $(INCLS)
-c $<
all: $(TARGET)
clean:
rm -f $(OBJS) $(TARGET)
跟服务端所需的引用路径和库都一样,不同的只是最终生成可执行程序而不是库。
C.编译成功后,只剩下执行这个程序了,由于日志等级设置的比较低,所以输出很多,下面只提出关键的输出:
[luochong@pay-db-server src]$ ./hello
hello server greet1.
“hello server greet1.“是客户端将收到的回复打印出来的结果。
[服务端源码]
[客户端源码]

相关文章推荐
- [图解教程] Axis2与Eclipse整合开发Web Service之一:简单的计算服务例子
- Android 入门开发指南之四 -- Hello,Android例子(上)
- VSX开发之语言服务系列(2)——从一个经典的例子开始
- www.hellocpp.net开发日记:网站性能优化之文件服务器分离技术
- Android开发9:网络访问&Web服务开发
- Visual C# 2008+SQL Server 2005 数据库与网络开发-- 6.1 报表服务简介
- thrift开发的例子(二)---cpp为例
- ★android开发--ListView+Json+异步网络图片加载+滚动翻页的例子(图片能缓存,图片不错乱)
- [网络开发]IOCP完整例子
- Android开发循序渐进实例5--网络访问例子
- iOS开发 - 第04篇 - 网络 - 02 - JSON解析 & 请求 & 黑酷例子 & HTTP通信
- Visual C# 2008+SQL Server 2005 数据库与网络开发--6.1.1 报表服务概述
- Android网络服务开发之Socket编程
- 【工业串口和网络软件通讯平台(SuperIO)教程】七.二次开发服务驱动
- Android 入门开发指南之四 -- Hello,Android例子(下)
- Android程序开发ListView+Json+异步网络图片加载+滚动翻页的例子(图片能缓存,图片不错乱)
- IT增值服务-客户案例(三):合肥薪火科技,Java和P2P网络借贷系统开发指导
- [图解教程] Axis2与Eclipse整合开发Web Service之一:简单的计算服务例子
- [图解教程] Axis2与Eclipse整合开发Web Service之一:简单的计算服务例子
- 【工业串口和网络软件通讯平台(SuperIO)教程】七.二次开发服务驱动