CentOS上yum安装nginx+mysql+php+php-fastcgi [经本人整理后亲自测试]
2011-02-14 17:25
1081 查看
CentOS上yum安装nginx+mysql+php+php-fastcgi
一、更改yum源为网易的源加快速度
vi /etc/yum.repos.d/CentOS-Base.repo
更改内容如下
二、update yum
yum -y update
三、利用CentOS Linux系统自带的yum命令安装、升级所需的程序库
LANG=C
yum -y install gcc gcc-c++ autoconf libjpeg libjpeg-devel libpng
libpng-devel freetype freetype-devel libxml2 libxml2-devel zlib
zlib-devel glibc glibc-devel glib2 glib2-devel bzip2 bzip2-devel ncurses
ncurses-devel curl curl-devel e2fsprogs e2fsprogs-devel krb5 krb5-devel
libidn libidn-devel openssl openssl-devel openldap openldap-devel
nss_ldap openldap-clients openldap-servers
四、安装mysql
具体可以参考 http://blog.csdn.net/siren0203/archive/2011/02/15/6185303.aspx 文章
mysql
#useradd mysql
#tar zxvf mysql-5.0.40.tar.gz
#cd mysql-5.0.40
#./configure --prefix=/usr/local/mysql
#make && make install
#/usr/local/mysql/bin/mysql_install_db --user=mysql //初始化MySQL数据库
#chown -R mysql /usr/local/mysql/var
#/usr/local/mysql/bin/mysqld_safe & //启动MySQL
#/usr/local/mysql/bin/mysqladmin -u root password 123456 //设置MySQL密码
#cp support-files/my-medium.cnf /etc/my.cnf
#echo "/usr/local/mysql/bin/mysqld_safe &" >>/etc/rc.local
安装MYSQL时候,在configure时候遇到了错误:configure error no curses termcap library found
解决方式(centos5系统):yum -y install ncurses-devel
五、安装nginx
我自己下载的包
输入命令 ./configure --prefix=/opt/nginx
make && make install
编译安装
可能有的时候会出现 PCRE library is not foun 这样的错误
那您就再去 http://blog.csdn.net/siren0203/archive/2011/02/14/6184551.aspx 这个地址找解决办法。。
设置开机启动
chkconfig nginx on
六、
安装PHP
这个地方是最重要的地方,因为默认情况下
Nginx和PHP他俩之间是一点感觉没有的。在之前,很多朋友都搭建过Apache+PHP,Apache+PHP编译后生成的是模块文件,而
Nginx+PHP需要PHP生成可执行文件才可以,所以要利用fastcgi技术来实现N
ginx与PHP的整合,这个只要我们安装是启用FastCGI即可。此次我们安装PHP不仅使用了FastCGI,而且还使用了PHP-FPM这么一个
东东,PHP-FPM说白了是一个管理FastCGI的一个管理器,它作为PHP的插件纯在,在安装PHP要想使用PHP-FPM时就需要把PHP-
FPM以补丁的形式安装到PHP中,而且PHP要与PHP-FPM版本一致,这是必须的,切记!
首先我们把PHP和PHP-FPM下载到同一目录下,此次用的为php-5.3.0.tar.bz2和php-5.3.0-fpm-0.5.12.diff.gz,下载到了同一目录下
#tar xvf php-5.3.0.tar.bz2
#gzip -cd php-5.3.0-fpm-0.5.12.diff.gz | patch -d php-5.3.0 -p1 //将php-5.3.0-fpm-0.5.12.diff.gz以补丁形式加到php-5.3.0里面
#cd php-5.3.0
#./configure --prefix=/usr/local/php --enable-fastcgi --enable-fpm
注:Nginx+PHP整合,在安装时必须启用--enable-fastcgi和 --enable-fpm,这两个选项是做什么的上面已经描述。执行完后系统会提示--enable-fastcgi是一个未知选项,我们不必理会

#make
#make install
#cp php.ini-dist /usr/local/php/etc/php.ini
下面我们就要启动PHP-FPM
#/usr/local/php/sbin/php-fpm start

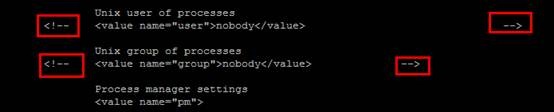
在启动PHP-FPM时会报上面这个错误,原因是PHP-FPM自己不知道以那个用户和组运行PHP,所以我们要修改一个文件,把文件中的注释去掉即可(打开文件把红色部分删除),然后PHP-FPM会以nobody用户和组去运行PHP。
#vi /usr/local/php/etc/php-fpm.conf
#/usr/local/php/sbin/php-fpm start
#ps -aux | grep php

#echo "/usr/local/php/sbin/php-fpm start" >>/etc/rc.local
七、整合Nginx与PHP
上面已经讲过,Nginx自己并不处理动态网页的请求,而且Nginx将得到的动态请求转交给PHP,下面我们打开Nginx的配置文件看一下
#vi /usr/local/nginx/conf/nginx.conf //标的部分是我们后面要修改的
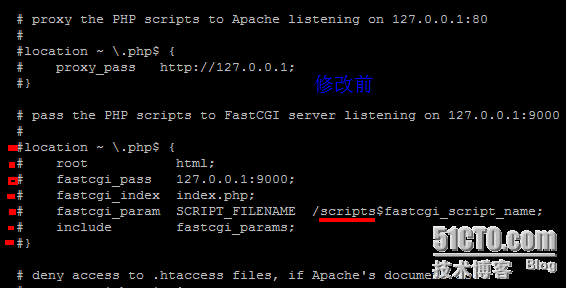
看上图,Nginx已经知道怎么把得到的请求传达给PHP,Nginx在得到*.php请求时,会把请求通过9000端口传给PHP。下面我们把这些注释给去掉即可,如下图
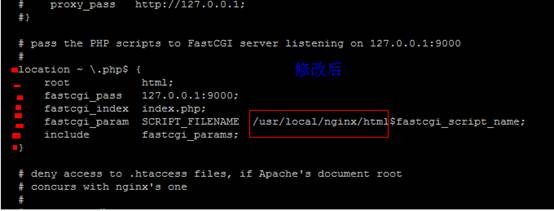
注:上面的/usr/local/nginx/html 是我们PHP网站放置的路径
那么只有Nginx自己知道咋找PHP了还不行,还需要PHP知道咋找Nginx,PS:你见过大街上的JJMM约会时有不是相互认识对方,或者是不知道
用啥方法和对方接头的?这点我们不需要担心,PHP-FPM已经在配置文件中定义了从哪接受PHP请求,我们可以打开配置文件看一下
#vi /usr/local/php/etc/php-fpm.conf
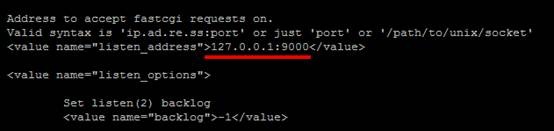
如上图所示,我们在前面已经看到过Nginx是通过本机的9000端口将PHP请求转发给PHP的,而上图我们可以看到PHP自己是从本机的9000端口侦听数据 ,Nginx与PHP通过本机的9000端口完成了数据请求。
八、测试
我们在nginx的配置文件里面已经定义了PHP网站的存放路径,路径问/usr/local/nginx/html
下面我们在这个目录下新建一个PHP页面测试网页,文件名为test.php,内容如下
<?php
phpinfo();
?>
重启PHP与nginx后(可以用杀死进程的方式关闭,然后在启动)我们在浏览器中输入http://localhost/test.php,出现如下界面算成功

为了您的安全,请只打开来源可靠的网址
打开网站
取消
为了您的安全,请只打开来源可靠的网址
打开网站
取消
一、更改yum源为网易的源加快速度
vi /etc/yum.repos.d/CentOS-Base.repo
更改内容如下
# CentOS-Base.repo
#
# This file uses a new mirrorlist system developed by Lance Davis for CentOS.
# The mirror system uses the connecting IP address of the client and the
# update status of each mirror to pick mirrors that are updated to and
# geographically close to the client. You should use this for CentOS updates
# unless you are manually picking other mirrors.
#
# If the mirrorlist= does not work for you, as a fall back you can try the
# remarked out baseurl= line instead.
#
#
[base]
name=CentOS-$releasever - Base
#mirrorlist=http://mirrorlist.centos.org/?release=$releasever&arch=$basearch&repo=os
#baseurl=http://mirror.centos.org/centos/$releasever/os/$basearch/
baseurl=http://mirrors.163.com/centos/$releasever/os/$basearch/
gpgcheck=1
gpgkey=http://mirror.centos.org/centos/RPM-GPG-KEY-CentOS-5
#released updates
[updates]
name=CentOS-$releasever - Updates
#mirrorlist=http://mirrorlist.centos.org/?release=$releasever&arch=$basearch&repo=updates
#baseurl=http://mirror.centos.org/centos/$releasever/updates/$basearch/
baseurl=http://mirrors.163.com/centos/$releasever/updates/$basearch/
gpgcheck=1
gpgkey=http://mirror.centos.org/centos/RPM-GPG-KEY-CentOS-5
#packages used/produced in the build but not released
[addons]
name=CentOS-$releasever - Addons
#mirrorlist=http://mirrorlist.centos.org/?release=$releasever&arch=$basearch&repo=addons
#baseurl=http://mirror.centos.org/centos/$releasever/addons/$basearch/
baseurl=http://mirrors.163.com/centos/$releasever/addons/$basearch/
gpgcheck=1
gpgkey=http://mirror.centos.org/centos/RPM-GPG-KEY-CentOS-5
#additional packages that may be useful
[extras]
name=CentOS-$releasever - Extras
#mirrorlist=http://mirrorlist.centos.org/?release=$releasever&arch=$basearch&repo=extras
#baseurl=http://mirror.centos.org/centos/$releasever/extras/$basearch/
baseurl=http://mirrors.163.com/centos/$releasever/extras/$basearch/
gpgcheck=1
gpgkey=http://mirror.centos.org/centos/RPM-GPG-KEY-CentOS-5
#additional packages that extend functionality of existing packages
[centosplus]
name=CentOS-$releasever - Plus
#mirrorlist=http://mirrorlist.centos.org/?release=$releasever&arch=$basearch&repo=centosplus
#baseurl=http://mirror.centos.org/centos/$releasever/centosplus/$basearch/
baseurl=http://mirrors.163.com/centos/$releasever/centosplus/$basearch/
gpgcheck=1
enabled=0
gpgkey=http://mirror.centos.org/centos/RPM-GPG-KEY-CentOS-5
二、update yum
yum -y update
三、利用CentOS Linux系统自带的yum命令安装、升级所需的程序库
LANG=C
yum -y install gcc gcc-c++ autoconf libjpeg libjpeg-devel libpng
libpng-devel freetype freetype-devel libxml2 libxml2-devel zlib
zlib-devel glibc glibc-devel glib2 glib2-devel bzip2 bzip2-devel ncurses
ncurses-devel curl curl-devel e2fsprogs e2fsprogs-devel krb5 krb5-devel
libidn libidn-devel openssl openssl-devel openldap openldap-devel
nss_ldap openldap-clients openldap-servers
四、安装mysql
具体可以参考 http://blog.csdn.net/siren0203/archive/2011/02/15/6185303.aspx 文章
mysql
#useradd mysql
#tar zxvf mysql-5.0.40.tar.gz
#cd mysql-5.0.40
#./configure --prefix=/usr/local/mysql
#make && make install
#/usr/local/mysql/bin/mysql_install_db --user=mysql //初始化MySQL数据库
#chown -R mysql /usr/local/mysql/var
#/usr/local/mysql/bin/mysqld_safe & //启动MySQL
#/usr/local/mysql/bin/mysqladmin -u root password 123456 //设置MySQL密码
#cp support-files/my-medium.cnf /etc/my.cnf
#echo "/usr/local/mysql/bin/mysqld_safe &" >>/etc/rc.local
安装MYSQL时候,在configure时候遇到了错误:configure error no curses termcap library found
解决方式(centos5系统):yum -y install ncurses-devel
五、安装nginx
我自己下载的包
输入命令 ./configure --prefix=/opt/nginx
make && make install
编译安装
可能有的时候会出现 PCRE library is not foun 这样的错误
那您就再去 http://blog.csdn.net/siren0203/archive/2011/02/14/6184551.aspx 这个地址找解决办法。。
设置开机启动
chkconfig nginx on
六、
安装PHP
这个地方是最重要的地方,因为默认情况下
Nginx和PHP他俩之间是一点感觉没有的。在之前,很多朋友都搭建过Apache+PHP,Apache+PHP编译后生成的是模块文件,而
Nginx+PHP需要PHP生成可执行文件才可以,所以要利用fastcgi技术来实现N
ginx与PHP的整合,这个只要我们安装是启用FastCGI即可。此次我们安装PHP不仅使用了FastCGI,而且还使用了PHP-FPM这么一个
东东,PHP-FPM说白了是一个管理FastCGI的一个管理器,它作为PHP的插件纯在,在安装PHP要想使用PHP-FPM时就需要把PHP-
FPM以补丁的形式安装到PHP中,而且PHP要与PHP-FPM版本一致,这是必须的,切记!
首先我们把PHP和PHP-FPM下载到同一目录下,此次用的为php-5.3.0.tar.bz2和php-5.3.0-fpm-0.5.12.diff.gz,下载到了同一目录下
#tar xvf php-5.3.0.tar.bz2
#gzip -cd php-5.3.0-fpm-0.5.12.diff.gz | patch -d php-5.3.0 -p1 //将php-5.3.0-fpm-0.5.12.diff.gz以补丁形式加到php-5.3.0里面
#cd php-5.3.0
#./configure --prefix=/usr/local/php --enable-fastcgi --enable-fpm
注:Nginx+PHP整合,在安装时必须启用--enable-fastcgi和 --enable-fpm,这两个选项是做什么的上面已经描述。执行完后系统会提示--enable-fastcgi是一个未知选项,我们不必理会
#make
#make install
#cp php.ini-dist /usr/local/php/etc/php.ini
下面我们就要启动PHP-FPM
#/usr/local/php/sbin/php-fpm start
在启动PHP-FPM时会报上面这个错误,原因是PHP-FPM自己不知道以那个用户和组运行PHP,所以我们要修改一个文件,把文件中的注释去掉即可(打开文件把红色部分删除),然后PHP-FPM会以nobody用户和组去运行PHP。
#vi /usr/local/php/etc/php-fpm.conf
#/usr/local/php/sbin/php-fpm start
#ps -aux | grep php
#echo "/usr/local/php/sbin/php-fpm start" >>/etc/rc.local
七、整合Nginx与PHP
上面已经讲过,Nginx自己并不处理动态网页的请求,而且Nginx将得到的动态请求转交给PHP,下面我们打开Nginx的配置文件看一下
#vi /usr/local/nginx/conf/nginx.conf //标的部分是我们后面要修改的
看上图,Nginx已经知道怎么把得到的请求传达给PHP,Nginx在得到*.php请求时,会把请求通过9000端口传给PHP。下面我们把这些注释给去掉即可,如下图
注:上面的/usr/local/nginx/html 是我们PHP网站放置的路径
那么只有Nginx自己知道咋找PHP了还不行,还需要PHP知道咋找Nginx,PS:你见过大街上的JJMM约会时有不是相互认识对方,或者是不知道
用啥方法和对方接头的?这点我们不需要担心,PHP-FPM已经在配置文件中定义了从哪接受PHP请求,我们可以打开配置文件看一下
#vi /usr/local/php/etc/php-fpm.conf
如上图所示,我们在前面已经看到过Nginx是通过本机的9000端口将PHP请求转发给PHP的,而上图我们可以看到PHP自己是从本机的9000端口侦听数据 ,Nginx与PHP通过本机的9000端口完成了数据请求。
八、测试
我们在nginx的配置文件里面已经定义了PHP网站的存放路径,路径问/usr/local/nginx/html
下面我们在这个目录下新建一个PHP页面测试网页,文件名为test.php,内容如下
<?php
phpinfo();
?>
重启PHP与nginx后(可以用杀死进程的方式关闭,然后在启动)我们在浏览器中输入http://localhost/test.php,出现如下界面算成功
为了您的安全,请只打开来源可靠的网址
打开网站
取消
为了您的安全,请只打开来源可靠的网址
打开网站
取消

相关文章推荐
- CentOS上yum安装nginx+mysql+php+php-fastcgi [经本人整理后亲自测试]
- centos-5 yum安装nginx-mysql5.1-php5.2-fastcgi构建LNMP服务器
- CentOS上yum安装nginx+mysql+php+php-fastcgi
- CentOS上yum安装nginx+mysql+php+php-fastcgi
- centos-5 yum安装nginx-mysql5.1-php5.2-fastcgi构建LNMP服务器
- centos-5 yum安装nginx-mysql5.1-php5.2-fastcgi构建LNMP服务器
- CentOS5.5安装Nginx、PHP(FastCGI)、MySQL --搭建LNMP环境安装wordpress
- centos安装nginx+mysql+php+fastcgi+memcache最简单方法
- centos6.3 yum安装nginx+mysql+php-fpm
- CentOS使用YUM安装php运行环境,包含php,php-fpm,nginx,mysql
- CentOS 5.5安装Nginx、PHP(FastCGI)、MySQL --搭建LNMP环境安装Wordpress、Discuz
- centos6.5下安装lnmp环境(nginx+linux+mysql+php)[yum安装]
- centos安装nginx+mysql+php+fastcgi+memcache最简单方法
- Centos下Nginx+PHP+MySql的安装和配置(综合整理)
- CentOS使用YUM安装php运行环境,包含php,php-fpm,nginx,mysql
- 通过yum安装nginx-mysql-php-fastcgi配置LNMP
- yum安装nginx-mysql-php-fastcgi构建LNMP服务器
- centos6.5使用yum安装nginx+mysql+php
- 通过yum安装nginx-mysql-php-fastcgi配置LNMP
- Centos6.9下 yum 安装 nginx1.10 + mysql5.6 + php5.6