使用myEclipse,tomcat 和Axis发布webService
2010-11-11 20:49
459 查看
一.准备工作:
1. 安装axis。去官方网站http://ws.apache.org/axis/下载axis包,然后解压到任何一个目录。本例使用的是axis-bin-1_4.tar.gz ,解压到E:/axis-bin-1_4/axis-1_4。
2. 开发环境准备。本例使用MyEclipse6.0 ,java j2ee 1.4库,web server用tomcat6。
二.创建web工程:
1. MyEclipse中新建web工程,名称为testAxis。工程目录为:D:/JavaProject/testAxis。
2. 把testAxis部署到tomcat。
3. 引入axis包: 把axis目录下的E:/axis-bin-1_4/axis-1_4 /lib/下的所有jar包拷贝到工程下面的WebRoot/WEB-INF/lib下,myelipse会自动添加到引用库:

4. 修改web.xml:如果没有特殊情况,最简单的方法就是用axis解压包中的web.xml直接替换testAxis工程的web.xml。例如本例,就用E:/ /axis-bin-1_4/axis-1_4/webapps/axis/WEB-INF/web.xml替换工程testAxis下的web.xml。
三.创建webservice:
1. 在工程testAxis里新建要实现方法的接口:本例新建sayHelloToCkp.java,放在com.ckp包中。
package com.ckp;
public interface sayHelloToCkp {
public String sayHello ();
}
2. 把该类生成wsdl文件:
Axis里有一个Java2WSDL方法,用于把java类生成wsdl。当然你可以写命令行手动执行这个方法。这里讲下使用MyEclipse来运行这个方法。
在sayHelloToCkp.java类文件上右键,Run As——》Open Run Dialog:

弹出窗口,新建一个configuration,下图1处,然后
Main选项卡中的main class 输入:
org.apache.axis.wsdl.Java2WSDL;
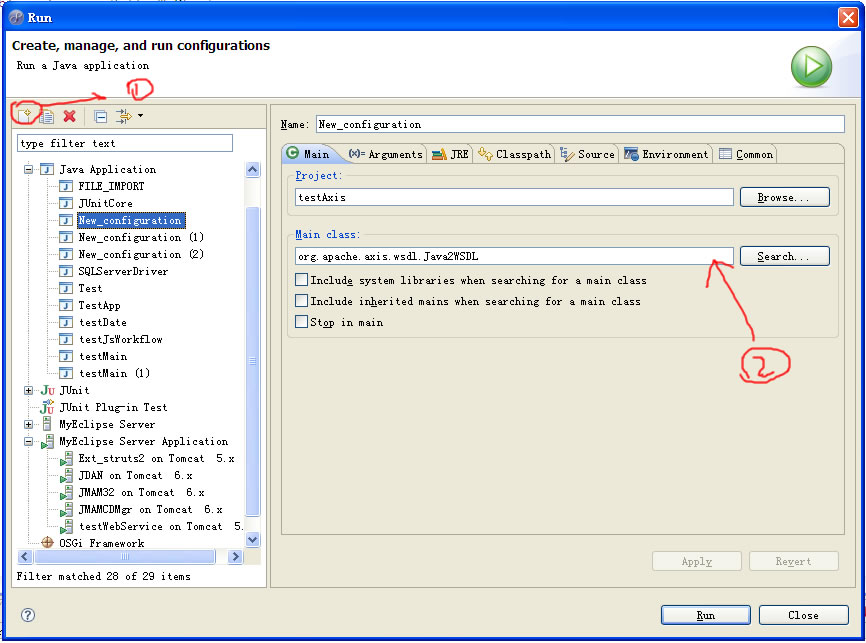
Arguments选项卡中的program arguments输入,如下图
-o ckp.wsdl
-l "http://localhost:8080/testAxis/services/ckp"
-n "urn:ckp"
-p"com.ckp" "urn:ckp"
com.ckp.sayHelloToCkp

然后点击Run。会在工程目录D:/JavaProject/testAxis下生成ckp.wsdl文件。
3. 用wsdl生成服务类
axis里面有WSDL2Java的方法(与Java2WSDL相反),用于把wsdl文件生成java service类。当然你还可以写命令行手动执行这个方法。这里讲下使用MyEclipse来运行这个方法。
同上,还是右键Run As——》Open Run Dialog,弹出窗口,新建configuration。这次使用
org.apache.axis.wsdl.WSDL2Java ,
参数是
-t -B -v -D -s -p com.ckp.server D:/JavaProject/testAixs/ckp.wsdl
如下图:

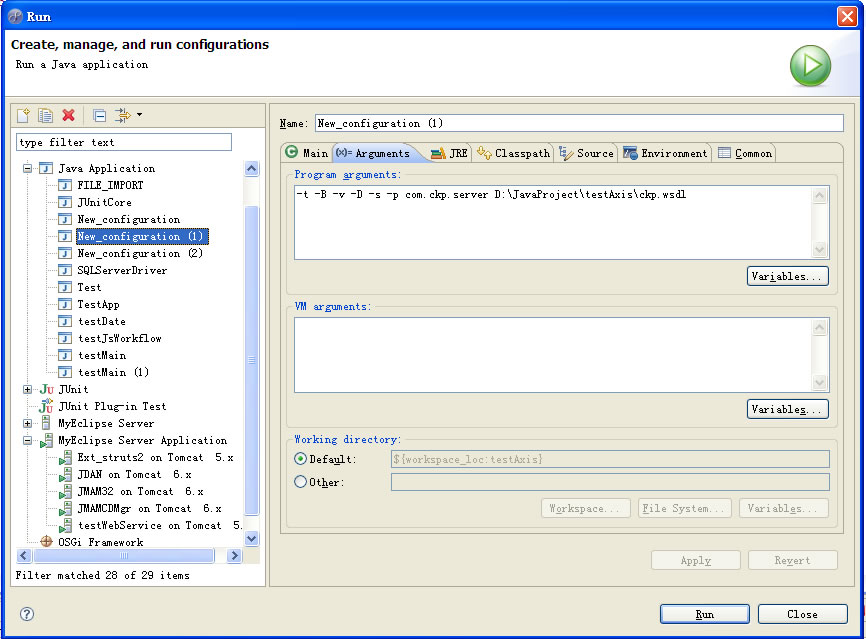
Run后,将在项目的根目录下生成相关的服务类、build.xml和deploy.wsdd,undesploy.wsdd等。我们把他们拷贝到工程里的src下即可(注意包的位置):

4. 服务的部署和生成server_config.wsdd:
先启动tomcat,然后运行命令行cmd,到达web服务器里类和deploy.wsdd所在的目录,如本例的是c:/apache-tomcat-6.0.14/webapps/testAxis/WEB-INF/classes/com/ckp/server
执行如下命令:
java -Djava.ext.dirs=E:/axis-bin-1_4/axis-1_4/lib org.apache.axis.client.AdminClient -lhttp://localhost:8080/testAxis/services/ckp?wsdl deploy.wsdd
前面的路径是axis解压路径里的lib路径,后面是未来的service的wsdl地址。
生成成功后,c:/apache-tomcat-6.0.14/webapps/testAxis/WEB-INF/下便可看到server-config.wsdd文件。
5. 测试:
在WebService的实现类CkpSoapBindingImpl.java里添加如下代码:
package com.ckp.server;
public class CkpSoapBindingImpl implements com.ckp.server.SayHellowToCkp{
public java.lang.String sayHello() throws java.rmi.RemoteException {
return "hello you";
}
}
重启tomcat,输入http://localhost:8080/testAxis/services 访问。
四.生成客户端:
有了WSDL文件,与生成服务器代码相同,只是参数不同,也是生成在项目根目录下:如下图:
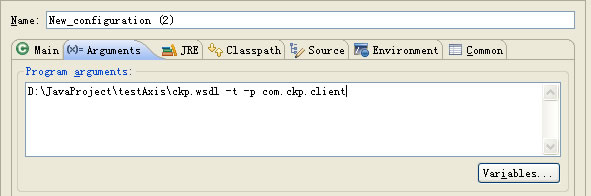
注:本例中,如果不想保留原来的接口类sayHelloToCkp.java,完全可以在最开始时就把接口类放在com.ckp.server下,然后在第三步第3小步中,再把它覆盖。
五、客户端的使用(PS:原文没有,自己补上的)

1、SayHelloToCkp.java ——服务接口方法类。这个类是一个Web Service的服务接口方法类,客户端需要通过这个类来调用服务器端所提供的这个服务的接口和方法。
2、SayHelloToCkpService.java——服务接口类。通过这个类来得到Web Service的服务接口,ServiceLocator类实现这个类的接口。
3、SayHelloToCkpLocator.java——服务地址类。在这个类中设置服务地址,进而得到服务接口。
4、SayHelloToCkpStub.java——Stub类。它实现了Axis调用JAX-RPC环境的过程。
调用客户端的过程:先创建一个ServiceLocator的实例,再通过ServiceLocator的实例创建服务接口的实例,直接调用服务接口实例的方法。如下所示。
Ok.关于WebService的使用已经完整了。
附录:WSDL2Java的参数含义
Options:
-h, --help
print this message and exit
-v, --verbose
print informational messages
-n, --noImports
only generate code for the immediate WSDL document
-O, --timeout <argument>
timeout in seconds (default is 45, specify -1 to disable)
-D, --Debug
print debug information
-W, --noWrapped
turn off support for "wrapped" document/literal
-s, --server-side
emit server-side bindings for web service
-S, --skeletonDeploy <argument>
deploy skeleton (true) or implementation (false) in deploy.wsdd.
Default is false. Assumes --server-side.
-N, --NStoPkg <argument>=<value>
mapping of namespace to package
-f, --fileNStoPkg <argument>
file of NStoPkg mappings (default NStoPkg.properties)
-p, --package <argument>
override all namespace to package mappings, use this package
name instead
-o, --output <argument>
output directory for emitted files
-d, --deployScope <argument>
add scope to deploy.xml: "Application", "Request", "Session"
-t, --testCase
emit junit testcase class for web service
-a, --all
generate code for all elements, even unreferenced ones
-T, --typeMappingVersion
indicate 1.1 or 1.2. The default is 1.1 (SOAP 1.1 JAX-RPC compliant. 1.2 indicates SOAP 1.1 encoded.)
-F, --factory <argument>
name of a custom class that implements GeneratorFactory interface (for extending Java generation functions)
-i, --nsInclude <namespace>
namescape to specifically include in the generated code (defaults to all namespaces unless specifically excluded with the -x option)
-x, --nsExclude <namespace>
namespace to specifically exclude from the generated code (defaults to none excluded until first namespace included with -i option)
-p, --property <name>=<value>
name and value of a property for use by the custom GeneratorFactory
-H, --helperGen
emits separate Helper classes for meta data
-U, --user <argument>
username to access the WSDL-URI
-P, --password <argument>
password to access the WSDL-URI
-c, --implementationClassName <argument>
use this as the implementation class
-w, --wrapArrays
Prefer generating JavaBean classes like "ArrayOfString" for certain schema array patterns (default is to use String [])
1. 安装axis。去官方网站http://ws.apache.org/axis/下载axis包,然后解压到任何一个目录。本例使用的是axis-bin-1_4.tar.gz ,解压到E:/axis-bin-1_4/axis-1_4。
2. 开发环境准备。本例使用MyEclipse6.0 ,java j2ee 1.4库,web server用tomcat6。
二.创建web工程:
1. MyEclipse中新建web工程,名称为testAxis。工程目录为:D:/JavaProject/testAxis。
2. 把testAxis部署到tomcat。
3. 引入axis包: 把axis目录下的E:/axis-bin-1_4/axis-1_4 /lib/下的所有jar包拷贝到工程下面的WebRoot/WEB-INF/lib下,myelipse会自动添加到引用库:
4. 修改web.xml:如果没有特殊情况,最简单的方法就是用axis解压包中的web.xml直接替换testAxis工程的web.xml。例如本例,就用E:/ /axis-bin-1_4/axis-1_4/webapps/axis/WEB-INF/web.xml替换工程testAxis下的web.xml。
三.创建webservice:
1. 在工程testAxis里新建要实现方法的接口:本例新建sayHelloToCkp.java,放在com.ckp包中。
package com.ckp;
public interface sayHelloToCkp {
public String sayHello ();
}
2. 把该类生成wsdl文件:
Axis里有一个Java2WSDL方法,用于把java类生成wsdl。当然你可以写命令行手动执行这个方法。这里讲下使用MyEclipse来运行这个方法。
在sayHelloToCkp.java类文件上右键,Run As——》Open Run Dialog:
弹出窗口,新建一个configuration,下图1处,然后
Main选项卡中的main class 输入:
org.apache.axis.wsdl.Java2WSDL;
Arguments选项卡中的program arguments输入,如下图
-o ckp.wsdl
-l "http://localhost:8080/testAxis/services/ckp"
-n "urn:ckp"
-p"com.ckp" "urn:ckp"
com.ckp.sayHelloToCkp
然后点击Run。会在工程目录D:/JavaProject/testAxis下生成ckp.wsdl文件。
3. 用wsdl生成服务类
axis里面有WSDL2Java的方法(与Java2WSDL相反),用于把wsdl文件生成java service类。当然你还可以写命令行手动执行这个方法。这里讲下使用MyEclipse来运行这个方法。
同上,还是右键Run As——》Open Run Dialog,弹出窗口,新建configuration。这次使用
org.apache.axis.wsdl.WSDL2Java ,
参数是
-t -B -v -D -s -p com.ckp.server D:/JavaProject/testAixs/ckp.wsdl
如下图:
Run后,将在项目的根目录下生成相关的服务类、build.xml和deploy.wsdd,undesploy.wsdd等。我们把他们拷贝到工程里的src下即可(注意包的位置):
4. 服务的部署和生成server_config.wsdd:
先启动tomcat,然后运行命令行cmd,到达web服务器里类和deploy.wsdd所在的目录,如本例的是c:/apache-tomcat-6.0.14/webapps/testAxis/WEB-INF/classes/com/ckp/server
执行如下命令:
java -Djava.ext.dirs=E:/axis-bin-1_4/axis-1_4/lib org.apache.axis.client.AdminClient -lhttp://localhost:8080/testAxis/services/ckp?wsdl deploy.wsdd
前面的路径是axis解压路径里的lib路径,后面是未来的service的wsdl地址。
生成成功后,c:/apache-tomcat-6.0.14/webapps/testAxis/WEB-INF/下便可看到server-config.wsdd文件。
5. 测试:
在WebService的实现类CkpSoapBindingImpl.java里添加如下代码:
package com.ckp.server;
public class CkpSoapBindingImpl implements com.ckp.server.SayHellowToCkp{
public java.lang.String sayHello() throws java.rmi.RemoteException {
return "hello you";
}
}
重启tomcat,输入http://localhost:8080/testAxis/services 访问。
四.生成客户端:
有了WSDL文件,与生成服务器代码相同,只是参数不同,也是生成在项目根目录下:如下图:
注:本例中,如果不想保留原来的接口类sayHelloToCkp.java,完全可以在最开始时就把接口类放在com.ckp.server下,然后在第三步第3小步中,再把它覆盖。
五、客户端的使用(PS:原文没有,自己补上的)
1、SayHelloToCkp.java ——服务接口方法类。这个类是一个Web Service的服务接口方法类,客户端需要通过这个类来调用服务器端所提供的这个服务的接口和方法。
2、SayHelloToCkpService.java——服务接口类。通过这个类来得到Web Service的服务接口,ServiceLocator类实现这个类的接口。
3、SayHelloToCkpLocator.java——服务地址类。在这个类中设置服务地址,进而得到服务接口。
4、SayHelloToCkpStub.java——Stub类。它实现了Axis调用JAX-RPC环境的过程。
调用客户端的过程:先创建一个ServiceLocator的实例,再通过ServiceLocator的实例创建服务接口的实例,直接调用服务接口实例的方法。如下所示。
//use a mail client webservice
SayHelloToCkpServiceLocator ckpServiceLocator = new SayHelloToCkpServiceLocator();
SayHelloToCkp sayHelloToCkp = ckpServiceLocator.getckp();
String result = sayHelloToCkp.sayHello();
System.out.println("调用WEBSERVICE结果:" + result);
Ok.关于WebService的使用已经完整了。
附录:WSDL2Java的参数含义
WSDL2Java Reference
Usage: java org.apache.axis.wsdl.WSDL2Java [options] WSDL-URIOptions:
-h, --help
print this message and exit
-v, --verbose
print informational messages
-n, --noImports
only generate code for the immediate WSDL document
-O, --timeout <argument>
timeout in seconds (default is 45, specify -1 to disable)
-D, --Debug
print debug information
-W, --noWrapped
turn off support for "wrapped" document/literal
-s, --server-side
emit server-side bindings for web service
-S, --skeletonDeploy <argument>
deploy skeleton (true) or implementation (false) in deploy.wsdd.
Default is false. Assumes --server-side.
-N, --NStoPkg <argument>=<value>
mapping of namespace to package
-f, --fileNStoPkg <argument>
file of NStoPkg mappings (default NStoPkg.properties)
-p, --package <argument>
override all namespace to package mappings, use this package
name instead
-o, --output <argument>
output directory for emitted files
-d, --deployScope <argument>
add scope to deploy.xml: "Application", "Request", "Session"
-t, --testCase
emit junit testcase class for web service
-a, --all
generate code for all elements, even unreferenced ones
-T, --typeMappingVersion
indicate 1.1 or 1.2. The default is 1.1 (SOAP 1.1 JAX-RPC compliant. 1.2 indicates SOAP 1.1 encoded.)
-F, --factory <argument>
name of a custom class that implements GeneratorFactory interface (for extending Java generation functions)
-i, --nsInclude <namespace>
namescape to specifically include in the generated code (defaults to all namespaces unless specifically excluded with the -x option)
-x, --nsExclude <namespace>
namespace to specifically exclude from the generated code (defaults to none excluded until first namespace included with -i option)
-p, --property <name>=<value>
name and value of a property for use by the custom GeneratorFactory
-H, --helperGen
emits separate Helper classes for meta data
-U, --user <argument>
username to access the WSDL-URI
-P, --password <argument>
password to access the WSDL-URI
-c, --implementationClassName <argument>
use this as the implementation class
-w, --wrapArrays
Prefer generating JavaBean classes like "ArrayOfString" for certain schema array patterns (default is to use String [])

相关文章推荐
- 使用myEclipse,tomcat 和Axis发布webService
- 使用myEclipse,tomcat 和Axis发布webService
- 【转载】使用myEclipse,tomcat 和Axis发布webService
- 使用myEclipse,tomcat 和Axis发布webService
- 使用myEclipse,tomcat 和Axis发布webService
- 使用Axis在Tomcat下发布Webservice操作指南
- 使用Axis在Tomcat下发布Webservice操作指南
- Axis + Tomcat + Eclipse 发布 WebService
- 使用Axis发布WebService相关环境准备
- WebService -- Java 实现之 CXF ( 使用:Spring+CXF+Tomcat发布webService)
- 使用契约优先的方式来开发WebService(用到了jaxws-ri),并发布到tomcat中
- 使用Apache cxf 和Spring在Tomcat下发布Webservice指南
- Servlet开发(一)如何在Myeclipse 中使用tomcat(配置tomcat,发布web项目)
- MyEclipse8.5创建webService发布到Tomcat 6和weblogic
- axis webservice tomcat 服务发布总结之相关流程和问题汇总
- 服务端使用Axis2-1.6.3发布webservice服务、客户端使用Axis1.4实现调用
- 使用Axis简单步骤发布Webservice
- axis 使用 WebService 发布项目
- 使用Jax-ws将webservice发布到Web容器(Tomcat)
- 使用MyEclipse_将web应用发布到Tomcat的Root下,访问时不加工程名