memcached以php作为客户端的安装和配置
2010-04-12 17:58
686 查看
环境说明:
服务器操作系统:CentOS 5.2
服务器IP为:192.168.10.195
Php版本:5.2.9(编译安装)
Php安装目录:/usr/local/php
Apache安装目录:/usr/local/apache
Memchaed安装和基本过程配置如下:
1. 安装libevent库用于Socket的处理
[root@cacti srv]#tar zvxf libevent-1.4.9-stable.tar.gz
[root@cacti srv]#cd libevent-1.4.9-stable
[root@cacti libevent-1.4.9-stable]#./configure --prefix=/usr/
[root@cacti libevent-1.4.9-stable]#make
[root@cacti libevent-1.4.9-stable]#make install
2. 安装memcached服务器端,安装过程中要指定libevent的安装位置
[root@cacti libevent-1.4.9-stable]#cd ..
[root@cacti srv]#tar zvxf memcached-1.4.0.tar.gz
[root@cacti srv]#cd memcached-1.4.0
[root@cactimemcached-1.4.0]#./configure --prefix=/usr/local/memcached --with-libevent=/usr/
[root@cacti memcached-1.4.0]#make
[root@cacti memcached-1.4.0]#make install
3. 安装php的memchaed扩展
[root@cactimemcached-1.4.0]# cd ..
[root@cactimemcached-1.4.0]# tar zvxf memcache-2.2.5.tgz
[root@cacti srv]# cd memcache-2.2.5
[root@cacti memcache-2.2.5]# ./configure --enable-memcache --with-php-config=/usr/local/php/bin/php-config --with-zlib-dir(注意php要按实际情况指定)
[root@cacti memcache-2.2.5]# make
[root@cacti memcache-2.2.5]# make install
如果安装准确无误会有如下的回显
Installing shared extensions: /usr/local/php/lib/php/extensions/no-debug-non-zts-20060613
4. 编辑php的主配置文件,本环境在/usr/local/php/lib目录
[root@cacti extensions]# vi /usr/local/php/lib/php.ini(更改如下)
修改
extension_dir = “./”
为
; extension_dir = “./”
然后在文件的最末尾添加如下内容:
extension_dir="/usr/local/php/lib/php/extensions/no-debug-non-zts-20060613/"
extension = memcache.so"
注意这里的路径一定要和安装过程中屏幕打印的一致!
5. 在apache的web目录创建php.ini测试文件(前提是php+apache整合成功)
[root@cacti extensions]# cd /usr/local/apache/htdocs/(按实际路径指定)
[root@cacti htdocs]# vi test.php(内容如下)
<?php
Phpinfo();
?>
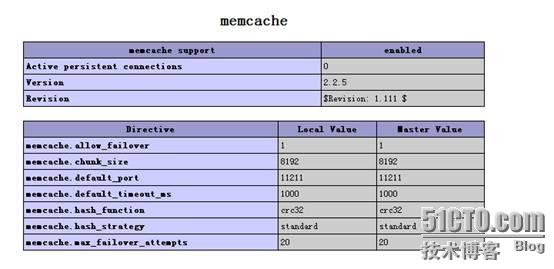
6. 重启apache,然后通过浏览器访问:http://192.168.10.195/test.php,如果有显示如下图所示,那么证明php已经加载了memcached的模块

7. 启动memcached
[root@cacti htdocs]# /usr/local/memcached/bin/memcached -d -m 10 -u root -l 192.168.10.195 -p 12000 -c 256 -P /tmp/memcached.pid
注释:
-d选项是启动一个守护进程,
-m是分派给Memcache利用的内存数目,单元是MB,我这里是10MB,
-u是运行Memcache的用户,我这里是root,
-l是监听的IP地
-p是设置Memcache监听的端口,我这里设置了12000,最好是1024以上的端口,
-c选项是最大运行的并发连数,默认是1024,我这里设置了256,根据你服务器的负载量来设定,
-P是设置保留Memcache的pid文件,我这里是保留在 /tmp/memcached.pid,
8. 查看端口是否启动正常,如果正常的话会启动两个端口,一个udp和一个tcp
[root@cacti htdocs]# netstat -nltp |grep mem
tcp 0 0 192.168.10.195:12000 0.0.0.0:* LISTEN 2387/memcached
[root@cacti htdocs]# netstat -nlup |grep mem
udp 0 0 192.168.10.195:11211 0.0.0.0:* 2387/memcached
8. 同样在apache的web根目录,写一个连接memcached的测试代码
[root@cacti htdocs]# vi haha.php(内容如下)
<?php
$mem = new Memcache;
$mem->connect("192.168.10.195", 12000);
$mem->set("key", "This is a test!", 0, 60);
$val = $mem->get('key');
echo $val;
?>
9. 在浏览器里访问http://192.168.10.195/haha.php,如果显示This is a test!则证明连接memcached成功,本文只是一个简单的demo,在实际应用中要在php程序中指定memcached的相关连接设置,和数据库设置
服务器操作系统:CentOS 5.2
服务器IP为:192.168.10.195
Php版本:5.2.9(编译安装)
Php安装目录:/usr/local/php
Apache安装目录:/usr/local/apache
Memchaed安装和基本过程配置如下:
1. 安装libevent库用于Socket的处理
[root@cacti srv]#tar zvxf libevent-1.4.9-stable.tar.gz
[root@cacti srv]#cd libevent-1.4.9-stable
[root@cacti libevent-1.4.9-stable]#./configure --prefix=/usr/
[root@cacti libevent-1.4.9-stable]#make
[root@cacti libevent-1.4.9-stable]#make install
2. 安装memcached服务器端,安装过程中要指定libevent的安装位置
[root@cacti libevent-1.4.9-stable]#cd ..
[root@cacti srv]#tar zvxf memcached-1.4.0.tar.gz
[root@cacti srv]#cd memcached-1.4.0
[root@cactimemcached-1.4.0]#./configure --prefix=/usr/local/memcached --with-libevent=/usr/
[root@cacti memcached-1.4.0]#make
[root@cacti memcached-1.4.0]#make install
3. 安装php的memchaed扩展
[root@cactimemcached-1.4.0]# cd ..
[root@cactimemcached-1.4.0]# tar zvxf memcache-2.2.5.tgz
[root@cacti srv]# cd memcache-2.2.5
[root@cacti memcache-2.2.5]# ./configure --enable-memcache --with-php-config=/usr/local/php/bin/php-config --with-zlib-dir(注意php要按实际情况指定)
[root@cacti memcache-2.2.5]# make
[root@cacti memcache-2.2.5]# make install
如果安装准确无误会有如下的回显
Installing shared extensions: /usr/local/php/lib/php/extensions/no-debug-non-zts-20060613
4. 编辑php的主配置文件,本环境在/usr/local/php/lib目录
[root@cacti extensions]# vi /usr/local/php/lib/php.ini(更改如下)
修改
extension_dir = “./”
为
; extension_dir = “./”
然后在文件的最末尾添加如下内容:
extension_dir="/usr/local/php/lib/php/extensions/no-debug-non-zts-20060613/"
extension = memcache.so"
注意这里的路径一定要和安装过程中屏幕打印的一致!
5. 在apache的web目录创建php.ini测试文件(前提是php+apache整合成功)
[root@cacti extensions]# cd /usr/local/apache/htdocs/(按实际路径指定)
[root@cacti htdocs]# vi test.php(内容如下)
<?php
Phpinfo();
?>
6. 重启apache,然后通过浏览器访问:http://192.168.10.195/test.php,如果有显示如下图所示,那么证明php已经加载了memcached的模块
7. 启动memcached
[root@cacti htdocs]# /usr/local/memcached/bin/memcached -d -m 10 -u root -l 192.168.10.195 -p 12000 -c 256 -P /tmp/memcached.pid
注释:
-d选项是启动一个守护进程,
-m是分派给Memcache利用的内存数目,单元是MB,我这里是10MB,
-u是运行Memcache的用户,我这里是root,
-l是监听的IP地
-p是设置Memcache监听的端口,我这里设置了12000,最好是1024以上的端口,
-c选项是最大运行的并发连数,默认是1024,我这里设置了256,根据你服务器的负载量来设定,
-P是设置保留Memcache的pid文件,我这里是保留在 /tmp/memcached.pid,
8. 查看端口是否启动正常,如果正常的话会启动两个端口,一个udp和一个tcp
[root@cacti htdocs]# netstat -nltp |grep mem
tcp 0 0 192.168.10.195:12000 0.0.0.0:* LISTEN 2387/memcached
[root@cacti htdocs]# netstat -nlup |grep mem
udp 0 0 192.168.10.195:11211 0.0.0.0:* 2387/memcached
8. 同样在apache的web根目录,写一个连接memcached的测试代码
[root@cacti htdocs]# vi haha.php(内容如下)
<?php
$mem = new Memcache;
$mem->connect("192.168.10.195", 12000);
$mem->set("key", "This is a test!", 0, 60);
$val = $mem->get('key');
echo $val;
?>
9. 在浏览器里访问http://192.168.10.195/haha.php,如果显示This is a test!则证明连接memcached成功,本文只是一个简单的demo,在实际应用中要在php程序中指定memcached的相关连接设置,和数据库设置

相关文章推荐
- php扩展memcached、memcache、redis的安装配置方法
- ubuntu16.04下SVN服务器安装配置、以eclipse作为客户端步骤小结
- Memcached 安装和客户端配置
- windows php下memcache+memcached安装与配置
- 使用memcached-client.php文件作为memcached客户端存取对象
- CentOS安装memcached及配置php的memcache扩展
- 源码安装Memcached服务器及其2种PHP客户端
- Linux下nginx,apache,memcached,php,mysql的安装和配置
- memcached安装配置及保存php session于memcached
- CentOS安装memcached及配置php的memcache扩展
- PHP作为memcached客户端的具体实现方法
- windows下xampp安装配置memcached-1.2.6-win32-bin, 及php_memcache.dll(20090703-5.3)下载
- php 优化一之memcached安装配置
- CentOS 安装 Apache PHP MYSQL Memcached Memcache 环境配置
- 在Ubuntu上配置使用memcached及PHP Memecache 客户端(apt-get方式)
- 在Ubuntu上配置使用memcached及PHP Memecache 客户端(apt-get方式)
- centos下nginx+postgresql+php+memcached+apc安装与配置
- windows php下memcache+memcached安装与配置
- 时间同步ntp服务的安装与配置(作为客户端的配置)
- Linux下安装php的memcached扩展(memcache的客户端)