RHEL5.3-WEB-linux+apache+mysql+php搭建论坛 (全rpm包安装)
2009-12-15 17:47
1251 查看
---陈功磊 2009-6-9
说明:... 2
在 dns对benet.com区的配置... 2
一、Apache服务器基本设置... 3
1、安装apache相关软件... 5
2、启动hpptd服务并测试... 5
3、简单修改主页并测试... 6
4、构建虚拟主机(基于域名)... 7
5、配置httpd随机启动... 10
二、MySQL安装... 10
1、安装软件包... 10
2、启动mysql服务... 11
3、设置管理员帐号密码并测试... 12
4、设置随机启动msysqld服务... 12
三、PHP安装... 12
安装软件包... 12
四、相关配置... 13
1、编辑Apache 配置文件/etc/hpptd/conf/httpd.conf相关项... 13
2、编辑个php页面... 13
3、重启httpd服务... 14
4、测试php页面... 14
五、安装bbs论坛网页文档... 14
1、拷贝bbs论坛文件压缩包到linu并解压... 15
2、复制uploads 目录里所有文件到/var/www/html/bbs 目录... 15
3、更改目录权限及配置... 16
4、安装动网论坛... 16说明:
主从dns服务器之前配置好了:
主dns 192.168.7.8 主机名dns01
从 dns 192.168.7.7 主机名 dns02
主从dns为可用状态:在 dns对benet.com区的配置
[root@dns01 named]# vi benet.com.zone # 编辑正向文件
$TTL 86400
@ IN SOA dns01.benet.com. root.benet.com. (
42 ; serial (d. adams)
3H ; refresh
15M ; retry
1W ; expiry
1D ) ; minimum
@ IN NS dns01.benet.com. # dns服务器
@ IN NS dns02.benet.com.
dns01 IN A 192.168.7.8
dns02 IN A 192.168.7.7
apache IN A 192.168.7.2
vsftpd IN A 192.168.7.3
samba IN A 192.168.7.4
mail IN A 192.168.7.5
dhcp IN A 192.168.7.6
www IN CNAME apache
sendmail IN CNAME mail
@ IN MX 5 sendmai.benet.com.
~
"benet.com.zone" 13L, 271C
[root@dns01 named]# vi 7.168.192.rev # 配置反向文件
$TTL 86400
@ IN SOA dns01.benet.com. root.benet.com. (
1997022700 ; Serial
28800 ; Refresh
14400 ; Retry
3600000 ; Expire
86400 ) ; Minimum
@ IN NS dns01.benet.com.
@ IN NS dns02.benet.com.
2 IN PTR apache.benet.com.
3 IN PTR vsftpd.benet.com.
4 IN PTR samba.benet.com.
5 IN PTR sendmail.benet.com.
6 IN PTR dncp.benet.com.
7 IN PTR dns02.benet.com.
8 IN PTR dns01.benet.com.
~
"7.168.192.rev" 12L, 475C
[root@dns02 ~]# nslookup # 在从服务器上检查服务情况
> www.benet.com # 默认从主dns解析
Server: 192.168.7.8
Address: 192.168.7.8#53
www.benet.com canonical name = apache.benet.com.
Name: apache.benet.com
Address: 192.168.7.2
> server 192.168.7.7 # 设置从从dns解析
Default server: 192.168.7.7
Address: 192.168.7.7#53
> www.benet.com
Server: 192.168.7.7
Address: 192.168.7.7#53
www.benet.com canonical name = apache.benet.com.
Name: apache.benet.com
Address: 192.168.7.2
> exit
[root@dns02 ~]#一、Apache服务器基本设置
系统使用镜像:Redhat.Enterprise.Linux.AS.V5.3-i386-dvd.iso
[root@ apache ~]# setup
弹出一个对话框。我们要进行的是防火墙配置,步骤如下:
选择“Firewall Configuration”---按 “Tab”键切换到“Run Tool”―回车―“Security Level”选项要在“Enabled”前面按一下“Tab”键---“SelLinux”选项要选“Disabled”―按一下“Tab”键---选中“Customize”-按图配置―“OK”―返回上一个对话框―“OK”―对话框自动关闭。配置完成。


[root@apache ~]# vi /etc/hosts
# Do not remove the following line, or various programs
# that require network functionality will fail.
127.0.0.1 apache www.benet.com localhost
::1 localhost6.localdomain6 localhost6
"/etc/hosts" 4L, 186C
[root@apache ~]# cat /etc/resolv.conf
nameserver 192.168.7.8
nameserver 192.168.7.7
[root@apache ~]# cat /etc/sysconfig/network-scripts/ifcfg-eth0
# Advanced Micro Devices [AMD] 79c970 [PCnet32 LANCE]
DEVICE=eth0
BOOTPROTO=static
BROADCAST=192.168.7.255
HWADDR=00:0C:29:8C:DA:02
IPADDR=192.168.7.2
IPV6INIT=yes
IPV6_AUTOCONF=yes
NETMASK=255.255.255.0
NETWORK=192.168.7.0
ONBOOT=yes
[root@apache ~]#
Apache基本:
后台进程:httpd
脚本:/etc/rc.d/init.d/httpd
使用端口:80(http),443(https)
所需RPM 包:httpd
配置路径:/etc/httpd/*
默认网站存放路径:/var/www/*
开始配置1、安装apache相关软件
[root@apache Server]# ls | grep httpd
httpd-2.2.3-22.el5.i386.rpm
httpd-devel-2.2.3-22.el5.i386.rpm
httpd-manual-2.2.3-22.el5.i386.rpm
system-config-httpd-1.3.3.3-1.el5.noarch.rpm
[root@apache Server]# rpm -ivh httpd-2.2.3-22.el5.i386.rpm # 开始安装,请按以下顺序安装所有包
[root@apache Server]# rpm -ivh apr-devel-1.2.7-11.i386.rpm
[root@apache Server]# rpm -ivh db4-devel-4.3.29-9.fc6.i386.rpm
[root@apache Server]# rpm -ivh expat-devel-1.95.8-8.2.1.i386.rpm
[root@apache Server]# rpm -ivh cyrus-sasl-devel-2.1.22-4.i386.rpm
[root@apache Server]# rpm -ivh openldap-devel-2.3.43-3.el5.i386.rpm
[root@apache Server]# rpm -ivh apr-util-devel-1.2.7-7.el5.i386.rpm
[root@apache Server]# rpm -ivh httpd-devel-2.2.3-22.el5.i386.rpm
[root@apache Server]# rpm -ivh httpd-devel-2.2.3-22.el5.i386.rpm
[root@apache Server]# rpm -ivh httpd-manual-2.2.3-22.el5.i386.rpm
[root@apache Server]# rpm -ivh libxslt-python-1.1.17-2.el5_2.2.i386.rpm
[root@apache Server]# rpm -ivh system-config-httpd-1.3.3.3-1.el5.noarch.rpm2、启动hpptd服务并测试
[root@apache Server]# service httpd restart
Stopping httpd: [ OK ]
Starting httpd: httpd: Could not reliably determine the server's fully qualified domain name, using 127.0.0.1 for ServerName # 此处的提示有错误,不过没有关系,稍后
[ OK ]
[root@apache Server]#
修改/etc/httpd/conf/httpd.conf文件
#ServerName www.example.com:80 # 默认注释掉的
ServerName www.benet.com:80 # 修改后的
[root@apache Server]# service httpd restart
Stopping httpd: [ OK ]
Starting httpd: [ OK ]
[root@apache Server]#
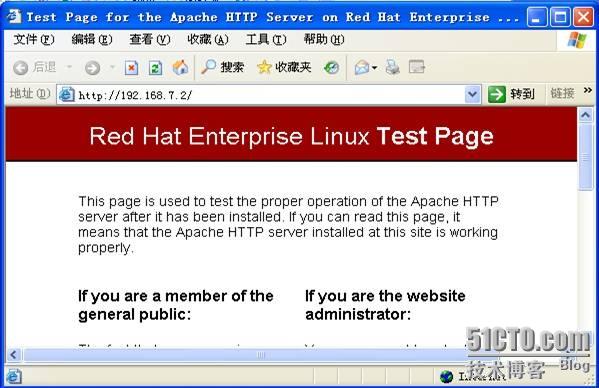
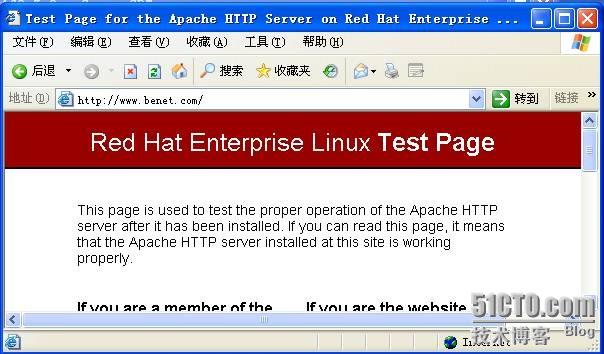
测试:
使用在xp系统测试(注意xp的dns为192.168.7.8和192.168.7.7)


3、简单修改主页并测试
[root@apache ~]# cd /var/www/html/
[root@apache html]# ls -l
total 0
[root@apache html]# echo hello.This is my web! > index.html # 创建index.html并添加语句
[root@apache html]# ls -l
total 8
-rw-r--r-- 1 root root 22 Jun 9 23:54 index.html
[root@apache html]#service httpd restart # 重启服务
Stopping httpd: [ OK ]
Starting httpd: [ OK ]
测试:

4、构建虚拟主机(基于域名)
修改dns服务器的配置
[root@dns01 named]# vi benet.com.zone
$TTL 86400
@ IN SOA dns01.benet.com. root.benet.com. (
42 ; serial (d. adams)
3H ; refresh
15M ; retry
1W ; expiry
1D ) ; minimum
@ IN NS dns01.benet.com.
@ IN NS dns02.benet.com.
dns01 IN A 192.168.7.8
dns02 IN A 192.168.7.7
apache IN A 192.168.7.2
vsftpd IN A 192.168.7.3
samba IN A 192.168.7.4
mail IN A 192.168.7.5
dhcp IN A 192.168.7.6
www IN CNAME apache
bbs IN CNAME apache # 添加的内容,其他不变
sendmail IN CNAME mail
@ IN MX 5 sendmai.benet.com.
"benet.com.zone" 23L, 493C written
[root@dns01 named]# service named restart # 重启服务
Stopping named: [ OK ]
Starting named: [ OK ]
[root@dns01 named]# nslookup # dns解析测试
> bbs.benet.com
Server: 192.168.7.8
Address: 192.168.7.8#53
web.benet.com canonical name = apache.benet.com.
Name: apache.benet.com
Address: 192.168.7.2
> exit
[root@dns01 named]#
建立/var/www/web 目录,用于存放web.benet.com 的网站
(默认的www.benet.com放在/arv/www/html目录中)
[root@apache www]# mkdir bbs # 建立目录
[root@apache www]# ls -l
total 48
drwxr-xr-x 2 root root 4096 Nov 12 2008 cgi-bin
drwxr-xr-x 3 root root 4096 Jun 9 23:33 error
drwxr-xr-x 2 root root 4096 Jun 10 00:00 html
drwxr-xr-x 3 root root 4096 Jun 9 23:33 icons
drwxr-xr-x 14 root root 4096 Jun 9 23:36 manual
drwxr-xr-x 2 root root 4096 Jun 10 00:09 bbs
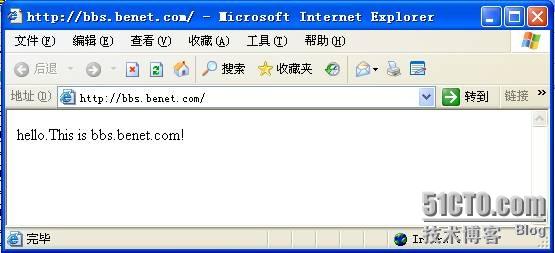
[root@apache www]# echo hello.This is bbs.benet.com! > bbs/index.html # 建立测试页面
[root@apache www]# cat bbs/index.html
hello.This is web.benet.com!
[root@apache www]# echo hello.This is www.benet.com! > html/index.html # 建立测试页面
[root@apache www]# cat html/index.html
hello.This is www.benet.com!
[root@apache www]#
编辑/etc/httpd/conf/httpd.conf配置文件
[root@apache www]# vi /etc/httpd/conf/httpd.conf
。。。。。。。。。。。。。。。
NameVirtualHost 192.168.7.2:80 # 去除此行注释符,并写该为此
。。。。。。。。。。。。。。。
#<VirtualHost *:80> # 模板
# ServerAdmin webmaster@dummy-host.example.com
# DocumentRoot /www/docs/dummy-host.example.com
# ServerName dummy-host.example.com
# ErrorLog logs/dummy-host.example.com-error_log
# CustomLog logs/dummy-host.example.com-access_log common
#</VirtualHost>
<VirtualHost 192.168.7.2:80> # 安装模板添加www.benet.com目录
ServerAdmin root@benet.com
DocumentRoot /var/www/html # 页面根目录位置
ServerName www.benet.com
ErrorLog logs/dummy-host.example.com-error_log
CustomLog logs/dummy-host.example.com-access_log common
</VirtualHost>
<VirtualHost 192.168.7.2:80> # 安装模板添加web.benet.com目录
ServerAdmin root@benet.com
DocumentRoot /var/www/bbs # 页面根目录位置
ServerName web.benet.com
ErrorLog logs/dummy-host.example.com-error_log
CustomLog logs/dummy-host.example.com-access_log common
</VirtualHost>
"/etc/httpd/conf/httpd.conf" 1005L, 34233C written
[root@apache www]# service httpd restart # 重启服务
Stopping httpd: [ OK ]
Starting httpd: [ OK ]
[root@apache www]#
测试:(在xp中测试)
(可以由于处理需要一点时间,所有web.benet.com要一点时间后才能访问的到,而www.benet.com可以立即访问的到,这也只是个人实验是情况)


5、配置httpd随机启动
[root@apache ~]# chkconfig --level 35 httpd on
[root@apache ~]# chkconfig --list httpd
httpd 0:off 1:off 2:off 3:on 4:off 5:on 6:off
[root@apache ~]#二、MySQL安装 1、安装软件包
所需软件包(要按一下顺序安装哦)
perl-DBI-1.52-1.fc6.i386.rpm
perl-DBD-MySQL-3.0007-1.fc6.i386.rpm
mysql-5.0.22-2.1.0.1.i386.rpm
mysql-server-5.0.22-2.1.0.1.i386.rpm
mysql-devel-5.0.22-2.1.0.1.i386.rpm
[root@apache ~]# mount -t iso9660 /dev/cdrom /media/cdrom
mount: block device /dev/cdrom is write-protected, mounting read-only
[root@apache ~]# cd /media/cdrom/Server/
[root@apache Server]# rpm -ivh perl-DBI-1.52-2.el5.i386.rpm
warning: perl-DBI-1.52-2.el5.i386.rpm: Header V3 DSA signature: NOKEY, key ID 37017186
Preparing... ########################################### [100%]
1:perl-DBI ########################################### [100%]
[root@apache Server]# rpm -ivh mysql-5.0.45-7.el5.i386.rpm
warning: mysql-5.0.45-7.el5.i386.rpm: Header V3 DSA signature: NOKEY, key ID 37017186
Preparing... ########################################### [100%]
1:mysql ########################################### [100%]
[root@apache Server]# rpm -ivh perl-DBD-MySQL-3.0007-2.el5.i386.rpm
warning: perl-DBD-MySQL-3.0007-2.el5.i386.rpm: Header V3 DSA signature: NOKEY, key ID 37017186
Preparing... ########################################### [100%]
1:perl-DBD-MySQL ########################################### [100%]
[root@apache Server]# rpm -ivh mysql-server-5.0.45-7.el5.i386.rpm
warning: mysql-server-5.0.45-7.el5.i386.rpm: Header V3 DSA signature: NOKEY, key ID 37017186
Preparing... ########################################### [100%]
1:mysql-server ########################################### [100%]
[root@apache Server]#2、启动mysql服务
[root@apache Server]# service mysql start
mysql: unrecognized service
[root@apache Server]# service mysqld start
Initializing MySQL database: Installing MySQL system tables...
OK
Filling help tables...
OK
To start mysqld at boot time you have to copy
support-files/mysql.server to the right place for your system
PLEASE REMEMBER TO SET A PASSWORD FOR THE MySQL root USER !
To do so, start the server, then issue the following commands:
/usr/bin/mysqladmin -u root password 'new-password'
/usr/bin/mysqladmin -u root -h apache password 'new-password'
See the manual for more instructions.
You can start the MySQL daemon with:
cd /usr ; /usr/bin/mysqld_safe &
You can test the MySQL daemon with mysql-test-run.pl
cd mysql-test ; perl mysql-test-run.pl
Please report any problems with the /usr/bin/mysqlbug script!
The latest information about MySQL is available on the web at http://www.mysql.com Support MySQL by buying support/licenses at http://shop.mysql.com [ OK ]
Starting MySQL: [ OK ]
[root@apache Server]# service mysqld restart
Stopping MySQL: [ OK ]
Starting MySQL: [ OK ]
[root@apache Server]#3、设置管理员帐号密码并测试
[root@apache Server]# cd
[root@apache ~]# mysqladmin -u root password 123.com
[root@apache ~]# mysql -u root -p
Enter password:
Welcome to the MySQL monitor. Commands end with ; or \g.
Your MySQL connection id is 6
Server version: 5.0.45 Source distribution
Type 'help;' or '\h' for help. Type '\c' to clear the buffer.
mysql> exit
Bye
[root@apache ~]#4、设置随机启动msysqld服务
[root@apache ~]# chkconfig --level 35 mysqld on
[root@apache ~]# chkconfig --list mysqld
mysqld 0:off 1:off 2:off 3:on 4:off 5:on 6:off
[root@apache ~]#三、PHP安装 安装软件包
所需的软件包:
php-common-5.1.6-15.el5.i386.rpm
php-cli-5.1.6-15.el5.i386.rpm
php-5.1.6-15.el5.i386.rpm
php-pdo-5.1.6-15.el5.i386.rpm
php-mysql-5.1.6-15.el5.i386.rpm
安装(请安装以上顺序安装哦)
[root@apache ~]# cd /media/cdrom/Server/
[root@apache Server]# rpm -ivh php-common-5.1.6-23.el5.i386.rpm
warning: php-common-5.1.6-23.el5.i386.rpm: Header V3 DSA signature: NOKEY, key ID 37017186
Preparing... ########################################### [100%]
1:php-common ########################################### [100%]
[root@apache Server]# rpm -ivh php-cli-5.1.6-23.el5.i386.rpm
warning: php-cli-5.1.6-23.el5.i386.rpm: Header V3 DSA signature: NOKEY, key ID 37017186
Preparing... ########################################### [100%]
1:php-cli ########################################### [100%]
[root@apache Server]# rpm -ivh php-5.1.6-23.el5.i386.rpm
warning: php-5.1.6-23.el5.i386.rpm: Header V3 DSA signature: NOKEY, key ID 37017186
Preparing... ########################################### [100%]
1:php ########################################### [100%]
[root@apache Server]# rpm -ivh php-pdo-5.1.6-23.el5.i386.rpm
warning: php-pdo-5.1.6-23.el5.i386.rpm: Header V3 DSA signature: NOKEY, key ID 37017186
Preparing... ########################################### [100%]
1:php-pdo ########################################### [100%]
[root@apache Server]# rpm -ivh php-mysql-5.1.6-23.el5.i386.rpm
warning: php-mysql-5.1.6-23.el5.i386.rpm: Header V3 DSA signature: NOKEY, key ID 37017186
Preparing... ########################################### [100%]
1:php-mysql ########################################### [100%]
[root@apache Server]#四、相关配置 1、编辑Apache 配置文件/etc/hpptd/conf/httpd.conf相关项
[root@apache ~]# vi /etc/httpd/conf/httpd.conf
ServerRoot "/etc/httpd" # apache根目录,此为默认值,可不改
<IfModule prefork.c>
StartServers 8
MinSpareServers 5
MaxSpareServers 20
ServerLimit 256 # 设置客户端连接数量,可按需修改
MaxClients 256
MaxRequestsPerChild 4000
</IfModule>
Listen 80 # 设置http监听端口好,默认为80
ServerAdmin root@benet.com # 设置管理员邮箱
ServerName www.benet.com:80 # 这种服务器主机名和端口
DocumentRoot "/var/www/html" # 这种页面根目录
DirectoryIndex index.html index.html.var index.php # 设置首页文件,其他都可以不必更改了哈
保存退出2、编辑个php页面
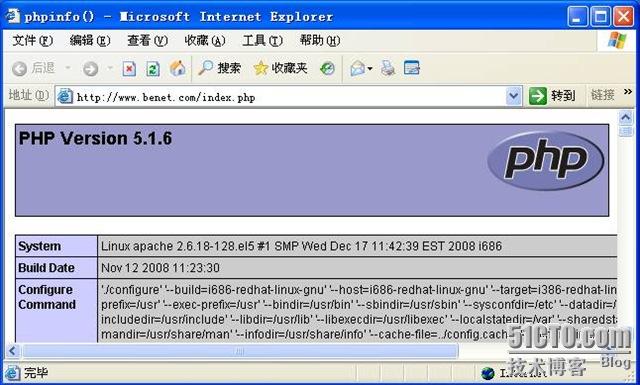
[root@apache ~]# vi /var/www/html/index.php
<?php
phpinfo();
?>
"/var/www/html/index.php" [New] 3L, 20C written
[root@apache ~]# cat /var/www/html/index.php
<?php
phpinfo();
?>
[root@apache ~]#3、重启httpd服务
[root@apache ~]# service httpd restart
Stopping httpd: [ OK ]
Starting httpd: [ OK ]
[root@apache ~]#4、测试php页面

五、安装bbs论坛网页文档
(说明:本文将bbs论坛网页文档打包为iso镜像文件然后挂载镜像)1、拷贝bbs论坛文件压缩包到linu并解压
[root@apache ~]# mount -t iso9660 /dev/cdrom /media/cdrom
mount: block device /dev/cdrom is write-protected, mounting read-only
[root@apache ~]# cd /media/cdrom
[root@apache cdrom]# cd /media/cdrom/linux/
[root@apache linux]# ls
Discuz!_6.0.0_SC_UTF8.zip php-5.2.9.tar.gz
root@apache linux]# cp Discuz\!_6.0.0_SC_UTF8.zip /root # 复制到root目录
[root@apache linux]# cd /root
[root@apache ~]# ls
anaconda-ks.cfg Discuz!_6.0.0_SC_UTF8.zip install.log install.log.syslog
[root@apache ~]# unzip Discuz\!_6.0.0_SC_UTF8.zip # 解压zip文件
[root@apache ~]# ls
anaconda-ks.cfg install.log upload users_guide.htm
Discuz!_6.0.0_SC_UTF8.zip install.log.syslog usersguide utilities
[root@apache ~]# ls upload/ # 查看一下下
admin faq.php member.php rss.php
admincp.php favicon.ico memcp.php search.php
ajax.php forumdata misc.php seccode.php
announcement.php forumdisplay.php modcp.php sitemap.php
api frame.php mspace space.php
archiver images my.php stats.php
attachment.php include plugin.php tag.php
attachments index.php plugins templates
blog.php install pm.php topicadmin.php
config.inc.php install.php post.php topic.php
crossdomain.xml invite.php redirect.php trade.php
customavatars ipdata register.php viewpro.php
digest.php leftmenu.php relatekw.php viewthread.php
discuz_version.php logging.php relatethread.php wap
eccredit.php magic.php robots.txt
[root@apache ~]#2、复制uploads 目录里所有文件到/var/www/html/bbs 目录
[root@apache ~]# ls
anaconda-ks.cfg install.log upload users_guide.htm
Discuz!_6.0.0_SC_UTF8.zip install.log.syslog usersguide utilities
[root@apache ~]# cp -r upload/* /var/www/bbs
[root@apache ~]# cd /var/www
[root@apache www]# ls bbs
admin faq.php magic.php robots.txt
admincp.php favicon.ico member.php rss.php
ajax.php forumdata memcp.php search.php
announcement.php forumdisplay.php misc.php seccode.php
api frame.php modcp.php sitemap.php
archiver images mspace space.php
attachment.php include my.php stats.php
attachments index.html plugin.php tag.php
blog.php index.php plugins templates
config.inc.php install pm.php topicadmin.php
crossdomain.xml install.php post.php topic.php
customavatars invite.php redirect.php trade.php
digest.php ipdata register.php viewpro.php
discuz_version.php leftmenu.php relatekw.php viewthread.php
eccredit.php logging.php relatethread.php wap
[root@apache www]#3、更改目录权限及配置
[root@apache www]# chmod -R 777 /var/www/bbs/
[root@apache www]# ls -l
total 44
drwxrwxrwx 16 root root 4096 Jun 10 04:16 bbs
drwxr-xr-x 2 root root 4096 Nov 12 2008 cgi-bin
drwxr-xr-x 3 root root 4096 Jun 10 02:25 error
drwxr-xr-x 2 root root 4096 Jun 10 04:12 html
drwxr-xr-x 3 root root 4096 Jun 10 03:27 icons
drwxr-xr-x 14 root root 4096 Jun 10 02:29 manual
[root@apache www]#
[root@apache www]# vi bbs/config.inc.php # 更改对应配置
$dbhost='linuxsrv'; # 修改一下内容
$dbuser='root';
$dbpw= '123';
$dbname ='benet';
$adminemail='root@benet.com';
$dbreport=0;
[root@apache www]#4、安装动网论坛
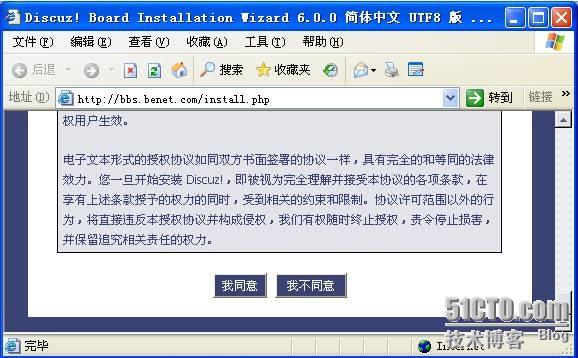
进入论坛安装页面,点击同意安装


点击上图同意后

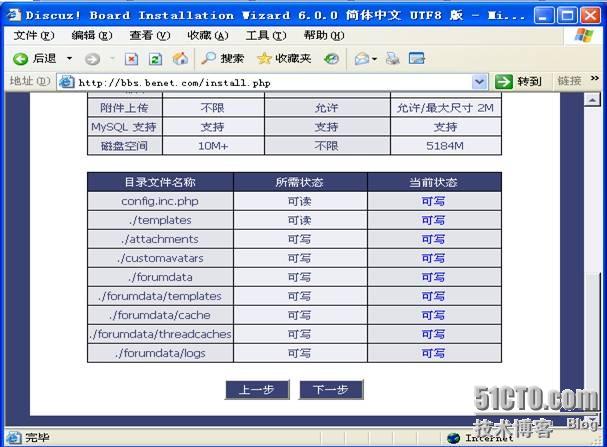
上图的当前状态要全为“可写”才行,否则写该相应文权限为777。
然后点击“下一步”按钮

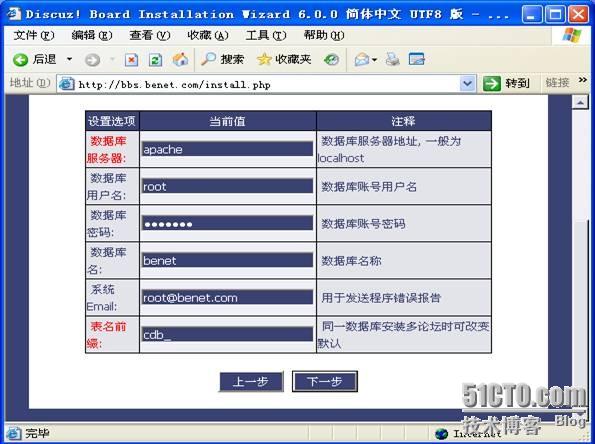
可以保持图片设置,然后点击“下一步”按钮

在上图中设置管理员Email地址及管理员密码(及论坛后台管理帐号和密码)
然后点击“下一步”

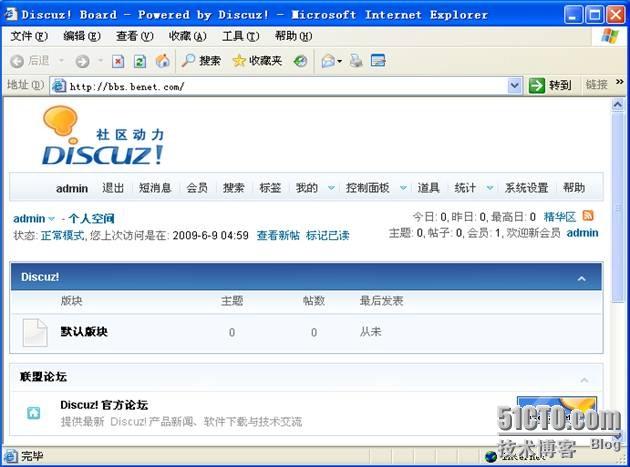
看到上图的安装成功提示,现在可以到论坛观光了。

成功了不是嘛! ^_^.
附加:
重启apache服务器,然后在装个静态htm网页玩玩看
[root@apache ~]# mount -t iso9660 /dev/cdrom /media/cdrom
mount: block device /dev/cdrom is write-protected, mounting read-only
[root@apache ~]# cd /media/cdrom
[root@apache cdrom]# ls
bn
[root@apache cdrom]# rm -rf /var/www/html/
[root@apache cdrom]# ls /var/www/html
ls: /var/www/html: No such file or directory
[root@apache cdrom]# mkdir /var/www/html
[root@apache cdrom]# cp -r bn/* /var/www/html
[root@apache cdrom]# ls /var/www/html
chgl index.dwt index.htm q.doc Templates
[root@apache cdrom]#
在xp系统上访问www.benet.com/index.htm和bbs.benet.com


完成。好累呀!!!本文出自 51CTO.COM技术博客
说明:... 2
在 dns对benet.com区的配置... 2
一、Apache服务器基本设置... 3
1、安装apache相关软件... 5
2、启动hpptd服务并测试... 5
3、简单修改主页并测试... 6
4、构建虚拟主机(基于域名)... 7
5、配置httpd随机启动... 10
二、MySQL安装... 10
1、安装软件包... 10
2、启动mysql服务... 11
3、设置管理员帐号密码并测试... 12
4、设置随机启动msysqld服务... 12
三、PHP安装... 12
安装软件包... 12
四、相关配置... 13
1、编辑Apache 配置文件/etc/hpptd/conf/httpd.conf相关项... 13
2、编辑个php页面... 13
3、重启httpd服务... 14
4、测试php页面... 14
五、安装bbs论坛网页文档... 14
1、拷贝bbs论坛文件压缩包到linu并解压... 15
2、复制uploads 目录里所有文件到/var/www/html/bbs 目录... 15
3、更改目录权限及配置... 16
4、安装动网论坛... 16说明:
主从dns服务器之前配置好了:
主dns 192.168.7.8 主机名dns01
从 dns 192.168.7.7 主机名 dns02
主从dns为可用状态:在 dns对benet.com区的配置
[root@dns01 named]# vi benet.com.zone # 编辑正向文件
$TTL 86400
@ IN SOA dns01.benet.com. root.benet.com. (
42 ; serial (d. adams)
3H ; refresh
15M ; retry
1W ; expiry
1D ) ; minimum
@ IN NS dns01.benet.com. # dns服务器
@ IN NS dns02.benet.com.
dns01 IN A 192.168.7.8
dns02 IN A 192.168.7.7
apache IN A 192.168.7.2
vsftpd IN A 192.168.7.3
samba IN A 192.168.7.4
mail IN A 192.168.7.5
dhcp IN A 192.168.7.6
www IN CNAME apache
sendmail IN CNAME mail
@ IN MX 5 sendmai.benet.com.
~
"benet.com.zone" 13L, 271C
[root@dns01 named]# vi 7.168.192.rev # 配置反向文件
$TTL 86400
@ IN SOA dns01.benet.com. root.benet.com. (
1997022700 ; Serial
28800 ; Refresh
14400 ; Retry
3600000 ; Expire
86400 ) ; Minimum
@ IN NS dns01.benet.com.
@ IN NS dns02.benet.com.
2 IN PTR apache.benet.com.
3 IN PTR vsftpd.benet.com.
4 IN PTR samba.benet.com.
5 IN PTR sendmail.benet.com.
6 IN PTR dncp.benet.com.
7 IN PTR dns02.benet.com.
8 IN PTR dns01.benet.com.
~
"7.168.192.rev" 12L, 475C
[root@dns02 ~]# nslookup # 在从服务器上检查服务情况
> www.benet.com # 默认从主dns解析
Server: 192.168.7.8
Address: 192.168.7.8#53
www.benet.com canonical name = apache.benet.com.
Name: apache.benet.com
Address: 192.168.7.2
> server 192.168.7.7 # 设置从从dns解析
Default server: 192.168.7.7
Address: 192.168.7.7#53
> www.benet.com
Server: 192.168.7.7
Address: 192.168.7.7#53
www.benet.com canonical name = apache.benet.com.
Name: apache.benet.com
Address: 192.168.7.2
> exit
[root@dns02 ~]#一、Apache服务器基本设置
系统使用镜像:Redhat.Enterprise.Linux.AS.V5.3-i386-dvd.iso
[root@ apache ~]# setup
弹出一个对话框。我们要进行的是防火墙配置,步骤如下:
选择“Firewall Configuration”---按 “Tab”键切换到“Run Tool”―回车―“Security Level”选项要在“Enabled”前面按一下“Tab”键---“SelLinux”选项要选“Disabled”―按一下“Tab”键---选中“Customize”-按图配置―“OK”―返回上一个对话框―“OK”―对话框自动关闭。配置完成。


[root@apache ~]# vi /etc/hosts
# Do not remove the following line, or various programs
# that require network functionality will fail.
127.0.0.1 apache www.benet.com localhost
::1 localhost6.localdomain6 localhost6
"/etc/hosts" 4L, 186C
[root@apache ~]# cat /etc/resolv.conf
nameserver 192.168.7.8
nameserver 192.168.7.7
[root@apache ~]# cat /etc/sysconfig/network-scripts/ifcfg-eth0
# Advanced Micro Devices [AMD] 79c970 [PCnet32 LANCE]
DEVICE=eth0
BOOTPROTO=static
BROADCAST=192.168.7.255
HWADDR=00:0C:29:8C:DA:02
IPADDR=192.168.7.2
IPV6INIT=yes
IPV6_AUTOCONF=yes
NETMASK=255.255.255.0
NETWORK=192.168.7.0
ONBOOT=yes
[root@apache ~]#
Apache基本:
后台进程:httpd
脚本:/etc/rc.d/init.d/httpd
使用端口:80(http),443(https)
所需RPM 包:httpd
配置路径:/etc/httpd/*
默认网站存放路径:/var/www/*
开始配置1、安装apache相关软件
[root@apache Server]# ls | grep httpd
httpd-2.2.3-22.el5.i386.rpm
httpd-devel-2.2.3-22.el5.i386.rpm
httpd-manual-2.2.3-22.el5.i386.rpm
system-config-httpd-1.3.3.3-1.el5.noarch.rpm
[root@apache Server]# rpm -ivh httpd-2.2.3-22.el5.i386.rpm # 开始安装,请按以下顺序安装所有包
[root@apache Server]# rpm -ivh apr-devel-1.2.7-11.i386.rpm
[root@apache Server]# rpm -ivh db4-devel-4.3.29-9.fc6.i386.rpm
[root@apache Server]# rpm -ivh expat-devel-1.95.8-8.2.1.i386.rpm
[root@apache Server]# rpm -ivh cyrus-sasl-devel-2.1.22-4.i386.rpm
[root@apache Server]# rpm -ivh openldap-devel-2.3.43-3.el5.i386.rpm
[root@apache Server]# rpm -ivh apr-util-devel-1.2.7-7.el5.i386.rpm
[root@apache Server]# rpm -ivh httpd-devel-2.2.3-22.el5.i386.rpm
[root@apache Server]# rpm -ivh httpd-devel-2.2.3-22.el5.i386.rpm
[root@apache Server]# rpm -ivh httpd-manual-2.2.3-22.el5.i386.rpm
[root@apache Server]# rpm -ivh libxslt-python-1.1.17-2.el5_2.2.i386.rpm
[root@apache Server]# rpm -ivh system-config-httpd-1.3.3.3-1.el5.noarch.rpm2、启动hpptd服务并测试
[root@apache Server]# service httpd restart
Stopping httpd: [ OK ]
Starting httpd: httpd: Could not reliably determine the server's fully qualified domain name, using 127.0.0.1 for ServerName # 此处的提示有错误,不过没有关系,稍后
[ OK ]
[root@apache Server]#
修改/etc/httpd/conf/httpd.conf文件
#ServerName www.example.com:80 # 默认注释掉的
ServerName www.benet.com:80 # 修改后的
[root@apache Server]# service httpd restart
Stopping httpd: [ OK ]
Starting httpd: [ OK ]
[root@apache Server]#
测试:
使用在xp系统测试(注意xp的dns为192.168.7.8和192.168.7.7)
3、简单修改主页并测试
[root@apache ~]# cd /var/www/html/
[root@apache html]# ls -l
total 0
[root@apache html]# echo hello.This is my web! > index.html # 创建index.html并添加语句
[root@apache html]# ls -l
total 8
-rw-r--r-- 1 root root 22 Jun 9 23:54 index.html
[root@apache html]#service httpd restart # 重启服务
Stopping httpd: [ OK ]
Starting httpd: [ OK ]
测试:

4、构建虚拟主机(基于域名)
修改dns服务器的配置
[root@dns01 named]# vi benet.com.zone
$TTL 86400
@ IN SOA dns01.benet.com. root.benet.com. (
42 ; serial (d. adams)
3H ; refresh
15M ; retry
1W ; expiry
1D ) ; minimum
@ IN NS dns01.benet.com.
@ IN NS dns02.benet.com.
dns01 IN A 192.168.7.8
dns02 IN A 192.168.7.7
apache IN A 192.168.7.2
vsftpd IN A 192.168.7.3
samba IN A 192.168.7.4
mail IN A 192.168.7.5
dhcp IN A 192.168.7.6
www IN CNAME apache
bbs IN CNAME apache # 添加的内容,其他不变
sendmail IN CNAME mail
@ IN MX 5 sendmai.benet.com.
"benet.com.zone" 23L, 493C written
[root@dns01 named]# service named restart # 重启服务
Stopping named: [ OK ]
Starting named: [ OK ]
[root@dns01 named]# nslookup # dns解析测试
> bbs.benet.com
Server: 192.168.7.8
Address: 192.168.7.8#53
web.benet.com canonical name = apache.benet.com.
Name: apache.benet.com
Address: 192.168.7.2
> exit
[root@dns01 named]#
建立/var/www/web 目录,用于存放web.benet.com 的网站
(默认的www.benet.com放在/arv/www/html目录中)
[root@apache www]# mkdir bbs # 建立目录
[root@apache www]# ls -l
total 48
drwxr-xr-x 2 root root 4096 Nov 12 2008 cgi-bin
drwxr-xr-x 3 root root 4096 Jun 9 23:33 error
drwxr-xr-x 2 root root 4096 Jun 10 00:00 html
drwxr-xr-x 3 root root 4096 Jun 9 23:33 icons
drwxr-xr-x 14 root root 4096 Jun 9 23:36 manual
drwxr-xr-x 2 root root 4096 Jun 10 00:09 bbs
[root@apache www]# echo hello.This is bbs.benet.com! > bbs/index.html # 建立测试页面
[root@apache www]# cat bbs/index.html
hello.This is web.benet.com!
[root@apache www]# echo hello.This is www.benet.com! > html/index.html # 建立测试页面
[root@apache www]# cat html/index.html
hello.This is www.benet.com!
[root@apache www]#
编辑/etc/httpd/conf/httpd.conf配置文件
[root@apache www]# vi /etc/httpd/conf/httpd.conf
。。。。。。。。。。。。。。。
NameVirtualHost 192.168.7.2:80 # 去除此行注释符,并写该为此
。。。。。。。。。。。。。。。
#<VirtualHost *:80> # 模板
# ServerAdmin webmaster@dummy-host.example.com
# DocumentRoot /www/docs/dummy-host.example.com
# ServerName dummy-host.example.com
# ErrorLog logs/dummy-host.example.com-error_log
# CustomLog logs/dummy-host.example.com-access_log common
#</VirtualHost>
<VirtualHost 192.168.7.2:80> # 安装模板添加www.benet.com目录
ServerAdmin root@benet.com
DocumentRoot /var/www/html # 页面根目录位置
ServerName www.benet.com
ErrorLog logs/dummy-host.example.com-error_log
CustomLog logs/dummy-host.example.com-access_log common
</VirtualHost>
<VirtualHost 192.168.7.2:80> # 安装模板添加web.benet.com目录
ServerAdmin root@benet.com
DocumentRoot /var/www/bbs # 页面根目录位置
ServerName web.benet.com
ErrorLog logs/dummy-host.example.com-error_log
CustomLog logs/dummy-host.example.com-access_log common
</VirtualHost>
"/etc/httpd/conf/httpd.conf" 1005L, 34233C written
[root@apache www]# service httpd restart # 重启服务
Stopping httpd: [ OK ]
Starting httpd: [ OK ]
[root@apache www]#
测试:(在xp中测试)
(可以由于处理需要一点时间,所有web.benet.com要一点时间后才能访问的到,而www.benet.com可以立即访问的到,这也只是个人实验是情况)

5、配置httpd随机启动
[root@apache ~]# chkconfig --level 35 httpd on
[root@apache ~]# chkconfig --list httpd
httpd 0:off 1:off 2:off 3:on 4:off 5:on 6:off
[root@apache ~]#二、MySQL安装 1、安装软件包
所需软件包(要按一下顺序安装哦)
perl-DBI-1.52-1.fc6.i386.rpm
perl-DBD-MySQL-3.0007-1.fc6.i386.rpm
mysql-5.0.22-2.1.0.1.i386.rpm
mysql-server-5.0.22-2.1.0.1.i386.rpm
mysql-devel-5.0.22-2.1.0.1.i386.rpm
[root@apache ~]# mount -t iso9660 /dev/cdrom /media/cdrom
mount: block device /dev/cdrom is write-protected, mounting read-only
[root@apache ~]# cd /media/cdrom/Server/
[root@apache Server]# rpm -ivh perl-DBI-1.52-2.el5.i386.rpm
warning: perl-DBI-1.52-2.el5.i386.rpm: Header V3 DSA signature: NOKEY, key ID 37017186
Preparing... ########################################### [100%]
1:perl-DBI ########################################### [100%]
[root@apache Server]# rpm -ivh mysql-5.0.45-7.el5.i386.rpm
warning: mysql-5.0.45-7.el5.i386.rpm: Header V3 DSA signature: NOKEY, key ID 37017186
Preparing... ########################################### [100%]
1:mysql ########################################### [100%]
[root@apache Server]# rpm -ivh perl-DBD-MySQL-3.0007-2.el5.i386.rpm
warning: perl-DBD-MySQL-3.0007-2.el5.i386.rpm: Header V3 DSA signature: NOKEY, key ID 37017186
Preparing... ########################################### [100%]
1:perl-DBD-MySQL ########################################### [100%]
[root@apache Server]# rpm -ivh mysql-server-5.0.45-7.el5.i386.rpm
warning: mysql-server-5.0.45-7.el5.i386.rpm: Header V3 DSA signature: NOKEY, key ID 37017186
Preparing... ########################################### [100%]
1:mysql-server ########################################### [100%]
[root@apache Server]#2、启动mysql服务
[root@apache Server]# service mysql start
mysql: unrecognized service
[root@apache Server]# service mysqld start
Initializing MySQL database: Installing MySQL system tables...
OK
Filling help tables...
OK
To start mysqld at boot time you have to copy
support-files/mysql.server to the right place for your system
PLEASE REMEMBER TO SET A PASSWORD FOR THE MySQL root USER !
To do so, start the server, then issue the following commands:
/usr/bin/mysqladmin -u root password 'new-password'
/usr/bin/mysqladmin -u root -h apache password 'new-password'
See the manual for more instructions.
You can start the MySQL daemon with:
cd /usr ; /usr/bin/mysqld_safe &
You can test the MySQL daemon with mysql-test-run.pl
cd mysql-test ; perl mysql-test-run.pl
Please report any problems with the /usr/bin/mysqlbug script!
The latest information about MySQL is available on the web at http://www.mysql.com Support MySQL by buying support/licenses at http://shop.mysql.com [ OK ]
Starting MySQL: [ OK ]
[root@apache Server]# service mysqld restart
Stopping MySQL: [ OK ]
Starting MySQL: [ OK ]
[root@apache Server]#3、设置管理员帐号密码并测试
[root@apache Server]# cd
[root@apache ~]# mysqladmin -u root password 123.com
[root@apache ~]# mysql -u root -p
Enter password:
Welcome to the MySQL monitor. Commands end with ; or \g.
Your MySQL connection id is 6
Server version: 5.0.45 Source distribution
Type 'help;' or '\h' for help. Type '\c' to clear the buffer.
mysql> exit
Bye
[root@apache ~]#4、设置随机启动msysqld服务
[root@apache ~]# chkconfig --level 35 mysqld on
[root@apache ~]# chkconfig --list mysqld
mysqld 0:off 1:off 2:off 3:on 4:off 5:on 6:off
[root@apache ~]#三、PHP安装 安装软件包
所需的软件包:
php-common-5.1.6-15.el5.i386.rpm
php-cli-5.1.6-15.el5.i386.rpm
php-5.1.6-15.el5.i386.rpm
php-pdo-5.1.6-15.el5.i386.rpm
php-mysql-5.1.6-15.el5.i386.rpm
安装(请安装以上顺序安装哦)
[root@apache ~]# cd /media/cdrom/Server/
[root@apache Server]# rpm -ivh php-common-5.1.6-23.el5.i386.rpm
warning: php-common-5.1.6-23.el5.i386.rpm: Header V3 DSA signature: NOKEY, key ID 37017186
Preparing... ########################################### [100%]
1:php-common ########################################### [100%]
[root@apache Server]# rpm -ivh php-cli-5.1.6-23.el5.i386.rpm
warning: php-cli-5.1.6-23.el5.i386.rpm: Header V3 DSA signature: NOKEY, key ID 37017186
Preparing... ########################################### [100%]
1:php-cli ########################################### [100%]
[root@apache Server]# rpm -ivh php-5.1.6-23.el5.i386.rpm
warning: php-5.1.6-23.el5.i386.rpm: Header V3 DSA signature: NOKEY, key ID 37017186
Preparing... ########################################### [100%]
1:php ########################################### [100%]
[root@apache Server]# rpm -ivh php-pdo-5.1.6-23.el5.i386.rpm
warning: php-pdo-5.1.6-23.el5.i386.rpm: Header V3 DSA signature: NOKEY, key ID 37017186
Preparing... ########################################### [100%]
1:php-pdo ########################################### [100%]
[root@apache Server]# rpm -ivh php-mysql-5.1.6-23.el5.i386.rpm
warning: php-mysql-5.1.6-23.el5.i386.rpm: Header V3 DSA signature: NOKEY, key ID 37017186
Preparing... ########################################### [100%]
1:php-mysql ########################################### [100%]
[root@apache Server]#四、相关配置 1、编辑Apache 配置文件/etc/hpptd/conf/httpd.conf相关项
[root@apache ~]# vi /etc/httpd/conf/httpd.conf
ServerRoot "/etc/httpd" # apache根目录,此为默认值,可不改
<IfModule prefork.c>
StartServers 8
MinSpareServers 5
MaxSpareServers 20
ServerLimit 256 # 设置客户端连接数量,可按需修改
MaxClients 256
MaxRequestsPerChild 4000
</IfModule>
Listen 80 # 设置http监听端口好,默认为80
ServerAdmin root@benet.com # 设置管理员邮箱
ServerName www.benet.com:80 # 这种服务器主机名和端口
DocumentRoot "/var/www/html" # 这种页面根目录
DirectoryIndex index.html index.html.var index.php # 设置首页文件,其他都可以不必更改了哈
保存退出2、编辑个php页面
[root@apache ~]# vi /var/www/html/index.php
<?php
phpinfo();
?>
"/var/www/html/index.php" [New] 3L, 20C written
[root@apache ~]# cat /var/www/html/index.php
<?php
phpinfo();
?>
[root@apache ~]#3、重启httpd服务
[root@apache ~]# service httpd restart
Stopping httpd: [ OK ]
Starting httpd: [ OK ]
[root@apache ~]#4、测试php页面
五、安装bbs论坛网页文档
(说明:本文将bbs论坛网页文档打包为iso镜像文件然后挂载镜像)1、拷贝bbs论坛文件压缩包到linu并解压
[root@apache ~]# mount -t iso9660 /dev/cdrom /media/cdrom
mount: block device /dev/cdrom is write-protected, mounting read-only
[root@apache ~]# cd /media/cdrom
[root@apache cdrom]# cd /media/cdrom/linux/
[root@apache linux]# ls
Discuz!_6.0.0_SC_UTF8.zip php-5.2.9.tar.gz
root@apache linux]# cp Discuz\!_6.0.0_SC_UTF8.zip /root # 复制到root目录
[root@apache linux]# cd /root
[root@apache ~]# ls
anaconda-ks.cfg Discuz!_6.0.0_SC_UTF8.zip install.log install.log.syslog
[root@apache ~]# unzip Discuz\!_6.0.0_SC_UTF8.zip # 解压zip文件
[root@apache ~]# ls
anaconda-ks.cfg install.log upload users_guide.htm
Discuz!_6.0.0_SC_UTF8.zip install.log.syslog usersguide utilities
[root@apache ~]# ls upload/ # 查看一下下
admin faq.php member.php rss.php
admincp.php favicon.ico memcp.php search.php
ajax.php forumdata misc.php seccode.php
announcement.php forumdisplay.php modcp.php sitemap.php
api frame.php mspace space.php
archiver images my.php stats.php
attachment.php include plugin.php tag.php
attachments index.php plugins templates
blog.php install pm.php topicadmin.php
config.inc.php install.php post.php topic.php
crossdomain.xml invite.php redirect.php trade.php
customavatars ipdata register.php viewpro.php
digest.php leftmenu.php relatekw.php viewthread.php
discuz_version.php logging.php relatethread.php wap
eccredit.php magic.php robots.txt
[root@apache ~]#2、复制uploads 目录里所有文件到/var/www/html/bbs 目录
[root@apache ~]# ls
anaconda-ks.cfg install.log upload users_guide.htm
Discuz!_6.0.0_SC_UTF8.zip install.log.syslog usersguide utilities
[root@apache ~]# cp -r upload/* /var/www/bbs
[root@apache ~]# cd /var/www
[root@apache www]# ls bbs
admin faq.php magic.php robots.txt
admincp.php favicon.ico member.php rss.php
ajax.php forumdata memcp.php search.php
announcement.php forumdisplay.php misc.php seccode.php
api frame.php modcp.php sitemap.php
archiver images mspace space.php
attachment.php include my.php stats.php
attachments index.html plugin.php tag.php
blog.php index.php plugins templates
config.inc.php install pm.php topicadmin.php
crossdomain.xml install.php post.php topic.php
customavatars invite.php redirect.php trade.php
digest.php ipdata register.php viewpro.php
discuz_version.php leftmenu.php relatekw.php viewthread.php
eccredit.php logging.php relatethread.php wap
[root@apache www]#3、更改目录权限及配置
[root@apache www]# chmod -R 777 /var/www/bbs/
[root@apache www]# ls -l
total 44
drwxrwxrwx 16 root root 4096 Jun 10 04:16 bbs
drwxr-xr-x 2 root root 4096 Nov 12 2008 cgi-bin
drwxr-xr-x 3 root root 4096 Jun 10 02:25 error
drwxr-xr-x 2 root root 4096 Jun 10 04:12 html
drwxr-xr-x 3 root root 4096 Jun 10 03:27 icons
drwxr-xr-x 14 root root 4096 Jun 10 02:29 manual
[root@apache www]#
[root@apache www]# vi bbs/config.inc.php # 更改对应配置
$dbhost='linuxsrv'; # 修改一下内容
$dbuser='root';
$dbpw= '123';
$dbname ='benet';
$adminemail='root@benet.com';
$dbreport=0;
[root@apache www]#4、安装动网论坛
进入论坛安装页面,点击同意安装

点击上图同意后
上图的当前状态要全为“可写”才行,否则写该相应文权限为777。
然后点击“下一步”按钮
可以保持图片设置,然后点击“下一步”按钮

在上图中设置管理员Email地址及管理员密码(及论坛后台管理帐号和密码)
然后点击“下一步”

看到上图的安装成功提示,现在可以到论坛观光了。

成功了不是嘛! ^_^.
附加:
重启apache服务器,然后在装个静态htm网页玩玩看
[root@apache ~]# mount -t iso9660 /dev/cdrom /media/cdrom
mount: block device /dev/cdrom is write-protected, mounting read-only
[root@apache ~]# cd /media/cdrom
[root@apache cdrom]# ls
bn
[root@apache cdrom]# rm -rf /var/www/html/
[root@apache cdrom]# ls /var/www/html
ls: /var/www/html: No such file or directory
[root@apache cdrom]# mkdir /var/www/html
[root@apache cdrom]# cp -r bn/* /var/www/html
[root@apache cdrom]# ls /var/www/html
chgl index.dwt index.htm q.doc Templates
[root@apache cdrom]#
在xp系统上访问www.benet.com/index.htm和bbs.benet.com

完成。好累呀!!!本文出自 51CTO.COM技术博客

相关文章推荐
- RHEL5.3-WEB-linux+apache+mysql+php搭建论坛 (全rpm包安装)
- CentOS5.3搭建LAMP(Linux, Apache, MySQL, PHP)Web服务器
- Ubuntu Server 14.04 安装+安全Web服务器(linux+apache+mysql+php)搭建流程(更新)
- PHP web服务器终极解决方案:CentOS v6.x Minimal 32bit + LNAMP 一键安装包【Linux+Nginx+Apache+MySQL+PHP+phpMyAdmin】
- LAMP攻略: LAMP环境搭建,Linux下Apache,MySQL,PHP安装与配置
- web服务器 linux+apache+tomcat+mysql+jsp+php 整合安装
- php-4.3+mysql-3.23+apache-2.0+vbb-2.32论坛的架设方法 ( rpm 包安装)
- 关于Linux+JDK+Tomcat+Apache+MySQL+PHP的Web服务环境搭建
- Linux下安装Apache+PHP+MySql 搭建PHP运行环境
- Linux下的mysql apache php rpm安装方法步骤(转载并补充细节)
- LAMP源码环境搭建WEB服务器Linux+Apache+MySQL+PHP
- LNMP架构的搭建(linux+nginx+mysql+php源码安装 )+Discuz论坛的搭建
- linux系统下Apache+mysql+php环境搭建----Mysql的安装和配置
- Linux+Apache+MySQL+PHP搭建高性能的web服务器
- 第四篇(1):企业常用Linux web环境安装配置(apache、php、mysql)
- linux下apache+mysql+php的rpm包安装实现phpwind
- 搭建LNAMP(Linux+Apache+Nginx+MySQL+PHP)前后端Web(PHP)开发环境
- WEB服务器linux+apache+mysql+php LAMP源码环境搭建
- ubuntu 11.10下面安装apache+php+mysql+phpadmin搭建web环境
- centos下yum搭建安装linux+apache+mysql+php环境的方法