Spring视频学习(一)依赖注入原理
2009-07-20 10:36
585 查看
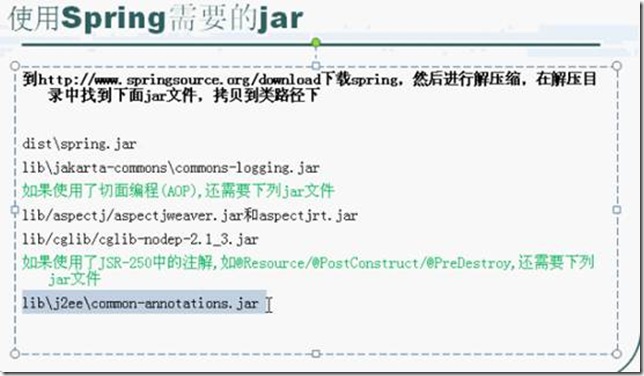
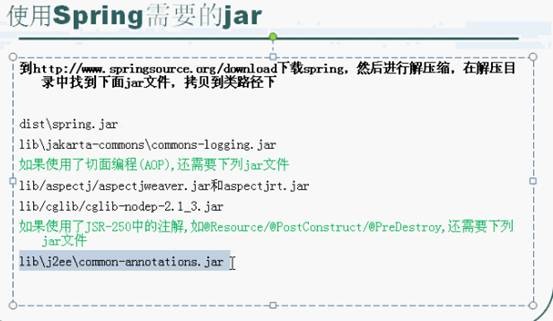
1. 控制反转 依赖对象的创建和维护由应用本身转移到外部容器,即控制权也转移到外部容器中。 2. 依赖注入 依赖对象有外部容器在运行期间动态注入到组件中。 3.所需要的jar包:
4.核心版的spring
(1)spring配置文件放在类路径src下 模板:
只要Spring.jar
Commons-logging.jar
这2个jar包即可
(2)然后配置xml,有spring容器管理bean
文件配置Bean有id和name,id不能有特殊字符,但需要有特殊字符时,用name
4.核心版的spring
(1)spring配置文件放在类路径src下 模板:
<?xml version="1.0" encoding="UTF-8"?>

<beans

xmlns="http://www.springframework.org/schema/beans"

xmlns:xsi="http://www.w3.org/2001/XMLSchema-instance"

xsi:schemaLocation="http://www.springframework.org/schema/beans http://www.springframework.org/schema/beans/spring-beans-2.5.xsd">
</beans>
只要Spring.jar
Commons-logging.jar
这2个jar包即可
(2)然后配置xml,有spring容器管理bean
文件配置Bean有id和name,id不能有特殊字符,但需要有特殊字符时,用name
<bean id="personService" class="com.persia.PersonServiceBean">
<!-- 由spring容器去创建和维护,我们只要获取就可以了 -->
</bean>
之后通过上下文来获取bean:
AbstractApplicationContext ctx=new ClassPathXmlApplicationContext(new String[]{"applicationContext.xml"});
IService s=(IService) ctx.getBean("personService");
s.save();
(3)spring依赖注入原理
public ItcastClassPathXMLApplicationContext(String filename){
this.readXML(filename);
this.instanceBeans();
this.injectObject();
}
先读取配置文件:
/**
* 读取xml配置文件
* @param filename
*/
private void readXML(String filename) {
SAXReader saxReader = new SAXReader();
Document document=null;
try{
URL xmlpath = this.getClass().getClassLoader().getResource(filename);
document = saxReader.read(xmlpath);
Map<String,String> nsMap = new HashMap<String,String>();
nsMap.put("ns","http://www.springframework.org/schema/beans");//加入命名空间
XPath xsub = document.createXPath("//ns:beans/ns:bean");//创建beans/bean查询路径
xsub.setNamespaceURIs(nsMap);//设置命名空间
List<Element> beans = xsub.selectNodes(document);//获取文档下所有bean节点
for(Element element: beans){
String id = element.attributeValue("id");//获取id属性值
String clazz = element.attributeValue("class"); //获取class属性值
BeanDefinition beanDefine = new BeanDefinition(id, clazz);
XPath propertysub =  element.createXPath("ns:property");
propertysub.setNamespaceURIs(nsMap);//设置命名空间
List<Element> propertys = propertysub.selectNodes(element);
for(Element property : propertys){
String propertyName = property.attributeValue("name");
String propertyref = property.attributeValue("ref");
PropertyDefinition propertyDefinition = new PropertyDefinition(propertyName, propertyref);
beanDefine.getPropertys().add(propertyDefinition);
}
beanDefines.add(beanDefine);
}
}catch(Exception e){
e.printStackTrace();
}
}
用一个bean集合来记录xml定义的bean,用一个属性类来代表定义的属性,然后加入bean类里面的属性集合。
第二步是利用反射技术实例化bean
/**
* 完成bean的实例化
*/
private void instanceBeans() {
for(BeanDefinition beanDefinition : beanDefines){
try {
if(beanDefinition.getClassName()!=null && !"".equals(beanDefinition.getClassName().trim()))
sigletons.put(beanDefinition.getId(), Class.forName(beanDefinition.getClassName()).newInstance());
} catch (Exception e) {
e.printStackTrace();
}
}

}
实例化后的bean保存在一个哈希表中,key为xml定义的id,value为实例。
第三步是为创建的bean注入定义的属性:
/**
* 为bean对象的属性注入值
*/
private void injectObject() {
for(BeanDefinition beanDefinition : beanDefines){
Object bean = sigletons.get(beanDefinition.getId());
if(bean!=null){
try {
PropertyDescriptor[] ps = Introspector.getBeanInfo(bean.getClass()).getPropertyDescriptors();
for(PropertyDefinition propertyDefinition : beanDefinition.getPropertys()){
for(PropertyDescriptor properdesc : ps){
if(propertyDefinition.getName().equals(properdesc.getName())){
Method setter = properdesc.getWriteMethod();//获取属性的setter方法 ,private
if(setter!=null){
Object value = sigletons.get(propertyDefinition.getRef());
setter.setAccessible(true);
setter.invoke(bean, value);//把引用对象注入到属性
}
break;
}
}
}
} catch (Exception e) {
}
}
}
}
最后有提供一个getBean的方法供应用程序来获取容器产生的bean:
/**
* 获取bean实例
* @param beanName
* @return
*/
public Object getBean(String beanName){
return this.sigletons.get(beanName);
}

相关文章推荐
- ITCAST视频-Spring学习笔记(编码剖析Spring依赖注入的原理)
- Spring2.5学习2.2_编码剖析Spring依赖注入原理
- 传智播客Spring2.5视频教程_编码剖析Spring依赖注入的原理 2
- Spring学习07--Bean对象的初始化(IOC的依赖注入)原理
- 传智播客Spring2.5视频教程_编码剖析Spring依赖注入的原理 3
- 传智播客Spring2.5视频教程_编码剖析Spring依赖注入的原理 1
- spring学习笔记整理--05(编码剖析Spring依赖注入的原理)
- Spring学习笔记——Spring依赖注入原理分析
- 传智播客Spring2.5视频教程_编码剖析Spring依赖注入的原理 4
- Spring学习笔记(6)----编码剖析Spring依赖注入的原理
- spring 控制反转与依赖注入原理-学习笔记
- Spring依赖注入原理学习
- Spring 学习 2- IOC原理 控制反转/依赖注入1
- spring 控制反转与依赖注入原理-学习笔记
- (5) 编码剖析Spring装配基本属性的原理【附加:注入依赖对象的两种方式】
- Spring.NET依赖注入框架学习--入门
- Spring学习笔记(二)依赖注入Dependency Injection
- 浅谈Spring IoC容器的依赖注入原理
- Spring学习资料之 依赖注入(二)
- spring学习总结一----控制反转与依赖注入