把DWR的配置写到Spring的配置文件里
2008-01-24 22:49
337 查看
DWR本身就提供对Spring的支持,可以直接把Spring中的Bean暴露给客户端浏览器的Javascript调用。在dwr.xml中的写法是这样的:
<dwr>
<allow>
<create creator="spring" javascript="AjaxPortalService">
<param name="beanName" value="AjaxPortalService"/>
<include method="changeWondowState"/>
<include method="changeWorkbenchState"/>
<include method="changeWindowOrder"/>
</create>
</allow>
</dwr>
这样写到也没什么,只是把项目分模块以后,虽有的配置都写到一个dwr.xml文件里面维护起来比较麻烦,尤其再遇到版本管理中的代码合并。所以曾经我扩展了DWR,让它可以从多个文件读取配置信息。然后每个模块自己一个配置文件,跟着source一起走。这样做也有问题,就是现在Java应用程序的配置文件太多啦!Spring的配置,WebWork的配置,Hibernate的配置,DWR的配置,再加上一些杂七杂八的xml和properties。看着这些配置文件简直要疯掉了。
正在此时,spring2横空出世,现在你可以把一些配置文件合并到一起了。正好趁此机会体验一下Spring2的自定义schema特性。
目标:
把DWR的配置写成这样:
<?xml version="1.0" encoding="GBK"?>
<beans xmlns="http://www.springframework.org/schema/beans"
xmlns:xsi="http://www.w3.org/2001/XMLSchema-instance"
xmlns:tx="http://www.springframework.org/schema/tx"
xmlns:aop="http://www.springframework.org/schema/aop"
xmlns:dwr="http://www.devside.org/schema/spring/dwr"
xsi:schemaLocation="http://www.springframework.org/schema/beans http://www.springframework.org/schema/beans/spring-beans-2.0.xsd http://www.springframework.org/schema/aop http://www.springframework.org/schema/aop/spring-aop-2.0.xsd http://www.springframework.org/schema/tx http://www.springframework.org/schema/tx/spring-tx-2.0.xsd http://www.devside.org/schema/spring/dwr http://www.devside.org/schema/spring/dwr.xsd" default-autowire="byName">
<bean id="departmentDao" class="cn.com.legendapl.hellostruts2.dao.DepartmentDao"/>
<bean id="employeeDao" class="cn.com.legendapl.hellostruts2.dao.EmployeeDao"/>
<bean id="companyService" class="cn.com.legendapl.hellostruts2.service.CompanyService"/>
<aop:config>
<aop:pointcut id="companyServiceOperation" expression="execution(* cn.com.legendapl.hellostruts2.service.ICompanyService.*(..))" />
<aop:advisor advice-ref="txAdvice" pointcut-ref="companyServiceOperation" />
</aop:config>
<bean id="ajaxCompanyProxy" class="cn.com.legendapl.hellostruts2.ajax.AjaxCompanyProxy"/>
<dwr:allow id="ajaxCompanyProxyAllow">
<dwr:create beanName="ajaxCompanyProxy" javascript="CompanyProxy">
<dwr:include method="findEmployeeById"/>
</dwr:create>
<dwr:convert converter="bean" match="cn.com.legendapl.hellostruts2.entity.*"/>
</dwr:allow>
</beans>
重点在这里:
<dwr:allow id="ajaxCompanyProxyAllow">
<dwr:create beanName="ajaxCompanyProxy" javascript="CompanyProxy">
<dwr:include method="findEmployeeById"/>
</dwr:create>
<dwr:convert converter="bean" match="cn.com.legendapl.hellostruts2.entity.*"/>
</dwr:allow>
好了现在动手开始做。
原理其实很简单,现在看张图。画的不好,敬请原谅!
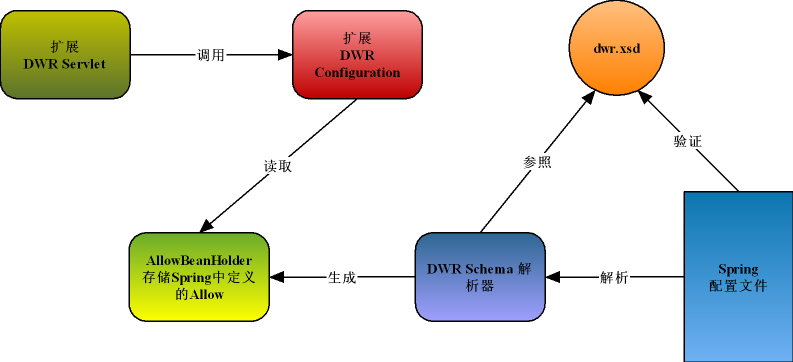
从这样图中我们可以看出我们要做如下工作:
1、做一个dwr.xsd,定义spring配置文件中的dwr这部分配置的schema。
要做这个需要有一定xml和xsd的知识,我也是现学现用啦!

<?xml version="1.0" encoding="UTF-8"?>
<xsd:schema xmlns="http://www.devside.org/schema/spring/dwr"
xmlns:xsd="http://www.w3.org/2001/XMLSchema"
xmlns:beans="http://www.springframework.org/schema/beans"
targetNamespace="http://www.devside.org/schema/spring/dwr"
elementFormDefault="qualified"
attributeFormDefault="unqualified">
<xsd:import namespace="http://www.springframework.org/schema/beans" schemaLocation="http://www.springframework.org/schema/beans/spring-beans-2.0.xsd"/>
<xsd:element name="allow">
<xsd:complexType>
<xsd:complexContent>
<xsd:extension base="beans:identifiedType">
<xsd:sequence>
<xsd:element name="create" type="createType" minOccurs="0" maxOccurs="unbounded"/>
<xsd:element name="convert" type="convertType" minOccurs="0" maxOccurs="unbounded"/>
</xsd:sequence>
</xsd:extension>
</xsd:complexContent>
</xsd:complexType>
</xsd:element>
<xsd:complexType name="createType">
<xsd:sequence>
<xsd:element name="auth" type="authType" minOccurs="0" maxOccurs="unbounded"/>
<xsd:element name="include" type="includeType" minOccurs="0" maxOccurs="unbounded"/>
<xsd:element name="exclude" type="excludeType" minOccurs="0" maxOccurs="unbounded"/>
</xsd:sequence>
<xsd:attribute name="beanName" type="xsd:string" use="required"/>
<xsd:attribute name="javascript" type="xsd:string" use="required"/>
</xsd:complexType>
<xsd:complexType name="convertType">
<xsd:attribute name="converter" type="xsd:string" use="required"/>
<xsd:attribute name="match" type="xsd:string" use="required"/>
</xsd:complexType>
<xsd:complexType name="authType">
<xsd:attribute name="method" type="xsd:string" use="required"/>
<xsd:attribute name="role" type="xsd:string" use="required"/>
</xsd:complexType>
<xsd:complexType name="includeType">
<xsd:attribute name="method" type="xsd:string" use="required"/>
</xsd:complexType>
<xsd:complexType name="excludeType">
<xsd:attribute name="method" type="xsd:string" use="required"/>
</xsd:complexType>
</xsd:schema>
2、我们要做一个DWRNamespaceHandler来处理DWR的配置信息,其实里面就做一件事把AllowBeanDefinitionParser注册给allow节点。因为我们dwr的配置部分根节点就一个标签allow,所以我们就做一个用于解析allow标签的AllowBeanDefinitionParser解析器就行。如果我们的根节点还有其他的标签,同样也要做相应的解析器。
public class DWRNamespaceHandler extends NamespaceHandlerSupport {
public void init() {
//把AllowBeanDefinitionParser注册到allow节点
registerBeanDefinitionParser("allow", new AllowBeanDefinitionParser());
}
}
其实难点是做AllowBeanDefinitionParser,这里你需要一些DOM模型的知识,来操作配置节点的内容。然后根据内容进行处理。在这里我们,需要做三件事:
[1] 把配置节点的内容转换成对象模型,即AllowBean(其实就是一些POJO罢了)。
[2] 把这个AllowBean注册给Spring的Context,这一步是可选的。因为我们主要是把这个Bean给DWR,当然顺道给Spring一份也没什么问题。
[3] 把这个AllowBean注册到AllowBeanHolder。
3、AllowBeanHolder。
其实这就是个简单的singleton类,整个运行期只有一个实例。它就像一个容器,AllowBeanDefinitionParser往里放,DWR的Configuration再从这里取。
4、扩展DWR的DefaultConfiguration,我们做一个SpringConfiguration。DWR的DefaultConfiguration是负责读取配置信息的。我们在其中加入从AllowBeanHolder读取配置信息的功能即可。
5、扩展DWR的DWRServlet,我们做一个SpringDWRServlet,原来的DWRServlet加载的是DefaultConfiguration,我们的Serlvet加载我们自己的SpringConfiguration即可。
6、万事俱备,只欠东风啦。就是让Spring知道我们干了这些!
在META-INF目录下(如果没有在src目录下创建一个)加入spring.handlers和spring.schemas两个文件。
spring.handlers中的内容:
http/://www.devside.org/schema/spring/dwr=org.devside.core.support.dwr.DWRNamespaceHandler
spring.schemas中的内容:
http/://www.devside.org/schema/spring/dwr.xsd=org/devside/core/support/dwr/dwr.xsd
<dwr>
<allow>
<create creator="spring" javascript="AjaxPortalService">
<param name="beanName" value="AjaxPortalService"/>
<include method="changeWondowState"/>
<include method="changeWorkbenchState"/>
<include method="changeWindowOrder"/>
</create>
</allow>
</dwr>
这样写到也没什么,只是把项目分模块以后,虽有的配置都写到一个dwr.xml文件里面维护起来比较麻烦,尤其再遇到版本管理中的代码合并。所以曾经我扩展了DWR,让它可以从多个文件读取配置信息。然后每个模块自己一个配置文件,跟着source一起走。这样做也有问题,就是现在Java应用程序的配置文件太多啦!Spring的配置,WebWork的配置,Hibernate的配置,DWR的配置,再加上一些杂七杂八的xml和properties。看着这些配置文件简直要疯掉了。
正在此时,spring2横空出世,现在你可以把一些配置文件合并到一起了。正好趁此机会体验一下Spring2的自定义schema特性。
目标:
把DWR的配置写成这样:
<?xml version="1.0" encoding="GBK"?>
<beans xmlns="http://www.springframework.org/schema/beans"
xmlns:xsi="http://www.w3.org/2001/XMLSchema-instance"
xmlns:tx="http://www.springframework.org/schema/tx"
xmlns:aop="http://www.springframework.org/schema/aop"
xmlns:dwr="http://www.devside.org/schema/spring/dwr"
xsi:schemaLocation="http://www.springframework.org/schema/beans http://www.springframework.org/schema/beans/spring-beans-2.0.xsd http://www.springframework.org/schema/aop http://www.springframework.org/schema/aop/spring-aop-2.0.xsd http://www.springframework.org/schema/tx http://www.springframework.org/schema/tx/spring-tx-2.0.xsd http://www.devside.org/schema/spring/dwr http://www.devside.org/schema/spring/dwr.xsd" default-autowire="byName">
<bean id="departmentDao" class="cn.com.legendapl.hellostruts2.dao.DepartmentDao"/>
<bean id="employeeDao" class="cn.com.legendapl.hellostruts2.dao.EmployeeDao"/>
<bean id="companyService" class="cn.com.legendapl.hellostruts2.service.CompanyService"/>
<aop:config>
<aop:pointcut id="companyServiceOperation" expression="execution(* cn.com.legendapl.hellostruts2.service.ICompanyService.*(..))" />
<aop:advisor advice-ref="txAdvice" pointcut-ref="companyServiceOperation" />
</aop:config>
<bean id="ajaxCompanyProxy" class="cn.com.legendapl.hellostruts2.ajax.AjaxCompanyProxy"/>
<dwr:allow id="ajaxCompanyProxyAllow">
<dwr:create beanName="ajaxCompanyProxy" javascript="CompanyProxy">
<dwr:include method="findEmployeeById"/>
</dwr:create>
<dwr:convert converter="bean" match="cn.com.legendapl.hellostruts2.entity.*"/>
</dwr:allow>
</beans>
重点在这里:
<dwr:allow id="ajaxCompanyProxyAllow">
<dwr:create beanName="ajaxCompanyProxy" javascript="CompanyProxy">
<dwr:include method="findEmployeeById"/>
</dwr:create>
<dwr:convert converter="bean" match="cn.com.legendapl.hellostruts2.entity.*"/>
</dwr:allow>
好了现在动手开始做。
原理其实很简单,现在看张图。画的不好,敬请原谅!
从这样图中我们可以看出我们要做如下工作:
1、做一个dwr.xsd,定义spring配置文件中的dwr这部分配置的schema。
要做这个需要有一定xml和xsd的知识,我也是现学现用啦!
<?xml version="1.0" encoding="UTF-8"?>
<xsd:schema xmlns="http://www.devside.org/schema/spring/dwr"
xmlns:xsd="http://www.w3.org/2001/XMLSchema"
xmlns:beans="http://www.springframework.org/schema/beans"
targetNamespace="http://www.devside.org/schema/spring/dwr"
elementFormDefault="qualified"
attributeFormDefault="unqualified">
<xsd:import namespace="http://www.springframework.org/schema/beans" schemaLocation="http://www.springframework.org/schema/beans/spring-beans-2.0.xsd"/>
<xsd:element name="allow">
<xsd:complexType>
<xsd:complexContent>
<xsd:extension base="beans:identifiedType">
<xsd:sequence>
<xsd:element name="create" type="createType" minOccurs="0" maxOccurs="unbounded"/>
<xsd:element name="convert" type="convertType" minOccurs="0" maxOccurs="unbounded"/>
</xsd:sequence>
</xsd:extension>
</xsd:complexContent>
</xsd:complexType>
</xsd:element>
<xsd:complexType name="createType">
<xsd:sequence>
<xsd:element name="auth" type="authType" minOccurs="0" maxOccurs="unbounded"/>
<xsd:element name="include" type="includeType" minOccurs="0" maxOccurs="unbounded"/>
<xsd:element name="exclude" type="excludeType" minOccurs="0" maxOccurs="unbounded"/>
</xsd:sequence>
<xsd:attribute name="beanName" type="xsd:string" use="required"/>
<xsd:attribute name="javascript" type="xsd:string" use="required"/>
</xsd:complexType>
<xsd:complexType name="convertType">
<xsd:attribute name="converter" type="xsd:string" use="required"/>
<xsd:attribute name="match" type="xsd:string" use="required"/>
</xsd:complexType>
<xsd:complexType name="authType">
<xsd:attribute name="method" type="xsd:string" use="required"/>
<xsd:attribute name="role" type="xsd:string" use="required"/>
</xsd:complexType>
<xsd:complexType name="includeType">
<xsd:attribute name="method" type="xsd:string" use="required"/>
</xsd:complexType>
<xsd:complexType name="excludeType">
<xsd:attribute name="method" type="xsd:string" use="required"/>
</xsd:complexType>
</xsd:schema>
2、我们要做一个DWRNamespaceHandler来处理DWR的配置信息,其实里面就做一件事把AllowBeanDefinitionParser注册给allow节点。因为我们dwr的配置部分根节点就一个标签allow,所以我们就做一个用于解析allow标签的AllowBeanDefinitionParser解析器就行。如果我们的根节点还有其他的标签,同样也要做相应的解析器。
public class DWRNamespaceHandler extends NamespaceHandlerSupport {
public void init() {
//把AllowBeanDefinitionParser注册到allow节点
registerBeanDefinitionParser("allow", new AllowBeanDefinitionParser());
}
}
其实难点是做AllowBeanDefinitionParser,这里你需要一些DOM模型的知识,来操作配置节点的内容。然后根据内容进行处理。在这里我们,需要做三件事:
[1] 把配置节点的内容转换成对象模型,即AllowBean(其实就是一些POJO罢了)。
[2] 把这个AllowBean注册给Spring的Context,这一步是可选的。因为我们主要是把这个Bean给DWR,当然顺道给Spring一份也没什么问题。
[3] 把这个AllowBean注册到AllowBeanHolder。
3、AllowBeanHolder。
其实这就是个简单的singleton类,整个运行期只有一个实例。它就像一个容器,AllowBeanDefinitionParser往里放,DWR的Configuration再从这里取。
4、扩展DWR的DefaultConfiguration,我们做一个SpringConfiguration。DWR的DefaultConfiguration是负责读取配置信息的。我们在其中加入从AllowBeanHolder读取配置信息的功能即可。
5、扩展DWR的DWRServlet,我们做一个SpringDWRServlet,原来的DWRServlet加载的是DefaultConfiguration,我们的Serlvet加载我们自己的SpringConfiguration即可。
6、万事俱备,只欠东风啦。就是让Spring知道我们干了这些!
在META-INF目录下(如果没有在src目录下创建一个)加入spring.handlers和spring.schemas两个文件。
spring.handlers中的内容:
http/://www.devside.org/schema/spring/dwr=org.devside.core.support.dwr.DWRNamespaceHandler
spring.schemas中的内容:
http/://www.devside.org/schema/spring/dwr.xsd=org/devside/core/support/dwr/dwr.xsd

相关文章推荐
- 菜鸟调错(四)——Spring与DWR集成,配置文件报错
- JAVA spring 把全局变量写到配置文件中
- 多spring配置文件整合DWR
- 菜鸟调错(四)——Spring与DWR集成,配置文件报错
- 在hibernate配置文件中,采用spring扫描时,packagesToScan的value应该写到实体类所在的文件夹或者再上一级文件夹.*
- spring的配置文件解析(转)
- Spring配置文件详解 - applicationContext.xml文件路径
- 扩展spring注解,读取配置文件
- spring 整合mybatis 出现解析不了配置文件的问题
- 在Spring-Mybatis-Restful中配置多数据源的properties文件
- spring中加载配置文件
- Spring配置文件总结
- Spring中使用Map、Set、List、数组、属性集合的注入方法配置文件
- Spring2.0配置文件加载util标签的Schema
- (六)Spring详解——使用注解替代配置文件
- Spring ApplicationContext.xml 配置文件常用注解和详解
- spring与servlet3.0无web.xml文件时的配置方式
- 配置多个Dwr并整合Spring、Struts
- Spring Cloud Config RSA简介及使用RSA加密配置文件的方法
- spring boot加载第三方jar包的配置文件